7
Cartridge Change
8
Useage Tips
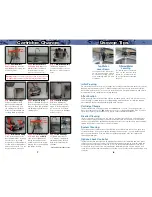
Step 1.
Shut Off Water
Undersink Only.
Close the
Shut-Off Valve by turning the
handle clockwise.
Step 6.
Install Cartridge
Install new Cartridge by
inserting the double o-ring
nipple on the Cartridge into
the center hole of the Base.
Press the top of the Cartridge
down to secure.
Step 8:
Pressurize System
Undersink Only.
SLOWLY
open the Shut-Off Valve by
turning the handle counter-
clockwise. Check the system,
Auxiliary Faucet, and all tubing
and fittings for leaks.
Step 9.
Flush Cartridge
Let filtered water run for
3 - 5 minutes. This will help
eliminate air in the line and
flush carbon fines from the
cartridge.
Your unit is now ready for use.
Step 3.
Remove Band Clamp
Turn Band Clamp Knob
counter-clockwise to loosen.
Once loose, remove and set
aside.
Step 2.
Relieve Pressure
Undersink Only.
Open the
Auxiliary Faucet until water
stops flowing to relieve
pressure on the system.
Step 5.
Replace O-Ring
Remove existing O-Ring from
Base. Whipe away any visible
debris on Base and install the
new O-Ring supplied in your
cartridge pack.
Step 7:
Attach Band Clamp
Place the Housing over the
Base and Cartridge. Housing
should rest on the new O-
Ring. Attach the Band Clamp
around the Housing and Base
and secure the latch. Turn the
Knob clockwise until tight.
Step 4.
Remove Cartridge
Using your hands or with
gloves, pull Cartridge and
Base out of Housing. Pull
old cartridge off of the Base.
Dispose of old cartridge and
set Base and Housing aside.
Turn
Clockwise
Turn
Counter-
Clockwise
Warning:
Failure to shut off your water and relieve pressure
in undersink systems could result in injury and flooding.
Latch
Knob
Tap Water
Lever Down
For tap water, the black lever
on the diverter valve should
be vertical. Your tap can op-
erate normally with hot and
cold water.
Filtered Water
Lever Up
For filtered water, the black
lever on the diverter valve
should be horizontal. Note:
do not put hot water through
the filter.
Initial Flushing
On your first use and each time you change the cartridge you will need to flush your system.
Running your filtered water for 3 - 5 minutes will get rid of any excess carbon fines (black
dust) that may be present. These excess carbon fines are completely harmless and should
not appear after the system has been fully flushed.
After Vacation
When using the filter for the first time after an extended period of non use (such as a vaca-
tion or holiday) to obtain the best possible drinking water quality we recommend running
water through the filter for approximately 30 to 60 seconds.
Cartridge Change
The Natural Kitchen Cartridge is rated for 1200 Gallons or 1 year. The average useage of
water for a family of four is 1,000 gallons per year for cooking and drinking. Even if you use
less water, replace your cartridge every year to ensure optimal performance.
Diverter Cleaning
If your source water is hard, scale can form on your diverter valve. Scale can clog aerator
screens and eventually damage seals and the internal valve mechanism. You can extend
the life of your diverter by periodically cleaning the aerator screens. Both are removeable by
turning the filtered or tap nozzles counter-clockwise.
System Cleaning
The stainless steel components are designed to be used for many years. It is a good idea
to clean the inside of the system during cartridge change every 2 - 3 years. Mild soap and
water is recommended. If you use bleach or hydrogen peroxide rinse the components
thoroughly afterwards.
Optional: Leak Controller
The Natural Kitchen is designed with high quality stainless steel materials and uses brass
compression connections to reduce the potential for leaks as much as possible. While this
unit is engineered to the highest standards, a risk of an unanticipated failure which could cause
flooding is always possible.
If you are installing the Natural Kitchen in an area where a leak
could cause substantial water damage to your home you should consider purchasing a leak
controller.


