background image

14

15

BASIC PRINCIPLES OF TELESCOPES

MAINTAINING YOUR TELESCOPE

To collimate your portable telescope, simply turn the collimation handle behind the telescope (see 

Figure 1). Turn this handle anticlockwise to focus on an object further away than the one you are 

currently observing. Turn the handle clockwise to focus on an object closer than the one you are 

currently observing. 

Note:

 remove the cover of the optical tube on the portable telescope before undertaking any observation.  

Note: 

if you are wearing corrective lenses (or especially glasses), you may find it useful to remove 

them before undertaking any observations using an eyepiece fixed to the telescope. If you have an 

astigmatism, you should wear your corrective lenses at all times. 

Use of an optical instrument requires knowledge of certain elements so as to obtain the best pos-

sible image quality. 

•  Never look through a glass window. The glass in a domestic house window contains optical faults 

and varies in thickness from one point to another. These irregularities risk affecting the ability to 

collimate your telescope. In most cases, you will not be able to obtain a perfectly clear image and 

you might even risk having a double image. 

•  Never look past or above objects producing a heat wave, particularly asphalt car parks during 

particularly hot summer days, or even building roofs. 

•  Hazy skies, mist and fog risk making it difficult to collimate the telescope for land observation. The 

details are much less visible in this type of conditions. 

Note: 

Your telescope has been designed for ordinary land and sky observations. 

It is possible that traces of dust and/or moisture may accumulate on the lens of your telescope from 

time to time. Ensure that you take the necessary precautions when cleaning the instrument to avoid 

damaging the optical elements. 

If you notice the presence of dust on the eyepiece, you can remove it with a spray of pressurised air. 

Spray it for two to four seconds, tilting the spray towards the surface of the glass. Then use an op-

tical cleaning solution and a white paper handkerchief to remove any traces of residue. Pour a small 

quantity of solution onto the handkerchief, then rub the optical elements. Use light movements, 

moving from the centre of the eyepiece (or the mirror) moving towards the outside DO NOT rub in 

a circular motion!

It is possible that sometimes some moisture may accumulate on the optical elements of your teles-

cope during an observation session. If you want to continue with the observation, you will need to 

remove the moisture, either using a hairdrier (on the lowest setting) or by directing the telescope 

towards the ground until the moisture evaporates. 

COLLIMATION

GENERAL OBSERVATION TIPS

MAINTAINING AND CLEANING THE OPTICAL ELEMENTS

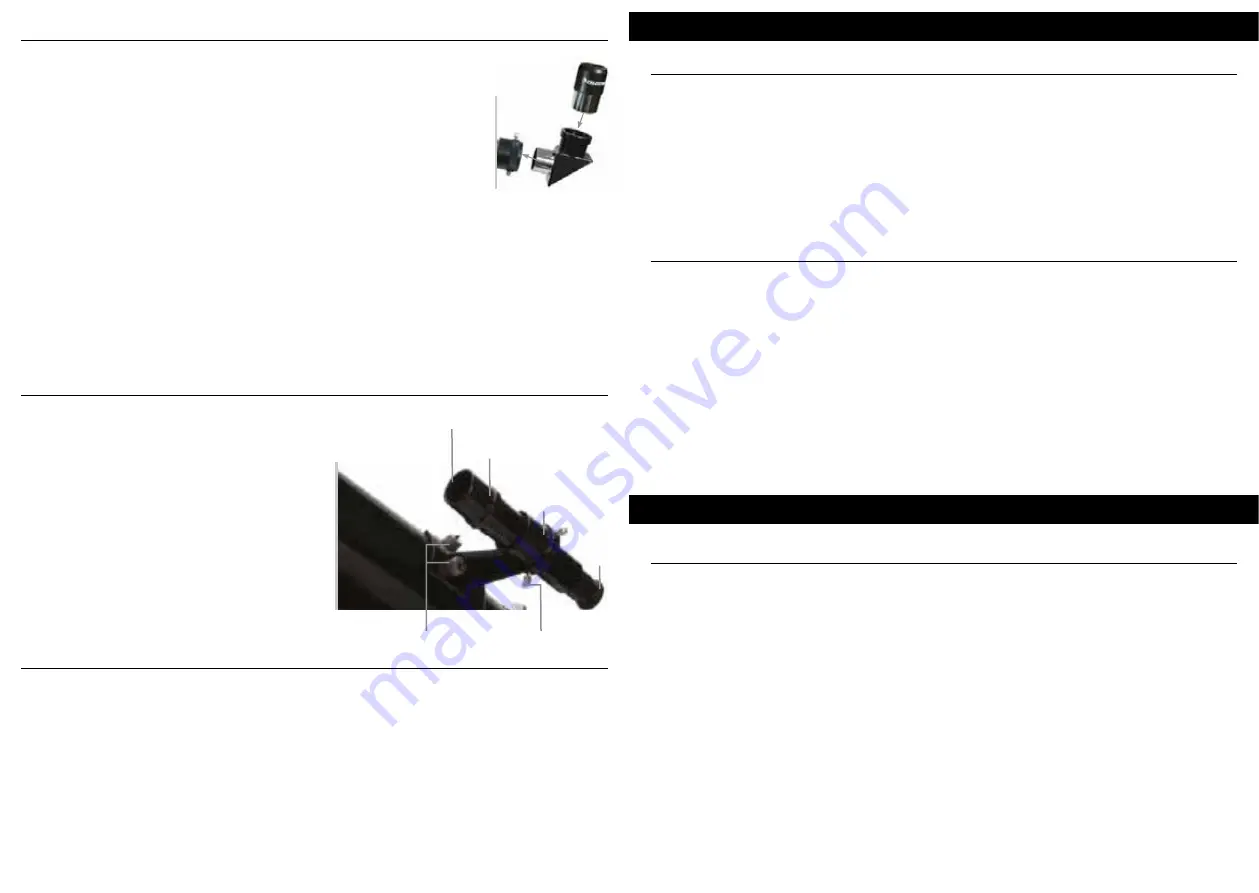
The star diagonal is a prism that diverts the light perpendicular to the tra-

jectory of the light entering the telescope. This permits a more comfortable 

observation position than if you had to look directly in the tube. The back of 

the portable telescope is an image rectifier that corrects the image by putting 

it back in place with correct left-right orientation, which has the advantage of 

facilitating the observation of land objects. Moreover, the star diagonal can 

be turned into the position that suits you best. To install the star diagonal and 

the eyepiece:

1. Ensure that the two screw handles behind the telescope tube do not exceed 

the opening before installation, that the plug-in cap is removed from the opening 

behind the telescope tube and that the caps are removed from the diagonal 

cylinder. Insert the small cylinder of the diagonal into the back opening of the 

telescope tube (Figure 11) then tighten the two screw handles.

2. Check that the two screws behind the telescope tube are not sticking out of the opening before 

installation and that the cover has been removed from the cylinders of the star diagonal. Insert the 

small cylinder of the star diagonal into the opening behind the telescope tube Then tighten the two  

screws.

3. It is possible to modify the focal distance of the eyepieces by reverting the procedure described 

above in stage 2. 


1. Pick up the finderscope (which is installed in the 

support of the finderscope). 

2. Remove the knurled nuts located on the 

threaded mounts on the tube of the (Figure 12). 

3. Place the finderscope supports on the mounts 

protruding from the optical tube then, holding 

it in place, screw it on to the kurled nuts. Then 

tighten the nuts. 

4. Please note that the finderscope must be 

oriented so that the widest diameter of the lens is 

directed towards the front of the telescope tube. 

5. Remove the covers from both ends of the fin-

derscope. 

1. In full daylight, locate a far-away object and 

centre it in the low power eyepiece (20 mm) of 

the main telescope. 

2. Look in the finderscope (the eyepiece end of 

the finderscope) and note the position of the 

same object. 

3. Without moving the main telescope, turn the 

adjustment screws situated (Figure 12) around 

the support of the finderscope until the reticle 

(the crossed lines) of the finderscope is centred 

on the object selected with the main telescope. 

4. If the image obtained in the finderscope is 

out of focus, turn the eyepice of the finderscope 

until the image becomes clear. 

(Figure 11)

INSTALLING THE STAR DIAGONAL AND THE EYEPIECE

INSTALLING THE FINDERSCOPE

ALIGNMENT OF THE FINDERSCOPE

Eyepiece

Finderscope

Finderscope  

support

Eyepiece

Knurled nuts

Adjustment screw

Note:  

Items observed through a finderscope will appear reversed and inverted, this is normal 

Summary of Contents for 53151590

Page 1: ...e Lesen Sie diese Anleitung sorgfältig durch und bewahren Sie sie gut auf Lea detenidamente este manual y consérvelo en un lugar seguro Leia cuidadosamente este manual e guarde o em local seguro LUNETTE DE VOYAGE MIZAR MIZAR PORTABLE TELESCOPE REISETELESKOP MIZAR TELESCOPIO DE VIAJE MIZAR LUNETA DE VIAGEM MIZAR Réf 53151590 ...

Page 2: ...en el trípode p 25 Movimiento manual del telescopio de viaje p 25 Instalación de la inversión acodada y de la lente ocular p 26 Instalación del buscador p 26 Alineación del buscador p 26 Nociones fundamentales sobre los telescopios p 27 Enfoque p 27 Consejos generales de observación p 27 Mantenimiento del telescopio de viaje p 27 Mantenimiento y limpieza de los elementos ópticos p 27 Especificacio...

Page 3: ...votre télescope afin de pouvoir l utiliser pour son rangement lorsqu il n est pas utilisé Déballez le contenu de la boîte avec soin car certaines pièces sont petites Utilisez la liste des pièces ci dessous pour vous assurer que toutes les pièces et tous les accessoires sont inclus dans la boîte Ne regardez jamais directement le Soleil à l œil nu ou avec un télescope à moins d utiliser un filtre ad...

Page 4: ... manœuvre Figure 1 La rotation latérale azimut est contrôlée par la molette de verrouillage de l azimut molette su périeure gauche de la Figure 7 Ces deux molettes se desserrent en tournant dans le sens inverse des aiguilles d une montre et se serrent en tournant dans l autre sens Desserrez ces molettes pour trouver des objets plus facilement avec le chercheur présenté un peu plus loin puis resser...

Page 5: ...i vous voulez poursuivre l observation il est nécessaire d éliminer la rosée soit à l aide d un sèche cheveux réglage le plus faible ou en dirigeant la lunette vers le sol jusqu à évaporation de la rosée MISE AU POINT CONSEILS GÉNÉRAUX D OBSERVATION ENTRETIEN ET NETTOYAGE DES ÉLÉMENTS OPTIQUES Le renvoi coudé est un prisme qui dévie la lumière perpendiculairement à la trajectoire de la lumière ent...

Page 6: ...Never use an ocular sun filter or a Herschel wedge The concentration of heat inside the telescope could damage these devices allowing unfiltered sunlight to directly reach your eyes Never leave the telescope unsupervised particularly in the presence of children or adults who are not familiar with its use En cas de condensation d humidité à l intérieur des éléments optiques retirez les accessoires ...

Page 7: ... controlled by the screw on the operating lever Figure 1 The lateral rotation azimuth is controlled by the azimuth screw handle upper left handle in Figure 7 These two screw handles can be unscrewed clockwise and tightened by screwing in the opposite direction Unscrew these handles to find objects easily using the finderscope detailed below then re tighten them Figure 6 Figure 7 Figure 8 Figure 9 ...

Page 8: ...ure evaporates COLLIMATION GENERAL OBSERVATION TIPS MAINTAINING AND CLEANING THE OPTICAL ELEMENTS The star diagonal is a prism that diverts the light perpendicular to the tra jectory of the light entering the telescope This permits a more comfortable observation position than if you had to look directly in the tube The back of the portable telescope is an image rectifier that corrects the image by...

Page 9: ...e Überhitzung im Inneren können das Teleskop und das Zubehör Schaden nehmen Verwenden Sie niemals einen Sonnenfilter am Okular oder einen Herschelkeil Die Wärmekonzen tration im Inneren des Teleskops kann zu Schäden an diesen Vorrichtungen führen sodass das Sonnenlicht ungefiltert auf Ihre Augen treffen kann Das Teleskop insbesondere in Anwesenheit von Kindern oder Erwachsenen nicht unbeaufsichtig...

Page 10: ...ng Höhe erfolgt über die Rändelschraube des Hebels für die Höhe neinstellung vgl Abb 1 Die horizontale Drehung Azimut erfolgt über die Rändelschraube der Azimut Sperre obere linke Schraube in Abb 7 Diese beiden Rändelschrauben lösen sich durch Drehen entgegen dem Uhrzeigersinn Drehen Sie sie im Uhrzeigersinn ziehen Sie sie wieder fest an Diese Schrauben sollten Sie lösen um Objekte leichter zu fin...

Page 11: ...INWEISE ZUR BEOBACHTUNG PFLEGE UND REINIGUNG DER OPTISCHEN ELEMENTE Der Zenitspiegel ist ein Prisma und lenkt das ankommende Licht im Teleskop um 90 um So können Sie während des Beobachtens eine für Sie angenehme Haltung einnehmen Durch den Bildaufrichter des Reiseteleskops wird der Bildgegenstand korrekt aufgerichtet und seitenrichtig dargestellt was die ter restrische Beobachtung zusätzlich erle...

Page 12: ...e generarse una concentración de calor peligrosa en el interior y dañar el telescopio y los accesorios fijados Nunca utilizar un filtro solar de lente ocular o una cuña de Herschel La concentración de calor en el interior del telescopio puede provocar daños en estos dispositivos al hacer llegar la luz del sol no filtrada directamente a los ojos No deje desatendido el telescopio en especial en pres...

Page 13: ...La rotación lateral acimut se controla con la perilla de bloqueo del acimut perilla su perior izquierda de la figura 7 Estas dos perillas se aflojan girándolas en el sentido contrario al de las agujas del reloj y se aprietan girándolas en el otro sentido Afloje estas perillas para encontrar objetos más fácilmente con el buscador que se presenta más adelante y a continuación vuelva a apretarlas Fig...

Page 14: ... LOS ELEMENTOS ÓPTICOS La inversión acodada es un prisma que desvía la luz perpendicularmente a la trayectoria de la luz que entra en el telescopio Esto le permite observar en una posición que es más cómoda que si mira directamente por el tubo La inversión del telescopio de viaje es un rectificador de imágenes que corrige la imagen volviéndola a colocar en su posición y correctamente orientada de ...

Page 15: ...perfície Pode gerar se uma concentração de calor perigosa no interior e danificar o telescópio e os acessórios acoplados Nunca utilizar um filtro solar de ocular ou um prisma Herschel A concentração de calor no interior do telescópio pode danificar estes dispositivos permitindo que a luz solar não filtrada passe diretamente através dos olhos Não deixe o telescópio sem supervisão em particular na p...

Page 16: ...nca de controlo Figura 1 A rotação lateral azimute é controlada pela anilha recartilhada de bloqueio do azimute anilha recartilhada superior esquerda da Figura 7 Estas duas anilhas recartilhadas desapertam se rodando no sentido inverso dos ponteiros do relógio e apertam se rodando no sentido contrário Desaperte as anilhas recartilhadas para encontrar os objetos mais facilmente com o buscador apres...

Page 17: ...xa ou apontando a luneta na direção do sol até que o orvalho evapore FOCAGEM CONSELHOS GERAIS DE OBSERVAÇÃO MANUTENÇÃO E LIMPEZA DOS ELEMENTOS ÓTICOS O prisma diagonal é um prisma que desvia a luz perpendicularmente à tra jetória da luz que entra na luneta Isto permite uma posição de observação mais confortável do que se estivesse a olhar diretamente pelo tubo O prisma da luneta de viagem é uma le...

Page 18: ...utilizado Isto permite limitar a infiltra ção por qualquer tipo de contaminante no tubo ótico Finalmente está apto a partir à descoberta da Astronomia de amador A sua Luneta Mizar irá proporcionar lhe várias noites de observação repletas de admiração perante a beleza do espetáculo oferecido pela abóboda celeste Os guias de dicas das lojas Nature et Découvertes encontram se à sua inteira disposição...

Page 19: ... Versailles France www natureetdecouvertes com N service client 33 0 1 8377 0000 Conforme aux normes européennes Compliant with European standards Entspricht europäischen Normen Conforme con las normas europeas Em conformidade com as normas europeias ...

Reviews: