• 21 •
INTRODUCTION
This manual provides detailed instructions for the set-up, use, specifications and optional accesso-
ries for the 60/700 Mizar Refracting Telescope. This easy-to-use and high performance refracting
telescope was designed for both land-based and astronomical observation. To make the most of this
instrument, we strongly advise you to take a few minutes to read this manual before undertaking your
first observations using the refracting telescope. An explanation is provided for every technical term
used in this manual in relation to the refracting telescope.
STANDARD EQUIPMENT
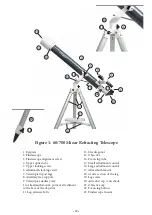
(See Fig. 1)
• Full optical tube with an objective a diameter of 60mm, lenses with a multilayer coating, sun shade,
assembly materials, finderscope 5 x 24 with mount, and rack-and-pinion focussing device. Focal dis-
tance of the objective = 700mm; F/11.7.
• Altazimuth mount with continuously adjustable, aluminium tripod with clamps.
• Accessories: Kellner eyepieces 25mm (28x), Kellner 9mm (78 x) (31.75mm in diameter)
Star diagonal accepting eyepieces with a tube diameter of 31.75mm
Auxiliary tray
Fastenings: A. 3 bolts of 6.5cm with wing nuts and washers
B. 3 screws (12.7mm long) with wing nuts and screwdriver
UNPACKING AND SET-UP
(the numbers in brackets refer to Fig. 1)
Please note that, even though the refracting telescope is in pieces, all of the most complex parts or the
most difficult parts of the instrument have been assembled in the factory; the first assembly of the re-
fracting telescope should not require, normally, more than around 15 minutes. Follow this procedure
to set up the refracting telescope:
1. Use the list provided above to unpack and locate the parts of the refracting telescope.
2. Attach the three aluminium legs of the tripod (7) to the base of the altazimuth mount (10), using
the three support brackets for the articulated legs (8) facing inwards. Three bolts (11) each 6.5cm long,
with wing nuts and washers, are provided for this purpose.
3. Attach the brackets for the auxiliary tray (8) to one of the three legs using the screws and nuts provi-
ded. Repeat this process until the three screws are attached to the three clamps on the legs. Screw the
auxiliary tray (9) to the bracket (8).
4. Set the central part of the adjustable tripod legs (18) to the desired length, for each of the three legs.
Set it in position by tightening the T screw to lock the legs (19).
5. Attach the finderscope mount (2) to the refracting telescope using the two knurled screws provided.
The knurled screws are already partially screwed into the main tube of the refracting telescope, ready
for the placement of the finderscope. The knurled screw can be inserted into the two holes located at
the base of the finderscope mount, and screw into the tube of the refracting telescope.
6. Insert the star diagonal (12) into the focussing tube (14) and insert the Kellner 25mm eyepiece (1)
into the star diagonal. Fix each of the pieces into position by moderately tightening the respective
screws. The eyepiece will determine the magnification of the refracting telescope. Eyepieces are avai-
lable with higher or lower magnification, allowing the telescope to be adapted to varying conditions
of observation. The Kellner 25mm eyepiece, provided as part of the standard equipment, provides
magnification of 25 (written as 25x) with the 60/700 Mizar refracting telescope.
Summary of Contents for LUNETTE MIZAR 60/700
Page 2: ... 2 ...

