background image

!""#$%&'(

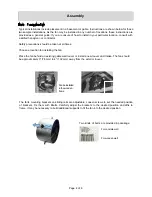
Fan be installed 
in the wooden 
frame

The fan s mounting brackets on sliding rails are adjustable,  oosen screws to set the needed position 
of  brackets,  Fi   them  with  8bolts.  Carefully  adjust  the  brackets  to  the  desired  position  and  affi   to 
frame. It may be necessary to build additional supports to fit the fan into the desired position.

Part   Fi ing the Fan 

Typical installations include placement in a basement or gable. Instructions are shown below for these 
two sample installations.  s the fan may be installed in any number of locations, these instructions are 
provided as a general guide. If you are unsure of how to install in your particular location, consult with 
a skilled handyman or contractor. 

Safety precautions should be taken at all times. 

Choose a location for installing the fan.

Place the fan behind an e isting gable wall louver or install a new louver and intake. The fan should 
be appro imately   

 mm  to    10  mm  away from the e terior louver. 

Page   of  8

Two kinds  of bolts  are provided in pacakage

For concrete wall

For wooden wall

Summary of Contents for 24208

Page 1: ... 2 20 Page 1 of 8 1 ...

Page 2: ...u are missing any parts or receive damaged parts please call Customer Service at 1 800 588 0590 Intended se Technical Specifications Property Specification Speed 1 50 P Fan Si e 1 1 9 10 in Solar Panel Type Polycrystalline Fan lade 1 in Weight N 15 8 lbs ir Flow 95C 1 50CF Fan otor rushless C Page of 8 The Gable Mount Fan is designed to be installed into any building that requires ventilation Powe...

Page 3: ...utilities when cutting or drilling ead and understand all instructions Failure to follow all instructions may result in serious injury or property damage o not allow persons to use the product until they have read this manual and have developed a thorough understanding of how it works o not modify this product in any way nauthori ed modification may impair the function and or safety and could affe...

Page 4: ... Instructions are shown below for these two sample installations s the fan may be installed in any number of locations these instructions are provided as a general guide If you are unsure of how to install in your particular location consult with a skilled handyman or contractor Safety precautions should be taken at all times Choose a location for installing the fan Place the fan behind an e istin...

Page 5: ... sunlight For this reason the optimal location for the solar panel will be where it can receive the ma imum amount of sunlight during the day with the little or no shade The solar panel is secured with all four screws in the package pen the solar panel by loosening the screws on one side to remove the brackets concealed inside Page 5 of 8 3 For concrete wall For wooden wall ...
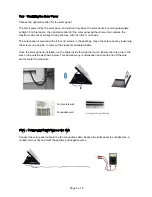
Page 6: ...IN I I S P N 0 Panels Solar Fan Connection iagram Page of 8 ...

Page 7: ...ecting cable 1 2 entilation Fan 1 3 Solar Panel ount racket 1 4 nstallation cessories pac 5 ser anual Replacement Parts For replacement parts and technical uestions please call Customer Service at 1 800 588 0590 Not all product components are available for replacement The illustrations provided are a convenient reference to the location and position of parts in the assembly se uence hen ordering p...

Page 8: ...eturned to the authori ed location at the purchasers e pense dated proof of purchase is re uired to receive warranty service nce received at authori ed location and defect proves to be the result of defective material and workmanship the defective part or unit will be replaced at warrantors option and returned to the original purchaser at warrantors e pense No refunds will be granted by the warran...

Reviews: