background image


Page 


3.  INSTALLATION 

WARNING:

 Nature Power recommends that all wiring be done by a certified technician or 

electrician to ensure adherence to the applicable electrical safety wiring regulations and 
installation codes. Failure to follow these instructions can damage the unit and could also 
result in personal injury or loss of life.


CAUTION:


Before beginning your Nature Power Inverter Installation, please consider the following: 

  The Nature Power Inverter base unit should be used or stored in an indoor area away from 

direct sunlight, heat, moisture or conductive contaminants. 

  When placing the unit, allow a minimum of three inches of space around the unit for optimal 

ventilation. 


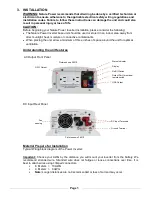
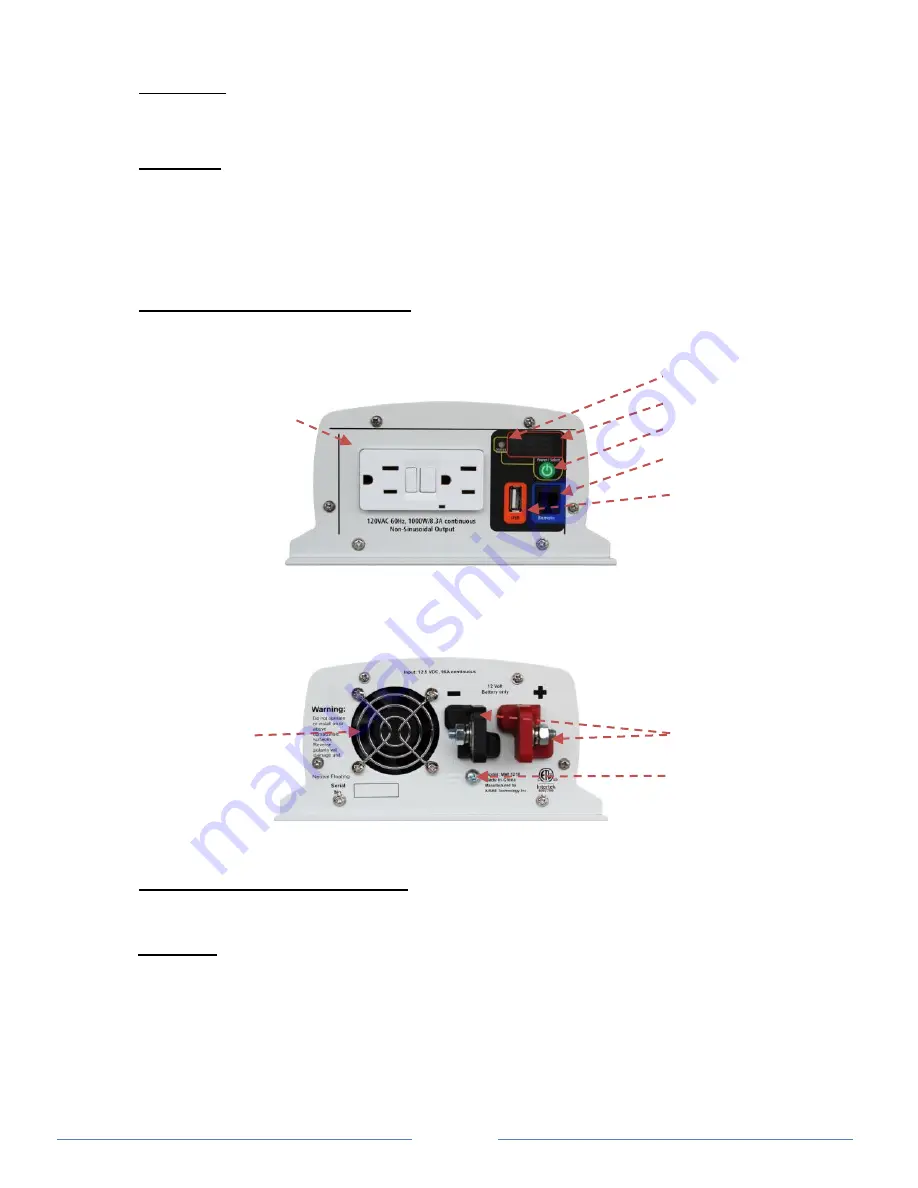
Understanding the unit features 


 AC Output Front Panel 


Picture shown 38210 


DC Input Rear Panel 


Picture shown 38210 


Material Prepare for Installation 

Typical Wiring block diagram of the Power Inverter: 

Important:

  Choose  your  AWG  by  the  distance  you  will  mount  your  inverter  from  the  battery. We 

recommend  stranded  wire.  Stranded  wire  does  not  fatigue  or  loose  connections  over  time.  It  is 
best to attach wires using crimped connectors. 


6   Meters  >   10 AWG 


9   Meters  >   8 AWG 


Note:

 Longer distances are not recommended or loss of current may occur.  

Fan 

opening 


DC Input Terminals 
 
 
Ground Terminal 

GFCI Output 

Status Indicator 
 
Display 
 
On/Off Switch 
 
Output Port for optional 
remote switch 
 
USB Output 

Summary of Contents for 38210

Page 1: ... every precaution has been taken to ensure the accuracy of the contents of this guide Nature Power Technology assumes no responsibility for errors or omissions Nature Power reserves the right to make changes to the product specifications and this manual without notice Therefore check the website for manual updates as necessary www naturepowerproducts com Important Please be sure to read and save t...

Page 2: ...Page 2 Table of Contents 1 INTRODUCTION 3 2 PRODUCT DESCRIPTION 4 3 INSTALLATION 5 4 UNIT OPERATION 8 5 TROUBLESHOOTING 10 6 SPECIFICATIONS 10 7 WARRANTY 11 ...

Page 3: ...eries have someone nearby in case of an emergency Study and follow all the battery manufacturer s specific precautions when installing using and servicing the battery connected to the inverter Wear eye protection and gloves Avoid touching your eyes while using this unit Keep fresh water and soap on hand in the event battery acid comes in contact with eyes If this occurs cleanse right away with soa...

Page 4: ... is encouraged to try to correct the interference by one or more of the following measures Reorient or relocate the receiving antenna Increase the separation between the equipment and the receiver Connect the equipment into an outlet on a circuit different from that to which the receiver is connected Consult the dealer or an experienced radio TV technician for help LIMITATIONS ON USE Do not use in...

Page 5: ...n placing the unit allow a minimum of three inches of space around the unit for optimal ventilation Understanding the unit features AC Output Front Panel Picture shown 38210 DC Input Rear Panel Picture shown 38210 Material Prepare for Installation Typical Wiring block diagram of the Power Inverter Important Choose your AWG by the distance you will mount your inverter from the battery We recommend ...

Page 6: ...onnect the DC power between the power inverter and the battery bank during service maintenance or trouble shooting DC Input and Grounding Cable Use of low resistance wire is required for all the DC connections between the inverter and the battery bank For 38210 38310 uses minimum 2 AWG wire with maximum cable length of 5 feet For 38215 use minimum 1 0 AWG wire with maximum cable length of 5 feet I...

Page 7: ... or serious injury Connect the grounding cable s ring terminal to the unit ground screw Connect the other side of the cable to the common grounding point Power Inverter DC Input Connection CAUTION Reverse the DC Input terminal will damage the unit and cannot be repaired Damage caused by reverse polarity connection is not covered by the warranty Connect one end of the negative DC input cable to the...

Page 8: ...tion to perform a monthly test on the GFCI to ensure the GFCI is functioning properly Turn unit on and plug a small AC load 40W light bulbs to the GFCI Check the AC load is ON Press Test button and observe a click sound Check AC load is turned off Press RESET button and check the AC load is back ON again 4 UNIT OPERATION WARNING RISK OF EQUIPMENT DAMAGE For 38210 38215 Do not plug surge protected ...

Page 9: ...15 Reduce load E07 Unit has sensed internal temperature is high and is close to thermal shutdown limit Reduce load and check if any ventilation of the unit is blocked AC Load on Power Inverter Although the Power Inverter can provide high surge power up to two times the rated output power some appliances may still trigger on the inverter protection system A higher power inverter is required for tho...

Page 10: ...TIONS Note Specifications are subject to change without notices Specification Modified Sinewave Series True Sinewave Series 38210 38215 38310 38320 Inverter AC Output Power 1000W 1500W 1000W 2000W AC Output Current 8 3A 12 5A 8 3A 16 6A AC Surge Power Peak 2000W 3000W 2000W 4000W AC Output Voltage 120 VAC 60 Hz AC Output Waveform Modified Sinewave True Sinewave Nominal DC Input Voltage 12 5 VDC No...

Page 11: ...s If you are experiencing any problems with your unit please contact our customer service department at info naturepowerproducts com or Phone 1 800 588 0590 before returning product to retail store After speaking to a customer service representative if products are deemed non working or malfunctioning the product may be returned to the purchasing store If such a unit is returned less than one year...

Reviews: