MoniPlus2 Voice Guidance Configuration Guide
April 29, 2014
12
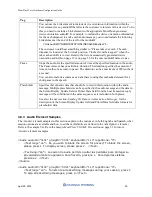
<afaOption name="OrientationScript" screen="0214" yesKeyPos="1" yesAudioID="" noKeyPos="2"
noAudioID="" />
</Config>
4.4.5 Adding the Dynamically Built Device Orientation Scripts
MoniPlus2 can automatically add descriptions of the locations of the devices on the ATM (device
orientation) to your VG file. To add these descriptions:
1.
You must include the OrientationScript attribute and associated screen and audio ID in the
<afaOption> element in your AudioGuidanceData.xml file. Refer to the
section on page 9 for details on the OrientationScript attribute.
2.
You must install the Device Orientation package (feature disk) on your ATM. When installed, this
package presents you with following options that define how the device orientation scripts will be
used in your MoniPlus2 implementation:
•
0 = Turn off device orientation
− do not include dynamic device orientation text at all
•
1 = Prepend device orientation
− prepend the dynamic device orientation text to the orientation
script text
•
2 = Replace device orientation
− completely replace the text in the orientation script with the
dynamic device orientation text (default)
The sample entries below show what specific entries will be added when the ATM is a 7600FFL. Similar
entry sets exist for each type of NH ATM. These entries are also included in the sample
AudioGuidanceData.xml file on page 35.
Any time the devices on the ATM change, such as when the envelope depository is replaced with a
BNA/BCA, you will need to either physically reload the VG XML file onto the ATM or download it
again from the host, whichever method you typically use to distribute the file. A new device orientation
list is only generated when the VG XML file is reloaded onto the ATM, so if you do not reload the file
when the devices change, the customer will not hear the correct device descriptions.
Note that the MoniPlus2 dynamic device orientation script includes Introduction and PIN Pad text as
shown below. This is the actual text that will be added to your VG file. If you already have similar text
defined in your own orientation script, you should change your existing text to eliminate any duplicate
instructions.
<Audio audioID="NHORIENTATIONLINKIntroduction">
<Text lang="en"> This orientation guide describes the locations of the devices on this ATM. You can insert your
card at any time to skip the remainder of this orientation and start your transaction immediately. To increase the
volume, press the dash key which is the bottom left key on the keypad. The volume will step up with each key press
until it reaches the maximum. The next key press will change the volume to its lowest level and then each key press
will increase the volume again.</Text>
</Audio>
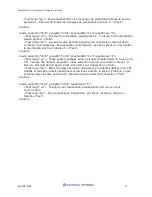
<Audio audioID="NHORIENTATIONLINKPinpad">
<Text lang="en"> The keypad is located approximately three feet off the ground, in the middle of the ATM, and has
16 keys arranged in four, columns. The three left hand columns of keys are arranged like a standard telephone
keypad. The fourth column contains four, function keys. Enter is the top key, of this column, and is used to confirm
entries. There is a circle on the Enter key. Clear is the second key, from the top and is used to clear an entry that you
have made. There is a left arrow or chevron on the clear key. Cancel is the third key, from the top, and is used to
cancel the transaction. There is an X on the cancel key. The bottom key is blank and is not used.</Text>
</Audio>


