


10
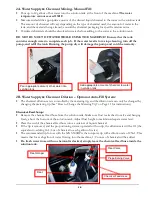
2A. Water Supply & Chemical Mixing– Manual Fill:
•
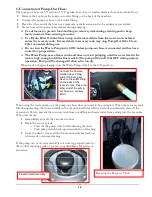
Pour up to 12 gallons of hot water into the solution tank at the front of the machine.
The water
temperature cannot exceed 130
°°°°
F.
•
Measure and add the appropriate amount of the desired liquid chemical to the water in the solution tank.
The amount of chemical will vary depending on the type of chemical used, the amount of water in the
tank, and the material being cleaned; consult the chemical packaging for specific mixture ratios.
•
Powdered chemicals should be dissolved in water before adding to the water in the solution tank.
DO NOT RUN OUT OF WATER WHILE USING THE MACHINE! Ensure that the tank
contains enough water to complete each job. If the water level is low: stop cleaning, turn off the
pump, and refill the tank. Running the pump dry will damage the pump and void the warranty.
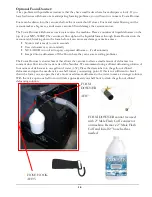
2B. Water Supply & Chemical Dilution – Optional Auto-Fill System:
•
The chemical dilution rate is controlled by the metering tip, and the dilution rate can only be changed by
changing the metering tip (See “How to Change the Metering Tip” on Page 11 for instructions.)
Chemical Feed Setup:
•
Remove the chemical feed hose from the solution tank. Make sure float is attached to valve and hanging
freely, above the bottom of the solution tank. Adjust float height to maintain adequate water level.
•
Place the end of the chemical feed hose into a container of liquid chemical.
•
If the tip is removed, and the proportioning system operated with no tip, the dilution rate will be 8:1 (the
equivalent to adding 16-1/4oz of chemical to each gallon of water.)
•
The recommended tip for use with the MX3-500RP is the turquoise tip with a dilution rate of 256:1. This
means that for each gallon of water flowing into the machine, 1/2 ounce of chemical will be added.
•
If a fresh water rinse with no chemical is desired, simply leave the chemical feed hose inside the
solution tank.
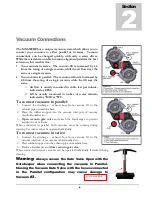
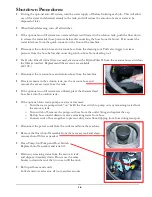
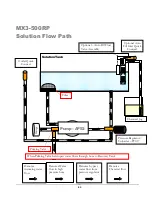
Proportioning Valve
Chemical Feed Hose
Float Hanger
Float
Pour appropriate amount of hot water into
solution tank
Add appropriate amount of chemical to water
in solution tank
Float Valve
Summary of Contents for MX3-500RP
Page 1: ...1 LMANN14 Revised 06 04 2014 Nautilus MX3 500RP Operating Manual...
Page 38: ...38 OPTIONAL AUTO FILL FLOAT VALVE ASSEMBLY NM5740...
Page 40: ...40 Pump Out Pump PARTS ASSEMBLY...
Page 41: ...41 1 2 3 5 4 4 6 7 8 9 10 11 12 3 8 9 8 9 8 9 39 2...
Page 48: ...48 2 39 1 72 73 73 67 9 30 31 82 83 2 83 82 84 INSIDE SOLUTION TANK BOTTOM VIEW SOLUTION TANK...
Page 50: ...50 92 91 95 94 112 13 14 14A 104 105 1 39 PUMP OUT CONNECTIONS...


