34
26
24
25
23
22
27
28
66 1 3/4"L
62 3"L
77
74
64 2 1/4"L
74
76
57
73
3 1/4"L
Seat Adjuster
Seat Cross Tube
Back Pad Tube
Back Pad Adjuster
Back Pad Adjustment Plate
Seat Pad
Back Pad
T Handle Pop Pin
Hex Bolt 1/2" x 3 1/4"L
Hex Bolt 3/8" x 3"L
Hex Bolt 3/8" x 2 1/4"L
Hex Bolt 3/8" x 1 3/4"L
1/2" Flat Washer Narrow
3/8" Flat Washer
1/2" Lock Nut
3/8" Lock Nut
A.
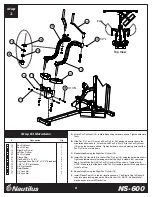
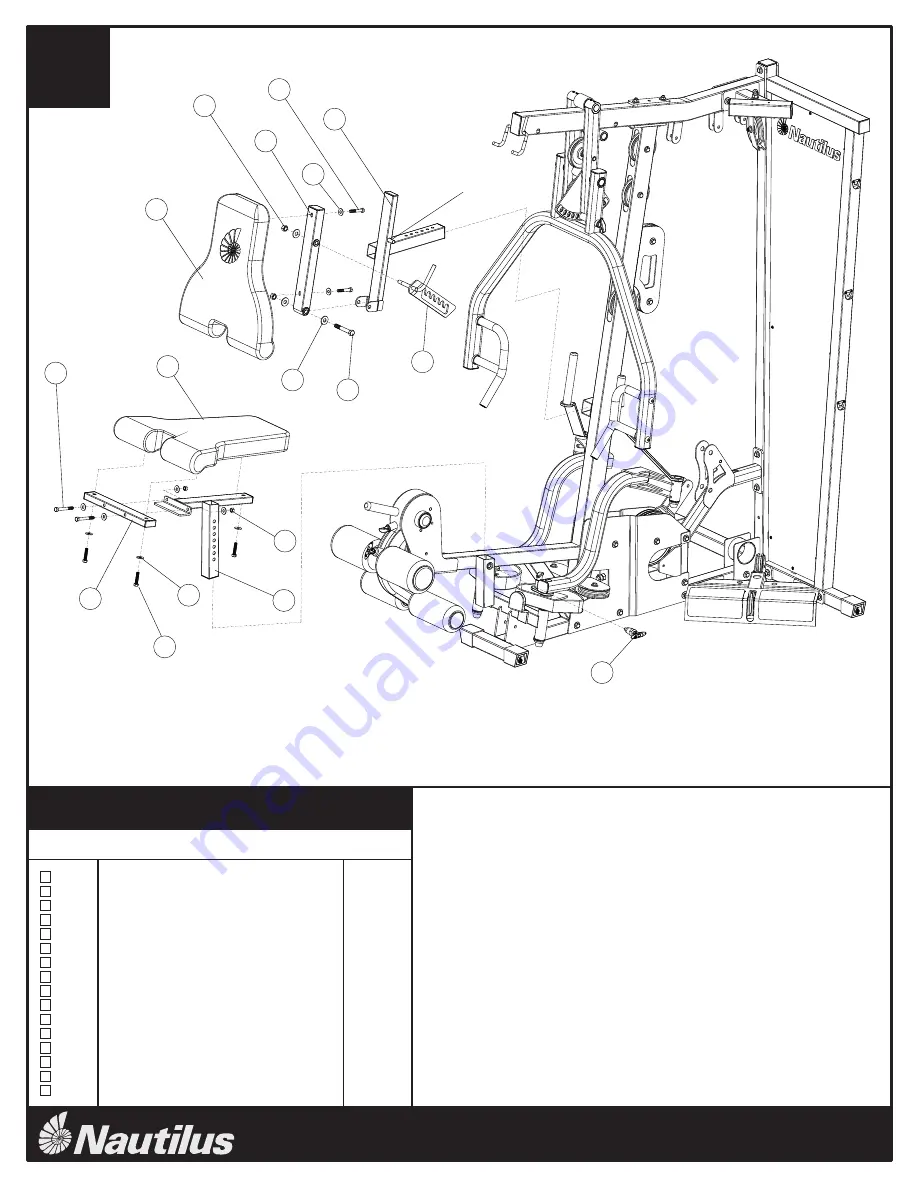
Attach Seat Cross Tube (23) to Seat Adjuster (22) using hardware shown.
Tighten hardware securely.
B.
Attach Seat Pad (27) to Seat Cross Tube (23) and Seat Adjuster (22) using
hardware shown. Tighten hardware secruely.
C.
Attach T Handle Pop Pin (34) to the Leg Extension Assembly with adjustable
wrench.
D.
Install Seat Adjuster (22) in Leg Extension Assembly in the slot shown. Use the
Pop Pin (34) to adjust height. NOTE: Pop Pin is threaded so that the seat can
be locked in place.
E.
Attach Back Pad Tube (24) to Back Pad (28) using hardware shown. Tighten
hardware securely.
TM
NS-600
10
Step #5 Materials:
step
5
#
Description
Qty.
1
1
1
1
1
1
1
1
1
2
2
3
3
9
2
2
22
23
24
25
26
27
28
34
57
62
64
66
73
74
76
77
F.
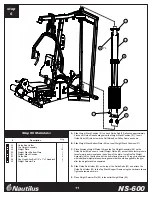
Attach Back Pad Tube (24) to Back Pad Adjuster (25) using hardware shown.
Tighten hardware securely making sure the Back Pad Tube (24) can rotate freely.
G.
Attach Back Pad Adjustment Plate (26) to Back Pad Tube (24) using hardware
shown. Make sure that the Back Pad Adjustment Pin rests inside the slot of the
Back Pad Adjustment Plate (26). Tighten hardware securely making sure the Back
Pad Adjustment Plate (26) can rotate freely.
H.
Install Back Pad Adjuster (25) in Front Upright in the slot shown.
BACK PAD
ADJUSTMENT PIN


