background image

Installation | Device Installation

11. Press and hold.

Press and hold the complete mount to the windshield for at least 15 seconds.

15 seconds is the minimum time for the adhesive to adhere properly. Failure 

to properly secure the Nauto 3 Device may cause it to detach from the 

windshield, which may lead to catastrophic damage or injury.

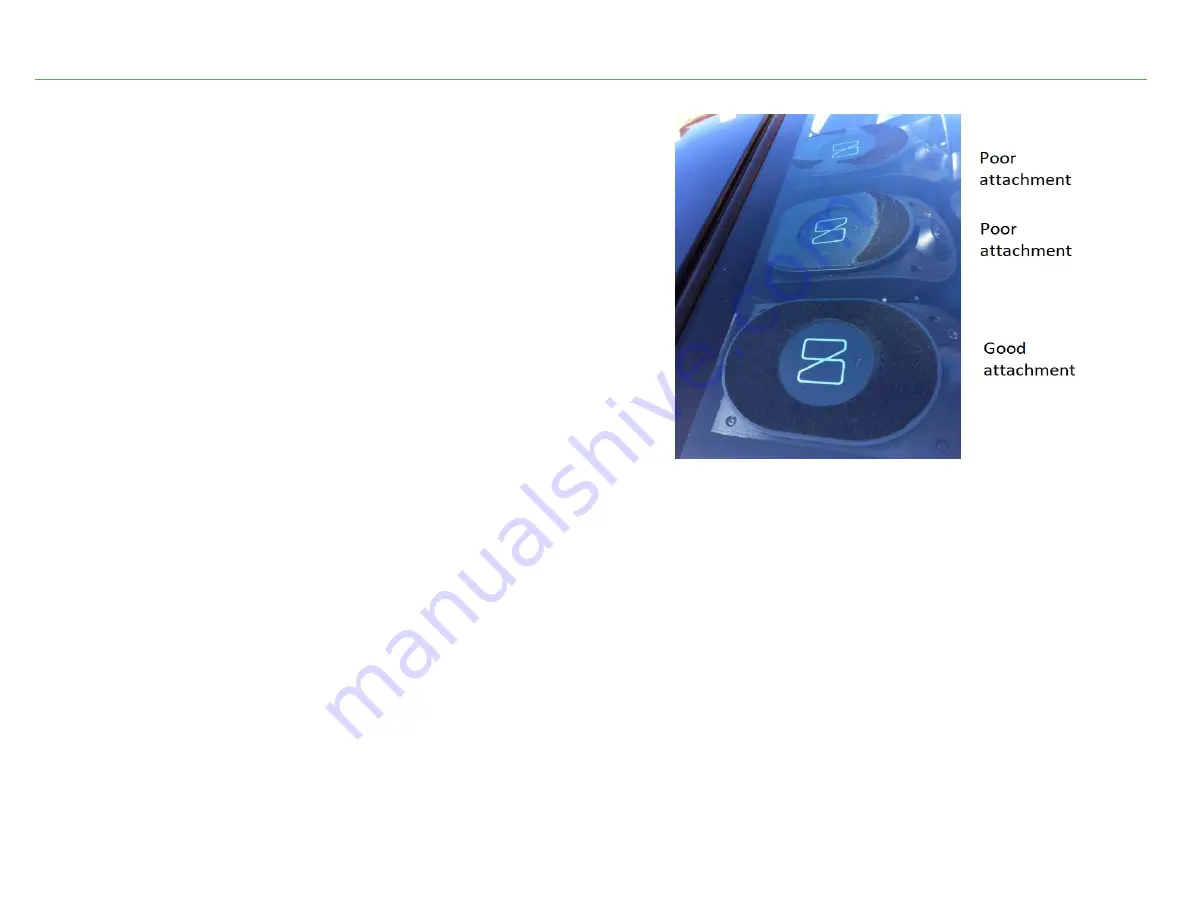
12. Verify the mount and Nauto 3 Device are securely attached.

From the outside of the vehicle, verify that the bracket adhesive is 

completely attached. Press and hold for an additional 15 seconds if not. 

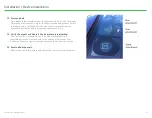
Please see picture to right for how adhesive should look from the outside. 

13. Secure all dash panels.

Make sure all cables are secure and out of the driver’s view and movement.

11

© Nauto 2020. All RightsReserved.

Summary of Contents for 3 Device

Page 1: ...InstallationGuide Nauto 3 Device US Installation Guide June 2021 ...

Page 2: ...verview 3 Installation Tool List and Components 4 Installation 5 OBD Connection PowerCableConnection 6 Device Registration 7 Device Installation 8 Vehicle Information 12 Additional Resources 13 Nauto 2020 All RightsReserved ...

Page 3: ... INCLUDING BUT NOT LIMITED TO ANY IMPLIED WARRANTIES OF MERCHANTABILITY FITNESS FOR ANY PARTICULAR PURPOSE OR NON INFRINGEMENT Nauto shall not be liable for any damages losses costs or expenses direct indirect or incidental consequential or special resulting from the use of this installation guide This guide is not written for any specific vehicle since the proper wiring and installation of electr...

Page 4: ...stall Guide This is optional and may not be included If included do notdisposeof small bag with MACaddress label 5 PowerCable 2 versions hardwire and OBD 6 OBD Y Cable This is optional and may not be included 1 2 3 4 5 6 Note Vehicle specific tools may also be required Nauto Recommended Connection Methods 6 Poke Wrap Requires splicing into a low voltage wire for aconnection See above Posi Tap Requ...

Page 5: ...ct the 12V or 24V source from other circuits in the vehicle and take care to make a strong connection to survive vibration and temperatures a Do not exceed the max amperage that the circuits fuse can handle keeping in mind the cumulative amps of other after market devices Ground Connection Nauto 3 Device BlackWire 1 Crimp or solder a ring terminal at the end of the black wire 2 Connect it directly...

Page 6: ...te the power end of the power cable or the end with the small black block see image for reference 2 Leave 8 10 of the cable exposed at the rearview mirror and route the cable safely and securely to the power supply unit 3 One way to do so that may be appropriate is as follows a Start tucking the cable under the windshield headliner starting just above the rearview mirror b The cable should be buri...

Page 7: ...r to installation 3 Scan QRCode The QR code is located on the device You may alsomanually enter the serial number which is located next to the QR code on the Nauto 3 Device 7 Nauto 2020 All RightsReserved Installation Device Registration 4 Review and confirm fleet name Note if this unit was removed from another vehicle in a swap you will be prompted to confirm ...

Page 8: ...to of the power connections made if hardwired If connected via OBD take photo of OBD connection Once taken the app will ask you to confirm the photo Nauto 2020 All RightsReserved 7 Images from the device The app will now communicate with the device to get live images to help properly align the device See next page for more details ...

Page 9: ... Find this on the opposite side from the rearview mirror Rotate the T5 screw clockwise to lock the Nauto 3 Device into place The other screw will not be tightened 5 Determine the optimal mounting location With the driver s side sun visor in the down position locate an unobstructed location on the windshield away from any sensors metallic surfaces or tint 6 Review live images from the Nauto 3 Devic...

Page 10: ... mirror should maintain a full range of motion 8 Clean the desired location using the provided swab Dry the area with a clean paper towel removing all film and residue 9 Peel the liner from the adhesive on the windshield mount 10 Slowly align the device into position Check the live images on the app If your view is properly aligned gently press the whole assembly to the windshield Ensure that the ...

Page 11: ...the windshield which may lead to catastrophic damage or injury 12 Verify the mount and Nauto 3 Device are securely attached From the outside of the vehicle verify that the bracket adhesive is completely attached Press and hold for an additional 15 seconds if not Please see picture to right for how adhesive should look from the outside 13 Secure all dash panels Make sure all cables are secure and o...

Page 12: ...nse plate and confirm From the back front of the vehicle capture a photo of the license plate Once taken the app will ask you to confirm the photo 8 Final check After you have completed all steps the app will ask you to submit the final check You must be in LTE or WiFi for this to complete 6 Enter vehicle information Enter the vehicles VIN number License Plate number and the Vehicle Name or Asset ...

Page 13: ...ed Device LED Feedback Solid Green Ready and Functioning Flashing Green Device is in Install Mode Flashing Blue Device is downloading or installing updates Orange Searching for Cellular Network Red Possible Hardware issue contact support Dim Red Commonly confused as LEDS These are infrared sensor for night mode Installation Video https www nauto com install ...

Reviews: