JR, BM
09/03/15
NTV-DOC 144
rB5
4 |
P a g e
Agreement
:
End user agrees to use this product in compliance with all State and Federal laws. NAV-TV Corp. would not be held liable for
misuse of its product. If you do not agree, please discontinue use immediately and return product to place of purchase. This product is
intended for off-road use and passenger entertainment only.
Front and Rear Camera
1.
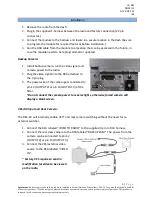
Connect the backup camera to the Yellow RCA labeled “FACTORY AV” of the AV
switcher.
2.
Plug the supplied 3-pin to RCA harness into the
radio. Plug the other end into the Yellow RCA
labeled “AV OUT” of the AV switcher.
3.
The Front camera signal goes to the RCA labeled
“V1” of the switcher.
4.
The black wire of the switcher goes to chassis
ground.
5.
The white/red wire (pin 7) goes to white/red (pin
12) of the REC AV XG module.
VES Input with Rear and Front Camera
1.
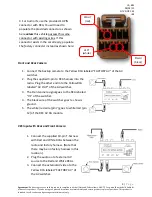
Connect the supplied 10-pin T-harness
with Red and White RCAs between the
radio and factory harness. (Note that
there may be no factory harness in this
location.)
2.
Plug the audio out of external AV
source to the Red and White RCAs.
3.
Connect the external AV video to the
Yellow RCA labeled “FACTORY AV” of
the AV switcher.
Shield
(black)
RIGHT
(red)
LEFT
(white)
4. For Audio IN, use the provided 10-PIN
connector with RCA. You will need to
populate the provided connector as shown
here
unless
this vehicle possess this same
connector with existing wires. If this
connector exists in the car already, populate
the
factory connector
instead as shown here:


