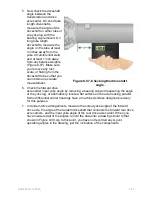


4. Move the cross back and forth to check the cross for binding. It should pivot
freely with zero drag. You can now torque the fasteners, but do not bend up the
lock tabs in case you have to loosen the bearing caps for lubing.
5. Now repeat the foregoing process to install the U-joint at the opposite end of the
driveshaft. Again, position the cross in the yoke so that the lube zerk fitting aligns
with the lube fitting at its opposite end.
6. For flange yoke applications, you can install the flange yoke, bearing assemblies,
and fasteners at this time.
4.8.1 Driveshaft Installation
You now have the U-joint at each end of the driveshaft assembly. Make a final
inspection of the driveshaft, checking the following:
1. No damage or dents are on the driveshaft tubing.
2. There is spline movement with minimal drag.
3. Both crosses turn in their bearing cups without bind. A slight drag is acceptable
(but no binding), but no looseness should be detectable.
4. Yoke flanges are free from burrs, paint, and contamination, any of which could
prevent the bearing caps from seating properly.
CAUTION
Once in use, bearing caps and their trunnions should remain matched. Also, never take
assembly short cuts by installing only the new bearing caps on a used trunnion, as this
will usually result in a rapid failure. Regard a U-joint cross, its four bearing assemblies,
and mounting hardware as a unit, and replace as such.
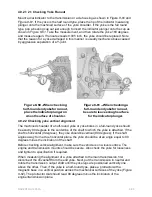
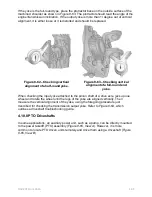
4.8.1 ll Round End Yoke
1. First put the transmission in neutral and jack one drive axle wheel off the ground.
This will allow you to rotate both the transmission output yoke and the differential
carrier yoke. Turn each yoke so that the yoke bores are horizontal.
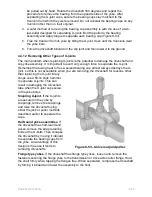
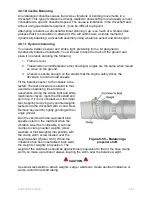
2. Swivel the U-joint cross on the driveshaft so that it is angled. This will allow you
to insert the trunnions into the yoke on the transmission and when both trunnions
are located in the yoke bores, you can rest the weight of the driveshaft.
Remember that a slip joint is always positioned so that it is closest the source of
power flow, which means on the transmission side. If the driveshaft is heavy, use
a sling to aid in handling and raising the driveshaft.
CAUTION
It makes sense to remove the grease fittings when installing a driveshaft; if they are
knocked against the yoke, they intend to shear. You can easily reinstall them after the
driveshaft has been installed.
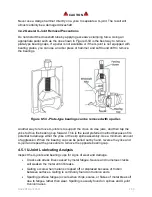
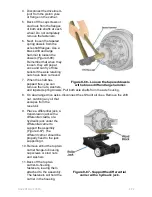
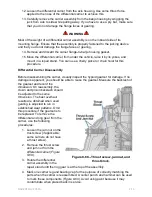
3. Apply a thin coating of antiseize compound to the outside of the two bearing
cups. Then raise the driveshaft slightly and move it to one side of the yoke so
that a trunnion protrudes through it. In this position, you can place a bearing cup
over the protruding trunnion, align it, and press it home by hand into the yoke
bore.
NAVEDTRA 14050A
8-61