8.
Repeat Step 7 until the four fasteners are tightened to the correct torque value.
9.
Install the other fasteners that hold the carrier in the axle housing. Tighten the
fasteners to the correct torque value.
10.
Connect the driveline universal joint to the pinion yoke or flange on the carrier.
11.
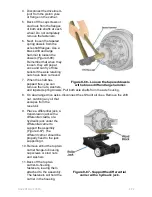
Install the gaskets and axle shafts into the axle housing and carrier (
Figure 8-91
).
The gasket and flange of the axle shafts must fit flat against the wheel hub.
12.
Install the hardware that fastens the axle shafts to the wheel hubs. Tighten to the
correct torque value.
13.
If the wheel hubs have studs, install the tapered dowels at each stud and into the
flange of the axle shaft. Use a punch or drift and hammer if needed. Install the
hardware on the studs and tighten to the correct torque value.
End Play Adjustment
Input shaft end play requirements will vary with operating conditions, mileage, and
rebuild procedures. To measure and adjust end play, do the following:
1.
Measure end play with a dial indicator positioned at the yoke end of the input
shaft.
2.
Move the input shaft axially and measure the end play. A new power divider or a
used unit rebuilt with all new components should read an endplay of 0.003-0.007
inch. A rebuilt unit with reused components will typically read from 0.013-0.017
inch.
3.
If the end play reading is not correct, remove the input shaft nut, flat washer, and
yoke. Remove the bearing cover capscrews and lock washers. Then remove the
cover and shim pack.
4.
To increase end play, add shims to the shim pack. To decrease and play,
remove shims from the shim pack.
5.
To reassemble the input shaft, install the adjusted shim pack and bearing cover.
Install capscrews and lock washers, and torque to correct value.
6.
Install the yoke, flat washer, and nut. Tighten the nut snugly. Tap the end of the
input shaft lightly to seat the bearings.
7.
Measure the input shaft end play again with a dial indicator. If the endplay is still
incorrect, repeat Steps 3-7.
8.
With the endplay correct, seal the shim pack to prevent lube leakage. Then
torque the input shaft nut and cover capscrews to the correct value.
NAVEDTRA 14050A
8-86


