background image

125

Appendixes

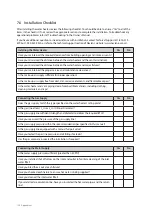
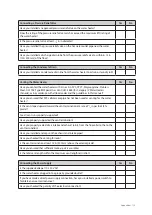
Connecting a Pressure Relief Valve

Yes

No

Have you installed an approved pressure relief valve on the water heater?

Does the rating of the pressure relief valve match or exceed the maximum BTU rating of 

the water heater?

Is the pressure relief valve at least 

3

/

4

 in in diameter?

Have you installed the pressure relief valve on the hot water outlet pipe near the water 

heater?

Have you installed a discharge drain tube from the pressure relief valve to within 6–12 in 

(150–300 mm) of the floor?

Connecting the Condensate Drain

Yes

No

Have you installed a condensate drain line from the water heater to a drain or laundry tub?

Venting the Water Heater

Yes

No

Have you vented the water heater with 2 in or 3 in PVC, CPVC, Polypropylene, Stainless 

Steel, UL-1738, Type BH Special Gas Vent (ULC-S636) for Category IV Water Heaters 

(Canada), or in accordance with all local codes and the guidelines in this manual?

Have you ensured that PVC cellular core pipe has not been used as venting for the water 

heater?

Is the vent sloped upward toward the vent termination at a rate of 

1

/

4

 in per foot (2 % 

grade)?

Are all vent runs properly supported?

Have you properly supported the vent termination?

Have you properly sealed all air intake and exhaust joints, from the flue collar to the to the 

vent termination?

Have you installed end caps on the exhaust and intake pipes?

Have you checked the venting for leaks?

Is the vent termination at least 12 in (300 mm) above the exterior grade?

Have you ensured that sufficient make-up air is available?

Is the total vent length within the maximum vent length restriction?

Connecting the Power Supply

Yes

No

Is the supplied voltage 110-120 V AC?

Is the water heater plugged into a properly grounded outlet?

If you have made a direct power supply connection, have you installed a power switch to 

facilitate end-user maintenance?

Have you checked the polarity of the electrical connection?

Summary of Contents for NPE-180A2

Page 1: ...Contact a licensed professional for the affected system for example a plumber or electrician When you contact Technical Support please have the following information at hand Model number Serial number...

Page 2: ...nstallationmustconformwithlocalcodesor intheabsenceoflocalcodes theNationalFuelGas Code ANSIZ223 1 NFPA54and orCSAB149 1 NaturalGasandPropaneInstallationCode Whenapplicable theinstallationmustconformw...

Page 3: ...6 2 3 Specifications 7 2 5 Components 9 2 6 Dimensions 12 2 7 Rating Plate 14 3 Installing the Water Heater 15 3 1 Choosing an Installation Location 15 3 2 Mounting the Water Heater to the Wall 18 3 3...

Page 4: ...se landline phones From a neighbor s phone call your gas provider and follow their instructions If you cannot reach your gas provider call the fire department Do not use or store flammable products su...

Page 5: ...ter has been approved for use in the USA and Canada only Using the water heater in any other country will void the manufacturer s warranty WARNING Do not store or use gasoline or other flammable liqui...

Page 6: ...ent burns Use the lowest operating temperature setting necessary to provide comfortably hot water If your household has children or elderly or disabled residents consider using a lower temperature set...

Page 7: ...t uredHomeConstruct ionand Safety Standard Title 24 CFR Part 3280 and or CAN CSA Z240 MH Series Mobile Homes Lead Free Keep this manual near this water heater for future reference whenever maintenan c...

Page 8: ...Propane Gas Supply Pressure from source 8 in WC 13in WC Natural Gas Manifold Pressure min max 0 04 inWC 0 40 inWC 0 03 inWC 0 55 inWC 0 03 inWC 0 76 inWC 0 03 inWC 0 96 inWC Propane Gas Manifold Pres...

Page 9: ...s c Gas Displays when the unit is configured for propane gas d Main Sub Displays whether the water heater is a main or a sub unit of the cascade system e Status Flow Displays the operation status incl...

Page 10: ...Exhaust Limit Temperature Sensor Exhaust Body Burner High Limit Fuse Ignition Transformer Burner Igniter Flame Rod Primary Heat Exchanger Secondary Heat Exchanger Flow Sensor Condensate Trap Front Pan...

Page 11: ...High Limit Fuse Ignition Transformer Burner Primary Heat Exchanger Secondary Heat Exchanger Water Adjust Valve Built in Flow Sensor Condensate Trap Front Panel PCB Box Mixing Valve Water Inlet Filter...

Page 12: ...nsformer Burner High Limit Fuse Burner Primary Heat Exchanger Igniter Flame Rod Secondary Heat Exchanger Water Adjust Valve Built in Flow Sensor Condensate Trap Front Panel PCB Box Mixing Valve Water...

Page 13: ...ir Intake 2 in B Exhaust Gas Vent 2 in C Hot Water Outlet 3 4 in D Gas Inlet 3 4 in E Recirculation Inlet 3 4 in F Condensate Outlet 1 2 in G Cold Water Inlet 3 4 in OverheadView 3 in 77 mm 6 7in 170m...

Page 14: ...t Water Outlet 3 4 in D Gas Inlet 3 4 in E Condensate Outlet 1 2 in F Cold Water Inlet 3 4 in OverheadView 3 in 77 mm 6 7in 170mm 4 5in 115mm 0 4 in 10 mm 1 5in 38mm 14 3in 364mm 2 6 in 67 mm A B Supp...

Page 15: ...supply available in the installation location If the water heater does not match each of these ratings do not install the water heater If conversion to Propane Gas is required the included Propane co...

Page 16: ...inated in any way discontinue use of the water heater and contact an authorized technician or licensed professional Contaminant Maximum Allowable Level Total Hardness Up to 200 mg l 12 grains gallon A...

Page 17: ...ater heater requires instant hot water we recommend running a recirculation line back to the water heater from the furthest fixture Insulate as much of the hot water supply and recirculation lines as...

Page 18: ...ation Clearances Install the water heater in an area that allows for service and maintenance access to utility connections piping filters and traps Based on the installation location ensure the follow...

Page 19: ...walls as the unit will make some operational noises while it is running WARNING The water heater is heavy Always lift the unit with assistance Be careful not to drop the water heater while lifting or...

Page 20: ...use the other wrench to tighten the connection Damaged connectors may result in system leaks Properly support the piping with hangers Do not allow the piping to be supported by the water heater or it...

Page 21: ...whether the use of 1 2 gas pipe is approved in the area CAUTION Prior to using an excess flow valve EFV in the gas line check the manufacturer s minimum and maximum flow capacity rating An improperly...

Page 22: ...as Pipe Full Size Gas Pipe Pipe Single Regulator System Typical Propane Gas piping examples Gas Regulators 2 Stage Low Pressure Regulator before entering home or building Gas Tank High Pressure Regula...

Page 23: ...80 1 950 1 840 1 630 3 in 11 300 7 780 6 250 5 350 4 740 4 290 3 950 3 670 3 450 3 260 2 890 4 in 23 100 15 900 12 700 10 900 9 660 8 760 8 050 7 490 7 030 6 640 5 890 In Cubic Feet ft3 per Hour 0 60...

Page 24: ...perly without sufficient inlet gas pressure Measuring the inlet gas pressure should be performed by a licensed professional only The inlet gas pressure must be maintained between 3 5 in and 10 5 in WC...

Page 25: ...g unions and manual shut off valves on the cold water inlet DHW outlet and recirculation water inlet Strive to make the hot water piping system as short as possible to deliver hot water to the fixture...

Page 26: ...e inlet water filter that is located inside the cold water inlet and then test the water heater for proper flow and inspect for leaks Instruct the water heater owner that the filter must be cleaned pe...

Page 27: ...pper Pipe 100 ft 30 m of equivalent length 3 4 in Copper Pipe 500 ft 150 m of equivalent length Lengths in excess of these limits will require an external recirculation pump If PEX is used for the wat...

Page 28: ...on Mode is used The following diagram shows the internal recirculation flow for pre heating Internal Recirculation Mode Primary Heat Exchanger Secondary Heat Exchanger Buffer Tank Flow Sensor Circulat...

Page 29: ...dule Set HotButton N A The following diagram shows the external recirculation flow for pre heating External Recirculation Mode using the Recirculation Inlet Primary Heat Exchanger Secondary Heat Excha...

Page 30: ...shall be sized to maintain a flow of 2 4 GPM through the water heater Follow the instructions below when connecting the pump wire accessory to the PCB WARNING Failure to follow the instructions below...

Page 31: ...ceive signals from multiple push buttons installed in various areas and performs optimal DHW recirculation only when there is a demand for hot water For more information about the parameter settings r...

Page 32: ...spade connectors at the end of the cables to securely install the cables to the terminal contacts Included Item HotButton Controller Items Not Included Push Button Switch GXXX001426 Wall Plate GXXX001...

Page 33: ...I RA1 Multiple switches connected directly to the same terminals at the controller 1 2 3 4 ON SW1 CE1 CE2 U1 C1 C2 C7 R6 PC1 12 V 5 V SIGNAL SIGNAL 1 GND R5 R9 R8 C3 R1 R2 R7 D1 CON3 CON5 CON2 CON1 S...

Page 34: ...CAUTION The Navien HotButton can be used ONLY with a water heater system configured for DHW recirculation HotButton DIP Switch Information CE1 CE2 U1 C1 C2 C7 R6 PC1 12 V 5 V SIGNAL SIGNAL 1 GND R5 R9...

Page 35: ...10A2 240A2 Note Set the 2 way valve inside the water heater to the Ext position when using the NaviCirc recirculation valve 1 2 3 4 ON SW1 CE1 CE2 U1 C1 C2 C7 R6 PC1 12 V 5 V SIGNAL SIGNAL 1 GND R5 R9...

Page 36: ...R1 R2 R7 D1 CON3 CON5 CON2 CON1 SIGNAL 2 SENSOR I RA1 Return Water Expansion Tank Check Valve DHW Supply Temperature Sensor Wired Push Button Wired Push Button Wired Push Button HotButton Kit NPE A2W...

Page 37: ...n Do not plug the relief valve CAUTION To avoid potential property damage or personal injury check the pressure relief valve at least once every three years by manually operating the valve to ensure p...

Page 38: ...ng distance between the water heater and the laundry tub or when the bottom of the water heater is lower than the top of the laundry tub 3 5 Connecting the Condensate Drain The Navien Condensing Water...

Page 39: ...potential water damage To connect the condensate drain 1 Connect a drain line to the 1 2 in fitting at the bottom of the water heater Use only corrosion resistant material for the drain line such as...

Page 40: ...e can cause injury or death from carbon monoxide The connection between the appliance and the neutralizer must be installed to prevent the backflow of condensate into the appliance Do not connect more...

Page 41: ...contaminants If you must install the water heater in an area with contaminated air use direct venting to supply clean air from outside the building We recommend regular filter cleaning and maintenanc...

Page 42: ...uidelines when venting the water heater Venting should be performed only by a licensed professional The venting system must be sealed gastight to prevent flue gas spillage and carbon monoxide emission...

Page 43: ...best results keep the venting system as short and straight as possible Locate the water heater as close as possible to the vent termination Do not connect the water heater vent to a vent for any othe...

Page 44: ...the vent collar Using an elbow directly at the collar will not allow for a tight seal between the appliances and vent pipe A length of straight pipe must be used when starting the vent run To avoid m...

Page 45: ...personal injury or death WARNING TheVID is not intended and should not be relied upon to detect all instances of the vent pipe s vertical movement or separation from the collar Various factors includ...

Page 46: ...es cracks or blockages prior to connecting it to the water heater DirectVenting The water heater uses 2 in or 3 in diameter exhaust and 2 in or 3 in diameter intake air ducts To ensure the draw of air...

Page 47: ...W 12 in 30 cm for appliances 50 000 Btuh 15 kW C Clearance to permanently closed window As specified by the manufacturer As specified by the manufacturer D Vertical clearance to ventilated soffit loca...

Page 48: ...Information on preventing blockage by snow and 3 Information on protecting building materials from degradation by flue gases A vent shall not terminate directly above a sidewalk or paved driveway tha...

Page 49: ...W x 5 in H or 8 in round 180 in2 13 1 4 in W x 13 1 4 in H NPE 240A2 NPE 240S2 199 900 50 in2 10 in W x 5 in H or 8 in round 199 in2 14 1 4 in W x 14 1 4 in H WARNING Do not install this water heater...

Page 50: ...ing C Clearance to permanently closed window As specified by the manufacturer As specified by the manufacturer D Vertical clearance to ventilated soffit located above the terminal within a horizontal...

Page 51: ...specified by the manufacturer The manufacturer shall specify a minimum clearance or state Not applicable in the table and or instructions 1 The minimum distance from adjacent public walkways adjacent...

Page 52: ...nded Vent Materials USA PVC CPVC Schedule 40 or 80 Solid Core UL1738 approved PVC or CPVC Approved Polypropylene PP Approved Stainless Steel SS Canada Type BH Special Gas Vent Class IIA PVC Type BH Sp...

Page 53: ...VC In high temperature applications the exhaust temperature can exceed 149 F 65 C In that case you must use Schedule 40 80 CPVC or Approved Polypropylene Stainless Steel in the USA or Type BH Special...

Page 54: ...3 2 or 3 Tee IASPP02 or IASPP03 2 or 3 Birdscreen 3 6 5 Measuring Vent Length The maximum vent length when using 2 in exhaust ducts is 75 ft 23 m The maximum vent length when using 3 in vent ducts is...

Page 55: ...r 3 Tee 2ZDES or 3ZDES 2 or 3 Birdscreen The following stainless steel AL29 4C vent components can be used as terminations Duravent FasNSeal Certified to UL1738 and ULCS636 FSELB9003 3 90 Elbow FSELB8...

Page 56: ...th sidewall and vertical venting installations Do not vertically stack concentric terminations on sidewalls Two pipe Vertical Venting Intake and exhaust pipes do not have to terminate in the same area...

Page 57: ...TICAL installations are allowed Horizontal terminations are prohibited The use of proper adapters and supports are required to fully complete the installation Low Profile Two Pipe Sidewall Venting Exh...

Page 58: ...0 ft 100 ft n a NPE 240A2 S2 2 in n a n a 35 ft 3 in 100 ft 100 ft n a List of approved materials can be found on page 51 Only the flexible vent models listed above are approved for use with this appl...

Page 59: ...NING Improperly connecting the power supply can result in electrical shock and electrocution Follow all applicable electrical codes of the local authority having jurisdiction In the absence of such re...

Page 60: ...ly for 3 seconds on the front panel to access the Service Installer menu 2 Select 1 Installer Menu 2 Parameter Settings 14 Altitude Setting by pressing the OK button and set up the altitude Function M...

Page 61: ...de system You can connect up to 32 water heaters to meet high volume hot water demands Some possible connection options include the following Recirculation via Internal Pumps A2 model only Communicati...

Page 62: ...Supply Line Cold Water Supply Line Gas Supply Line Union Ball Valve or Navien Plumb Easy Valve Check Valve Faucet Expansion Tank Pressure Relief Valve NPE 150S2 180S2 210S2 240S2 4 1 1 Piping Sizes an...

Page 63: ...on Cables Up to 32 water heaters can be connected with Navien Ready Link communication cables Select one of the water heaters in the cascade system as the main water heater and then connect the other...

Page 64: ...old the Menu button and the Back button simultaneously for 3 seconds to access the Service Installer menu Then select 2 Cascade Status and Set 4 Cascade System Removal Now the water heaters will opera...

Page 65: ...result in substantial property damage severe personal injury or death WARNING Improper venting of the water heater units can result in excessive levels of carbon monoxide which can lead to severe pers...

Page 66: ...e common vent system by the installer the Navien CommonVent Collar Kit must be installed in the exhaust duct of each water heater unit use direct vent with separate intake and exhaust lines or indirec...

Page 67: ...tionally the recommended clearance from the FRONT of the unit is 24 for maintaining and servicing Clearances Between Multiple Units Ensure that the installed water heaters satisfy all installation cle...

Page 68: ...n working with primers and solvent cements General and Local Standards Information When installing and operating the common vent system the following standards and regulations must be complied with an...

Page 69: ...of the pipe where cement will be applied is clean Apply an even layer of cement over all mating surfaces Use solvent cement in room temperatures higher than 32 0 Use primer when required especially i...

Page 70: ...ter Heater Units Required Load Total BTU H Model Total Length ft NPE 240A2 S2 D 3 D 4 D 6 D 8 399 800 2 60 106 200 599 700 3 40 71 160 799 600 4 30 53 120 999 500 5 42 96 150 1 199 400 6 35 80 142 1 3...

Page 71: ...tallation s Keep this manual for future reference whenever maintenan ce or service is required Do not store or use gasoline or other flammable vapors and liquids in the vicinity of this or any otherap...

Page 72: ...haust vent adapter from the top of the unit Disconnect the Vent Installation Detector VID wiring from the harness 3 Connect the Common Vent Collar Kit to the exhaust duct of the water heater unit Main...

Page 73: ...ust connect it to the wire with the VID label Note The Damper includes aVID jumper wire VID 5 3 2 Connecting the Pipe to the Common Vent Collar Kit WARNING When cutting the vent pipe ensure that the c...

Page 74: ...stem 2 Insert the vent pipe into the vent collar to start the vent run Make sure to completely slide the vent into the collar until the end makes contact with the bottom of the socket Note Verify that...

Page 75: ...p solution bubbles will form on the connection if any leaks exist 2 Assemble the wye joint or wye assembly to the vent pipe Apply solvent cement to the mating surfaces Apply Cement HubWye Assembly App...

Page 76: ...ide of the wye joint or wye assembly Each trunk pipe is connected to the other wye joint or wye assembly Refer to Connecting Pipes with Cement on page 67 for more information DANGER If the connections...

Page 77: ...ent system and direct the end of the hose to a drain 7 1in 180mm WARNING After installing the condensate drain hose check the loop again to ensure that the prime water is not spilled The loop siphon m...

Page 78: ...Size NPE 150S2 Natural Gas 0 5 399ft 6 30 5 400 10 100ft 6 50 NPE 180A2 S2 0 5 399ft 4 50 6 30 5 400 10 100ft 4 65 6 50 NPE 210A2 S2 NPE 240A2 S2 0 5 399ft 4 80 7 50 5 400 10 100ft 5 05 7 75 5 6 Setti...

Page 79: ...he exhaust will be much warmer than the ambient air Therefore you will see water vapor being produced at the termination 5 7 Common VentTermination Clearances 5 7 1 Direct Vent Application Vertical In...

Page 80: ...t Harmful exhaust gas may leak if the gasket is not installed or if it is not installed properly Gasket 5 8 Maintenance Periodically check the damper condition inside the CommonVent Collar Kit through...

Page 81: ...To turn the water heater on or off press the Power button When the power is turned on for the first time you must complete the start up wizard The temperature will appear on the front panel display af...

Page 82: ...Int Recir Always On Intelligent Weekly Ext Recir Always On Intelligent Weekly HotButton S2 Type Ext Recir Always On Intelligent Weekly HotButton Note If the weekly recirculation mode is selected conf...

Page 83: ...nter Commercial Mode The Temperature Lock feature must be OFF Refer to 3 8 2 Setting the Front Panel DIP Switches on page 59 to disable the Temperature Lock Press and hold the Menu button and the Back...

Page 84: ...ternal recirculation loop Select Always On Intelligent Weekly or HotButton Internal Recirculation Select Always On Intelligent or Weekly S2 type Select No Recirculation or External Recirculation No Re...

Page 85: ...xternal Recirculation feature you can choose commands in the menu to preheat according to the set DHW temperature Item Description 1 Always On Set to repeat DHW Recirculation 2 Intelligent Set to dete...

Page 86: ...e 11 Mixing Valve Current mixing valve state 12 Flame Valve Flame detection current AD value 13 Current RPM Fan RPM 14 Current APS APS voltage 15 HotButton Ext Temp Current temperature of the HotButto...

Page 87: ...automatically cleared when the problem is resolved You can press the Back button to clear a level 1 error The error is then cleared if the problem has been resolved Item Description 18 AHU Comm AHU c...

Page 88: ...Back button to return to the previous screen or menu 6 4 4 Viewing Other System Information 1 Press the Menu button and then select 4 EMS Data 2 Press the Up button or the Down button to switch betwe...

Page 89: ...Change Change the Installer Menu password Note If you enter an incorrect password 10 times or make no input for 1 minute the water heater will return to Normal mode To return to the previous mode pre...

Page 90: ...he Recirculation Off offset temperature This setting is not adjustable when the HotButton kit is used HotButton can be set in 1 Recirculation Setting 2 External Recirculation Setting range 5 F 3 C 54...

Page 91: ...in Parameter Edit mode for 5 seconds to reset individual parameters to their default values 3 Press the Back button to return to the previous screen or menu Item Description 6 Exhaust Limit Control E...

Page 92: ...5 C or Outdoor HighTemp Set point 9 F 5 C Default 14 F 10 C 6 5 1 3 Setting the Application 1 From the Installer Menu select 3 Application Settings 2 Press the Up button or the Down button to switch b...

Page 93: ...nge 5 F 3 C 54 F 30 C set in 1 F 0 5 C increments Default 9 F 5 C When the energy saver function is enabled This setting is not adjustable Category Item Description 3 Air Handler Unit 4 AHU Outdoor Hi...

Page 94: ...r menu AHU Communication AHU Communication feature can be used when NPE and thermostat are difficult to connect It can be used for AHU heating with a hot water recirculation line Note AHU has an RS 48...

Page 95: ...ng performance Outdoor Reset Control automatically changes the space heating temperature setting based on the outdoor temperature and the current space heating system application system load To achiev...

Page 96: ...ion standard when the cascade combustion is ON Setting range 15 15 Default 0 Item Description 1 Cascade Info Number of an individual water heater and the status 2 Number of Oper Unit Number of current...

Page 97: ...r 5 seconds 5 times for 75 seconds 5 Mixing Valve S2 Type Only This procedure turns the valve to a fully open position and then to a fully closed position over approximately 10 seconds A value between...

Page 98: ...to run in the 1 stage minimum operation mode 3 1st MAX Set the water heater to run in the 1 stage maximum operation mode 4 2nd MIN Set the water heater to run in the 2 stage minimum operation mode 5 2...

Page 99: ...ation or company which either in person or through a representative is engaged in and is responsible for the connection utilization repair or servicing of gas utilization equipment or accessories who...

Page 100: ...illustration of the front cover on the unit Figure 1 NPE A2 S2 Series Front cover In Canada The conversion shall be carried out in accordance with the requirements of the provincial authorities having...

Page 101: ...let Pipe Figure 2 NPE A2 S2 Series Internal Components 3 Once the front cover is removed place it in a safe location to prevent accidental damage With the internal components exposed locate the gas in...

Page 102: ...king inside the port before proceeding to the next step Packings Packing NPE 150S2 NPE 180A2 S2 210A2 S2 240A2 S2 8 Replace the gas inlet pipe to its original position and use all screws to secure all...

Page 103: ...e Be careful not to confuse it with the Gas Orifice for propane gas Note that the Gas Orifice from the PROPANE CONVERSION KIT covers the water heater s installation at an altitude of 0 to 10 100 ft DA...

Page 104: ...ockwise to raise or counterclockwise to lower the CO2 value Figure 8 Set Screw Location Note The set screw is located behind the screw on cover This must be removed first CAUTION Ensure that the High...

Page 105: ...his must be removed first d At high fire do not check the offset value and never adjust the gas valve DANGER Improper gas valve settings can cause severe personal injury death or substantial property...

Page 106: ...it has been Converted to Natural Gas Cet appareil a ete converti au Gaz Naturel Manifold Gas Pressure Pression la tubulure d alimentation Min 0 03 to Max 0 96 inches WC BTU Input Debit calorifique Max...

Page 107: ...r Flow GPM NPE 240A2 240S2 0 5 10 15 20 25 30 35 40 45 50 0 1 2 3 4 5 6 7 8 9 10 Pressure Loss psi Water Flow GPM NPE 210A2 210S2 0 5 10 15 20 25 30 35 40 45 50 0 1 2 3 4 5 6 7 8 9 10 Pressure Loss ps...

Page 108: ...1 0 2 0 3 0 4 0 5 0 6 0 7 0 8 0 9 0 10 0 11 0 0 30 60 90 120 150 Flow GPM T Temperature Rise NPE 210A2 0 0 1 0 2 0 3 0 4 0 5 0 6 0 7 0 8 0 9 0 10 0 0 30 60 90 120 150 Flow GPM T Temperature Rise NPE...

Page 109: ...erature Rise NPE 210S2 Flow GPM T Temperature Rise NPE 180S2 0 0 1 0 2 0 3 0 4 0 5 0 6 0 7 0 8 0 9 0 10 0 0 30 60 90 120 150 Flow GPM T Temperature Rise NPE 150S2 Note At altitudes above 2 000 ft 610...

Page 110: ...14 1 CON13 13 1 FRONT PANEL HOT BUTTON Or H2AIR Dip s w 4 6pin CON1 TB1 LIVE NEUTRAL 1 1 CON3 CON2 CON14 1 PIN1 PIN3 PIN2 Vent Installation Detector S W TDS Sensor Burner HTL GROUND P E GV1 M GV2 CON4...

Page 111: ...Installation Detector Inlet Thermistor 2 Outlet Thermistor 1 Outlet Thermistor 2 UART Communication Interface FRONT PANEL Communication Interface FUSE 5A HOT BUTTON Inlet Thermistor 1 EMI FILTER PWM...

Page 112: ...111 Appendixes 7 5 Component Assembly Diagrams and Parts Lists 7 5 1 Case Assembly 2 5 3 21 4 1 13 18 15 20 17 10 16 12 11 9 19 8 22 7 6 14...

Page 113: ...PCB 30024835A 30024835 NPE 180A2 210A2 240A2 30024837A 30024837 NPE 150S2 180S2 210S2 240S2 9 Case Bracket Lower 20048214 10 Case Bracket Upper 20049507 11 Junction Box 20046065 12 Rubber Ring 2002512...

Page 114: ...113 Appendixes 7 5 2 Burner Assembly NPE 180A2 210A2 240A2 1 2 3 5 6 27 28 8 27 27 26 26 9 10 11 22 14 16 18 19 17 20 21 22 4 13 15 7 12 23 6 25 29 24 9 22...

Page 115: ...NPE 180A2 12 Ignition Transformer 30010455A 30010455 13 Fan Bracket R 20022096 14 Fan Damper 30008825A 30008825 15 Fan Packing 20022744 16 Fan Bracket F 20022095A 20022095 17 Screw S18A M4 6 20038859...

Page 116: ...t Exchanger Assembly 30026111A 30025252 NPE 210S2 240S2 30026110A 30025110 NPE 180S2 30026109A 30025477 NPE 150S2 2 SC Ex Inlet Adaptor 20049491 3 SC Ex Outlet Adaptor 30024763 4 Thermistor 30008366A...

Page 117: ...30024779A 30024779 NPE 150S2 21 Cold Inlet Pipe 30024778A 30024778 NPE 210S2 240S2 30024777A 30024777 NPE 180S2 30024776A 30024776 NPE 150S2 22 Clip 20045992A 20045992 23 Mixing Pipe 30024784A 3002478...

Page 118: ...5 24 14 26 27 28 8 24 24 29 11 30 8 31 12 13 17 18 32 33 24 5 Description Service Code Part Remark 1 Buffer Tank 30016125A 30023708 2 Fastener 20017724A 20017724 3 O RING P29 20017923A 20017923 4 Buff...

Page 119: ...ater Filter 30008171A 30008171 19 Return Connect Adapter 20048405A 20048405 20 Pump Air Separator 30014451A 30013056 21 Circulation Pump 30008355 22 Drain Plug 30008630 23 Pump Connect Adapter 2004841...

Page 120: ...119 Appendixes 7 5 5 Waterway Assembly NPE 150S2 180S2 210S2 240S2 1 2 3 4 5 6 7 8 9 10 11 7 7 7 12 9...

Page 121: ...tlet Adapter 30024924 4 Water Adjust Valve Built in Flow Sensor 30022123A 30022123 5 Mixing Valve 30022124A 30022124 6 Screw STS430 M4 10 20038758 7 Clip 20045992A 20045992 8 O RING P18 20006947A 2000...

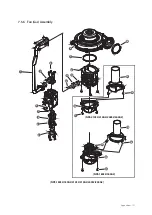
Page 122: ...121 Appendixes 7 5 6 Fan Gas Assembly 1 2 3 4 5 6 7 8 9 10 11 12 13 15 17 16 18 6 14 19 15 14 NPE 210S2 210A2 240S2 240A2 NPE 180S2 180A2 16 17 NPE 180S2 180A2 210S2 210A2 240S2 240A2...

Page 123: ...122 Appendixes 1 2 3 4 5 6 7 8 9 10 11 12 14 17 18 11 NPE 150S2...

Page 124: ...S2 180A2 210S2 210A2 240S2 240A2 10 Single Venturi 30014688A 30014688 NPE 150S2 Dual Venturi 30024967A 30024967 NPE 180S2 180A2 30025251A 30025251 NPE 210S2 240S2 210A2 240A2 11 Venturi Packing 200226...

Page 125: ...dirt corrosive elements and flammable vapors Is the water heater and vent piping clear of combustible materials including clothing cleaning materials and rags Connecting the Gas Supply Yes No Does th...

Page 126: ...ce with all local codes and the guidelines in this manual Have you ensured that PVC cellular core pipe has not been used as venting for the water heater Is the vent sloped upward toward the vent termi...

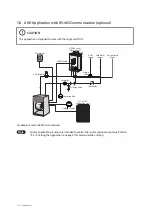
Page 127: ...add on controller for the Navien NPE A2 S2 water heaters It adds input and output functions to the NPE A2 S2 water heaters for a combination application where space heating and domestic hot water DHW...

Page 128: ...ernal Pump Optional Connect the external pump cable to the NPE A2 PCB System Diagram for NPE S2 Flow Switch Check Valve Expansion Tank Cold Water Supply DHW Supply Space Heating Supply Heat Demand Out...

Page 129: ...ixing Valve COMM Cable Outdoor Sensor Expansion Tank Circulator DHW Supply Recirculation Water Cold Water Supply Air Eliminator A C or H P Condensing Unit Thermostat Check Valve For details contact th...

Page 130: ...iance is located in a crawl space unless the appliance is located in a detached uninhabitable garage For all residential dwellings a carbon monoxide detector must also be present on each habitable lev...

Page 131: ...Memo...
Reviews: