NAVCAM-717D
USER MANUAL
9
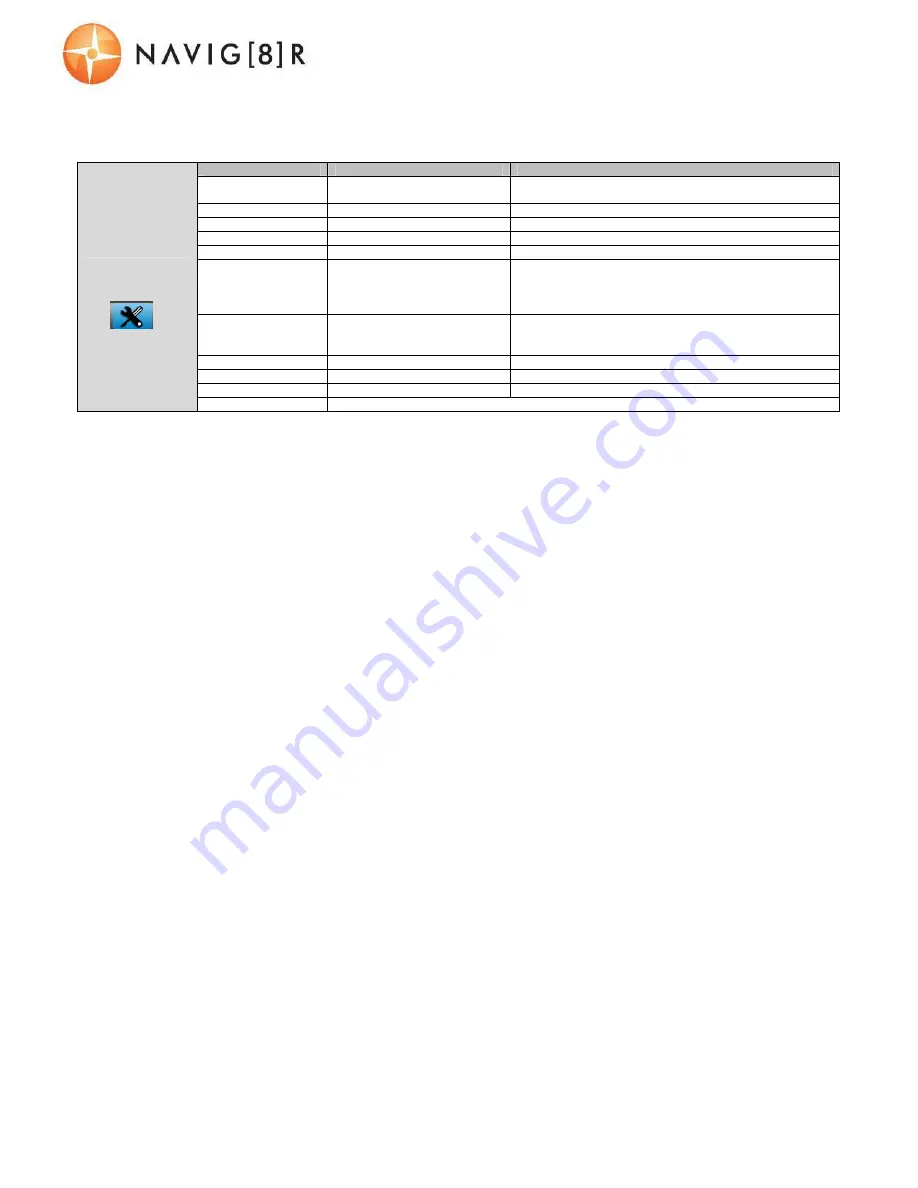
SYSTEM SETTINGS
From the main screen, press the MENU button, then using a combination of the arrow keys and the OK button to confirm your
choice, select settings from the following options list:
System settings
Menu
Options
Description
Date/time
MM/DD/YY, DD/MM
/YY, YY/MM/DD
Select the preferred date orientation
Auto power off
Off, 3, 5, 10mins
Turn device off after a set period of time
Beep Sound
Off, On
Audible beep on key press
Language
Various
Choose preferred system language
Frequency
50Hz, 60Hz
[Adjust to 50Hz for Australia power supply]
Format
SD Card
Format SD card (Note: Permanently erases all
data on card. Note: the unit cannot be used until
formatting is complete, which usually takes about
20seconds depending on the size of your card.)
Screen Saver
Off, 30sec, 1mins,
2mins
If no buttons have been pressed and if no
recording is taking place, the unit can be shut off
automatically after set periods of time
Lamp settings
Day Mode, Night Mode
Day mode IR Lamps ON, Night mode IR LED OFF
Delay shutdown
Off, 5sec, 10sec, 30sec
Keep camera on after car is turned off
Default setting
Cancel, OK
Perform a factory reset
Version
Used when checking to see if a new firmware is released.
Summary of Contents for NAVCAM-717D
Page 1: ...NAVCAM 717D USER MANUAL 1...

![Preview for 1 page of Navig[8]r NAVCAM-717D User Manual](http://thumbs.mh-extra.com/thumbs/navig-8-r/navcam-717d/navcam-717d_user-manual_3571056-01.webp)
![Preview for 2 page of Navig[8]r NAVCAM-717D User Manual](http://thumbs.mh-extra.com/thumbs/navig-8-r/navcam-717d/navcam-717d_user-manual_3571056-02.webp)
![Preview for 3 page of Navig[8]r NAVCAM-717D User Manual](http://thumbs.mh-extra.com/thumbs/navig-8-r/navcam-717d/navcam-717d_user-manual_3571056-03.webp)
![Preview for 4 page of Navig[8]r NAVCAM-717D User Manual](http://thumbs.mh-extra.com/thumbs/navig-8-r/navcam-717d/navcam-717d_user-manual_3571056-04.webp)
![Preview for 5 page of Navig[8]r NAVCAM-717D User Manual](http://thumbs.mh-extra.com/thumbs/navig-8-r/navcam-717d/navcam-717d_user-manual_3571056-05.webp)
![Preview for 6 page of Navig[8]r NAVCAM-717D User Manual](http://thumbs.mh-extra.com/thumbs/navig-8-r/navcam-717d/navcam-717d_user-manual_3571056-06.webp)
![Preview for 7 page of Navig[8]r NAVCAM-717D User Manual](http://thumbs.mh-extra.com/thumbs/navig-8-r/navcam-717d/navcam-717d_user-manual_3571056-07.webp)
![Preview for 8 page of Navig[8]r NAVCAM-717D User Manual](http://thumbs.mh-extra.com/thumbs/navig-8-r/navcam-717d/navcam-717d_user-manual_3571056-08.webp)
![Preview for 9 page of Navig[8]r NAVCAM-717D User Manual](http://thumbs.mh-extra.com/thumbs/navig-8-r/navcam-717d/navcam-717d_user-manual_3571056-09.webp)
![Preview for 10 page of Navig[8]r NAVCAM-717D User Manual](http://thumbs.mh-extra.com/thumbs/navig-8-r/navcam-717d/navcam-717d_user-manual_3571056-10.webp)
![Preview for 11 page of Navig[8]r NAVCAM-717D User Manual](http://thumbs.mh-extra.com/thumbs/navig-8-r/navcam-717d/navcam-717d_user-manual_3571056-11.webp)
![Preview for 12 page of Navig[8]r NAVCAM-717D User Manual](http://thumbs.mh-extra.com/thumbs/navig-8-r/navcam-717d/navcam-717d_user-manual_3571056-12.webp)
![Preview for 13 page of Navig[8]r NAVCAM-717D User Manual](http://thumbs.mh-extra.com/thumbs/navig-8-r/navcam-717d/navcam-717d_user-manual_3571056-13.webp)


