background image


www.navig8r.com.au/G35 

                                                                                 29

MAIN MAP SCREEN 

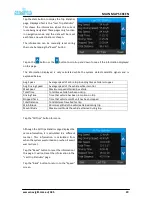
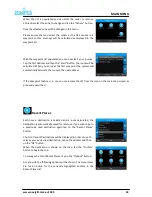
Tap the Stats button to display the Trip Statistics 

page.  Displayed  first  is  the  “Last  Trip  Statistics”. 

This  shows  the  information  about  the  current 

route being navigated. These pages only function 

in  navigation  mode  and  the  data  will  be  reset 

each time a new destination is chosen. 

The  information  can  be  manually  reset  during 

the route by tapping the “Reset” button. 


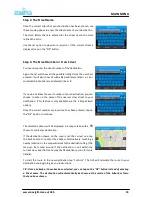
Tap on the 

 button or the 

 button to scroll up and down to see all the information displayed 

on this page. 

The  information  displayed  is  only  calculated  while  the  system  detects  satellite  signals  and  is 

explained below. 


Tap the “All Trips” button for more.  


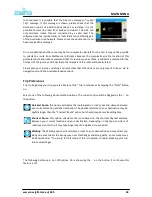
Although the All Trips Statistics page displays the 

same  information,  it  is  calculated  in  a  different 

manner.  This  information  is  calculated  from 

when the system was turned on or when it was it 

was last reset.  

Tap the “Reset” button to reset the information I 

this page. It will not reset the information in the 

“Last Trip Statistics” page.    

Tap  the  “Back”  button  to  return  to  the  “Speed” 

screen. 


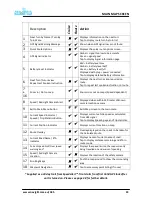
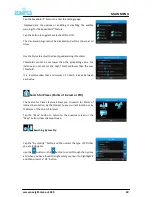
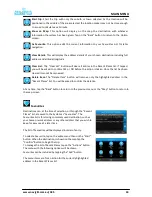
Avg. Speed 

Average speed of entire trip including time vehicle is stopped 

Avg. Driving Speed 

Average speed of the vehicle while in motion 

Max Speed 

Maximum speed attained by vehicle  

Total Time 

Total time vehicle has been on trip 

Driving Time 

Time that vehicle has been in motion on trip 

Stopped Time 

Time that vehicle or GPS unit has been stopped  

Total Distance 

Total distance travelled for trip 

Min Altitude 

Minimum altitude the vehicle attained during trip 

Max Altitude 

Maximum altitude the vehicle attained during trip. 

Summary of Contents for G35

Page 1: ...u 9 8 1 Time Icon 10 8 2 Volume Icon 10 8 3 Battery Icon 10 8 4 Navigation 10 8 5 GPS Receiver 10 9 Travel kit 11 9 1 MP3 Player 11 9 2 MP4 Player 12 9 3 Photo Viewer 13 9 4 E Book Viewer 14 9 5 Games...

Page 2: ...t Camera Location 31 18 17 Scrolling Maps 30 18 18 Waypoint Navigation 30 19 The main menu 33 19 1 The Navigate To Menu 32 19 1 1 Entering Your Destination by an Address 34 19 1 1 1 Entering Your Dest...

Page 3: ...www navig8r com au G35 3 TABLE OF CONTENTS 21 Adding your own Points Of Interest POI data to the G35 49 22 Frequently Asked Questions 51...

Page 4: ...www navig8r com au G35 4 HARDWARE Hardware...

Page 5: ...the software mapping data of this product When leaving your vehicle do not leave the G35 Navig8r on the dashboard of the car It should be removed and placed in a secure place along with the windscree...

Page 6: ...unt 4 Car Charger 12v DC 5 USB Data Cable 6 User Manual This Document 7 240V AC Charger Getting to Know Your G35 Navig8r Item Description Item Description 1 Power Button 2 Touch Screen Panel 3 Charge...

Page 7: ...ll take longer if the device is turned on Subsequent charging should take less time to complete Charging can be completed with the main switch of the GPS unit in the OFF position Once the initial char...

Page 8: ...break the seal N B Tinted windows may impede the G35 Navig8rs ability to detect the GPS satellites correctly Connecting the Car Charger Caution To protect the GPS against the possibility of damage cau...

Page 9: ...VIGATION Launches the Navig8r Navigation Software E GPS Receiver Launches the GPS status software F Travel Kit Launches the Extra features and System software Main Menu Explained Note Prior to launchi...

Page 10: ...nter the Navigation software Please refer to part 2 of the manual for detailed instructions E GPS Receiver 1 Tap the GPS Receiver Icon to display information about the number and strength of satellite...

Page 11: ...bout Enter to see Information about the hardware L Return Return to the Main System menu M Back Return back to the previous screen N Next Proceed to the next menu screen Tap the MP3 Player Icon to sta...

Page 12: ...ntly on the device This feature should not be used whilst in control of a vehicle To Begin Playback double tap on the file to be played Playback will begin automatically in full screen During playback...

Page 13: ...the first available image This feature should not be used whilst in control of a vehicle Double tap images in the file list to display the image It is recommended the image files are reduced to the r...

Page 14: ...file to be displayed To end viewing tap the return button to return to the previous screen Included in the Navig8r G35 GPS are 6 Games Tap on the above icon in the Main Menu to enter the Games Zone Th...

Page 15: ...ture the screen will automatically dim slightly when removed from a power supply Please adjust the settings accordingly Tap the back button to return to the previous screen Adjust the main volume of t...

Page 16: ...ion Daylight Saving time is automatically adjusted From time to time it may be necessary to recalibrate the touch screen on this device It is recommended that this should be completed prior to first u...

Page 17: ...e previous screen Connecting the G35 GPS to a Computer The Navig8r G35 GPS system requires no drivers or software to be installed when connecting to PC s running Windows 2000 or later Please use the U...

Page 18: ...es are from a digital camera try resizing the image Images only need to be 320 X 240 pixels This will save space on the card as well AVI files are not loading As above If the resolution of the video f...

Page 19: ...www navig8r com au G35 19 NAVIGATION NAVIGATION...

Page 20: ...in a position that provides a clear view of the road ahead but should also be placed so that the driver does not have to look away from the road to check the screen The first time the GPS unit is use...

Page 21: ...t up tap the Tick icon to uncheck the box and then make your selection If the Start Demo option has been selected please tap a Demonstration Route to be viewed The Demonstration routes are recorded ac...

Page 22: ...www navig8r com au G35 22 MAIN MAP SCREEN MAIN MAP SCREEN Getting to Know the Main Map Screen...

Page 23: ...Displayed when within 250 meter of known camera location camera 9 Exit to Main Menu Button Exits Map screen to the main menu 10 Current Speed Indicator Speedo Trip Statistics Button Displays current...

Page 24: ...displayed when in a route this menu gives several quick options for changing the criteria for the current route If active the icon will be shown with a A Toll Road When selected as shown will allow th...

Page 25: ...en if the trip has been paused Tap on the icon in the Quick Trip options to resume the trip or on the warning message 4 GPS Signal Indicator The GPS signal status icon is displayed in all modes The G3...

Page 26: ...more accurate the data from the GPS satellites is Tap on the Back or Map buttons to return to the main map screen 5 Battery Level Indicator This icon shows the current level of charge remaining in th...

Page 27: ...may vary or change and these changes may not have been included in your current map version Tap either icon to repeat the last spoken instructions by the G35 Distances given in spoken instructions ar...

Page 28: ...tions Please see The Main Menu Section in this manual 10 Current Speed Indicator Speedo Trip Statistics Button The current speed of the GPS unit is displayed in both cruise and navigation modes on the...

Page 29: ...atistics page displays the same information it is calculated in a different manner This information is calculated from when the system was turned on or when it was it was last reset Tap the Reset butt...

Page 30: ...equire the purchase of a registration code Shown on the map in both Cruise and Navigation mode this icon displays the current speed limit for the road currently being travelled along Warnings are give...

Page 31: ...Position indicator and draw the stylus towards the bottom of the screen The Map will be redrawn to show the area behind you current location You can use the Zoom in and Zoom out button 7 16 to see the...

Page 32: ...they will automatically be removed from this list The address displayed with a is the address used as the next waypoint the system is calculating the journey to this address Returns to the previous s...

Page 33: ...options Back Returns you to the Map screen End Trip Cancels your current Navigation Displayed in Navigation Mode only Exit Exits the Navig8r Navigation program and returns to the Main System Menu The...

Page 34: ...ard Tap on the 3 Step Wizard icon to begin entering you destinations address Step 1 The Town City or Suburb Using the stylus spell out the name of the city town or suburb of your destination After the...

Page 35: ...cross street to your destination This feature is only available via the 3 Step Wizard option Once the correct number or cross street has been entered tap on the Ok button to continue The selected addr...

Page 36: ...ion entered they will be displayed in list form To veiw the list tap the List button Use the button or the button to scroll through the options and when you have found the correct address tap it to hi...

Page 37: ...map around by placing the stylus on the screen and moving it across the screen If the stylus is dragged to the right of the screen the map of to the left will now be displayed You can repeat this at a...

Page 38: ...an aid to navigation around the Australian Road network Trip Preferences Prior to beginning your trip you are able to set the Trip preferences by tapping the Prefs button on Select one of the followin...

Page 39: ...ed This button overrides all other settings to disable enable the audiable alerts High Alert Toggles the Vocal alert for High Over Speed Warnings Low Alert Toggles the Vocal alert for Low Over Speed W...

Page 40: ...old lower than the Low Threshold It is recommended that a minimum of 3 Km h is kept between each value Search for Places Points of Inerest or POI The Search for Places feature allows you to search for...

Page 41: ...firm button to begin the trip to the location Searching By Nearest Tap the Nearest button and then select the type of POI that you are looking for Use the button or the button to scroll through the op...

Page 42: ...l through the options When you have found the correct Point of Interest that you are looking for select it and then tap the OK button Tap the Confirm button to begin the trip to the location Waypoints...

Page 43: ...the next address If the Waypoint feature is in use you can access the list from the icon on the main map screen as previously described Recent Places Each time a destination is selected and a route ca...

Page 44: ...an action for the currently highlighted address in the Recent Places list Start trip Start the trip with only the suburb or town selected As the location will be positioned in the middle of the area s...

Page 45: ...em has been given Tap on the Back button to return to the Option screen As Favourite This option adds the current information to your Favourites List for later navigation View Details This will displa...

Page 46: ...in daylight Thin Style Daylight Maps 2D These Maps should also be familiar to some users Also easy to read in daylight Thick Style Night Time Maps 2D In the same style as the Daylight maps the high co...

Page 47: ...lay an accurate representation of the approaching intersection This is very usefully if approaching complex intersections Standard The Standard view displays an icon that is indicative of the next tur...

Page 48: ...ed to check out settings made in the Look Feel before using it on the road Demonstration routes will run at 5 times the normal speed Select the demonstration file you wish to view and then tap the Sta...

Page 49: ...o return to the Options menu About The About screen shows Copyright information about the software and all data used in the G35 Navig8r GPS system Use the button or the button to scroll through the in...

Page 50: ...GPS to your computer as described in the section Connecting the GPS to the computer in the first part of the manual This can be completed by connecting the computer directly or by placing the SD card...

Page 51: ...ed receivers such as GPS navigation systems Each satellite transmits data about its location and height of orbit and the time that the signal was sent The Control Segment Is the ground based tracking...

Page 52: ...incorrect the visual representation of you location may not be displayed correctly Map data is compiled from several sources and may not be 100 up to date Councils and regulatory authorities may chang...

Page 53: ...by computers as Mass Storage devices simular to USB drives Macs running OSX 10 2 or later should be able to access the GPS and SD Card Slot by connecting with the supplied USB cable without the need...

Page 54: ...iving position without having to turn your head or take your eyes of the road while driving Q I find it hard to enter an address while driving what should I do A The driver of a vehicle should not att...

Page 55: ...own Q I am having issues syncing with the satellite A Ensure that you have clear access to the sky Turn the unit off and back on again If the unit has been turned off for a period of time it can take...

Reviews: