background image

7

EN

ENGLISH

CONNECTING TO A GAS SUPPLY


GAS CYLINDER REQUIREMENTS

The grill is set and tested with ULPG gas only. The regulator supplied for use with ULPG gas only. The factory-supplied regulator and hose 

must be used with a 9 kg (20 lbs) (Diameter: 318 mm, Height: 475 mm) LP gas tank.

 Contact your gas supplier for a special regulator 

for bulk gas that fuels other appliances.

CAUTION: It is important to inspect the full length of the gas line hose. If it is evident there is excessive abrasion 

or wear, or the hose is cut, the hose must be replaced prior to the appliance being used. Only use replacement 

regulators compliant with AS 4621 and hoses to AS/NZS 1869.

INSTALLING A GAS CYLINDER

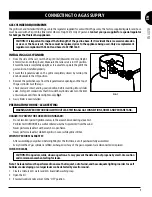
1.  From the side of the cart, rest the 9 kg (20 lbs) (Diameter: 318 mm, Height: 

475 mm) tank onto the ground. Make sure the tank valve is in OFF position. 

Ensure the tank is completely upright, as it is unsafe to operate the grill if the 

gas tank is not installed properly. 

2.  Ensure the regulator valve on the grill is completely closed by turning the 

knob clockwise to the OFF position.

3.  Remove the protective caps from the regulator valve opening and the top of 

the gas cylinder. Save the caps.

4.  Check seals are intact and in good condition before inserting into cylinder 

valve. For Type 21 connections that fit inside the cylinder valve turn the inlet 

anti-clockwise until firm. Hand-tighten only. 

Fig 1

.

5.  Gas cylinder is now installed.

PREPARATION FOR USE – LEAK TESTING:

WARNING: NEVER USE YOUR GRILL WITHOUT LEAK TESTING ALL GAS CONNECTIONS, HOSES AND PROPANE TANK.

DANGER: TO PREVENT FIRE OR EXPLOSION HAZARD:

•  Do not smoke or permit ignition sources in the area while conducting a leak test.
•  Perform test OUTDOORS in a well ventilated area that is protected from the wind.
•  Never perform a leak test with a match or open flame.
•  Never perform a leak test while the grill is in use or while grill is still hot.

WHEN TO PERFORM A LEAK TEST:

•  After assembling your grill and before lighting for the first time, even if purchased fully assembled.
•  Every time the LP gas cylinder is refilled, exchanged or if any of the gas components are disconnected or replaced.

CHECK FOR LEAKS

CAUTION: Strong odors, colds, sinus congestion, etc. may prevent the detection of propane by smell. Use caution 

and common sense when testing for leaks.

Note: The leak test must be performed in an area that is quiet, out of wind, and has adequate lighting in order to see if 

bubbles are developing or so larger leaks can be detected by smell or sound.

1.  Create a mixture 50% water and 50% liquid dish washing soap.
2.  Open the lid.
3.  Ensure all control knobs are set to the "OFF" position.

FIG. 1

Summary of Contents for Pit Boss PB1230G

Page 1: ...manual before installation and use of this electric pellet fuel burning appliance Failure to follow these instructions could result in property damage bodily injury or even death Contact local buildi...

Page 2: ...ion restrictions such as any grill being installed on a combustible surface inspection requirements or even ability to use in your area Do not replace the grill with an extra hotplate The warranty wil...

Page 3: ...rectsupervisionorinstructionbyapersonresponsible for their safety 8 Parts of the barbecue may be very hot and serious injury may occur Keep young children and pets away while in use 9 Do not enlarge i...

Page 4: ...sume no liability caused by the quality of fuel CREOSOTE Creosote orsoot isatar likesubstance Whenburning itproducesblacksmokewitharesiduewhichisalsoblackincolor Sootorcreosote isformedwhentheapplianc...

Page 5: ...a cold or flu is often detected too late Alcohol consumption and drug use increase the effects of carbon monoxide poisoning Carbonmonoxideisespeciallytoxictomotherandchildduringpregnancy infants thee...

Page 6: ...Procedure 17 First Use Operating Burners 17 Lighting 17 Shutting Off Your Grill 18 Controlling Flare Ups 18 Minimize Flare Ups 18 Care Maintenance 19 Tips Techniques 20 Troubleshooting 21 Electrical...

Page 7: ...inserting into cylinder valve For Type 21 connections that fit inside the cylinder valve turn the inlet anti clockwise until firm Hand tighten only Fig 1 5 Gas cylinder is now installed PREPARATIONFO...

Page 8: ...cooking gas appliance indoors is permissible only if the cylinder is disconnected and removed from the outdoor cooking gas appliance Cylinders must not be stored in a building or enclosure including...

Page 9: ...th or serious injury may occur 4 Place dust cap on cylinder valve outlet whenever the cylinder is not in use Only install the type of dust cap on the cylinder valve outlet that is provided with the cy...

Page 10: ...g the winter move your grill to an area that is out of the wind and direct cold Check local bylaws regarding the proximity of your grill in relation to your home and or other structures Put everything...

Page 11: ...greatly reduce the chances of a grease flare up Ensure that the flame broiler slider in the closed position covering the slotted openings Great range for cooking anything wrapped in bacon or where you...

Page 12: ...ired Cook Temperature Actual Cook Temperature and Meat Probe Temperatures if connected If only one Meat Probe is connected only one reading will be displayed 230 245 205 175 150 120 110 SMOKE 95 OFF H...

Page 13: ...le based on the P setting selected on the Digital Control Board The default setting is P4 HOPPER PRIMING PROCEDURE These instructions should be followed the first time the grill is ignited and each ti...

Page 14: ...d ash from the fire pot Avoid touching the igniter to avoid injury as it may be extremely hot 2 Once all cooking components are removed and cleaned press the Power Button to turn the unit on Check the...

Page 15: ...he Pellet and Gas unit SHUTTING OFF YOUR GRILL 1 When finished cooking with the main barrel lid remaining closed press the Power Button to turn the unit off and turn the Temperature Control Dial to OF...

Page 16: ...WEATHER COOKING As it becomes warmer outdoors the cooking time will decrease Follow these few suggestions on how to enjoy your grill throughout the hot months Adjust your cooking temperatures downwar...

Page 17: ...isgrillforthefirsttimebyoperatingthegrillforatleast15minutesonHIGHwith lid closed This will heat clean the internal parts and dissipate odors LIGHTING CAUTION Keepoutdoorgascookingapplianceareaclearan...

Page 18: ...se grease to splatter and could result in serious burns bodily harm or other damage 2 Do NOT leave grill unattended while preheating or burning off food residue on HIGH If grill has not been cleaned a...

Page 19: ...probe to short out causing false readings If a probe is damaged it should be replaced 3 INSIDE SURFACES It is recommended to clean your fire pot after every few uses This will ensure proper ignition...

Page 20: ...g to use it to serve with your meat be sure to bring it to a boil before serving Cooked foods should not be left out in the heat for more than an hour Do not leave hot foods out of refrigeration for m...

Page 21: ...ot Primed Before the unit is used for the first time or anytime the hopper is completely emptied out the auger must be primed to allow pellets to fill the auger tube If not primed the igniter will tim...

Page 22: ...y When Last Connected To Power Safety feature prevents an automatic restart Press the Power Button to turn the unit off wait two minutes then press the Power Button to turn the unit on again Turn Temp...

Page 23: ...valve The ignition wire is broken Contact Customer Service for assistance or a replacement part The battery has died Install a new battery New battery doesn t work Check the battery polarity The negat...

Page 24: ...services comply with a testing tolerance of 5 10 percent FUEL INPUT RATING 2 KG H 4 4 LB H INDEX W WHITE Y YELLOW P PURPLE R RED K BLACK G GREEN P P R Y Y Y P K K W G W W W R R W W W W Y Y K W IGNITE...

Page 25: ...Side Panel x2 29 A Cart Back Panel x1 30 A Cart Front Panel x1 31 A Cart Cross Girder M x1 32 A Cart Cross Girder L x1 33 A LP Gas Cylinder Support Bracket x1 34 A LP Gas Cylinder Wire Retainer x1 35...

Page 26: ...15 A 14 A 17 A 18 A 20 A 16 A 8 A 6 A 7 A 5 A 13 A 11 A 21 A 22 A 24 A 25 A 26 A 27 A 9 A 23 1 A 23 2 A 28 A 29 A 30 A 31 A 32 A 37 A 38 A 39 A GRILL REPLACEMENT PARTS 45 A 44 A 43 A 46 A 42 A 49 A 4...

Page 27: ...Drop Chute Cover HOPPER REPLACEMENT PARTS Part Description 10 PDH Auger Motor 11 PDH Nylon Bushing 12 PDH Auger Flighting Assembly 13 PDH Auger Box Housing 14 PDH Hopper Housing Gasket 15 PDH Igniter...

Page 28: ...ratures excessive humidity chlorine industrial fumes fertilizers lawn pesticides and salt are some of the substances that can affect metal coatings For these reasons the warranty does not cover rust o...

Page 29: ...d requires proof of purchase to establish a warranty claim therefore retain your original sales receipt or invoice for future reference The serial and model number of your Pit Boss grill can be found...

Page 30: ...reas Rectangular areas have been used in these figures the same principles apply to any other shaped area 20 This appliance shall only be used in an above ground open air situation with natural ventil...

Page 31: ...31 EN ENGLISH...
Page 32: ...al Corporation Pty Ltd 61 8 9248 9822 service genesiscorp com au WARNING Thisproductcanexposeyoutochemicalsincludingcarbonmonoxide whichisacombus tionby productknowntocausecancer birthdefectsorotherre...

Reviews: