IMPORTANT
The battery in this unit may not be fully
charged. After electricity is connected
to unit, let battery charge for at least 24
hours, then normal operation of this unit
should take effect. To check, press the
TEST button. The emergency lamps
should illuminate.
READ AND FOLLOW ALL
SAFETY INSTRUCTIONS
1. Do not use outdoors.
2. Equipment should be mounted securely
in locations and at heights where it will
not be readily subjected to tampering by
unauthorized personnel.
3. Do not mount near gas or electric
heaters.
4. Cap unused wires with enclosed wire
nuts or other approved method.
5. Do not use this equipment for
anything other than its intended use.
6. The use of accessory equipment not
recommended by the manufacturer will
void product listing and warranty and
may cause an unsafe condition.
7. Disconnect AC power before servicing
and installation.
8. Use caution when servicing batteries.
9. Any service on this equipment should be
performed by qualified personnel only.
10. Make sure wire terminations are secure
and leads are properly tucked in appro-
priate wire channels.
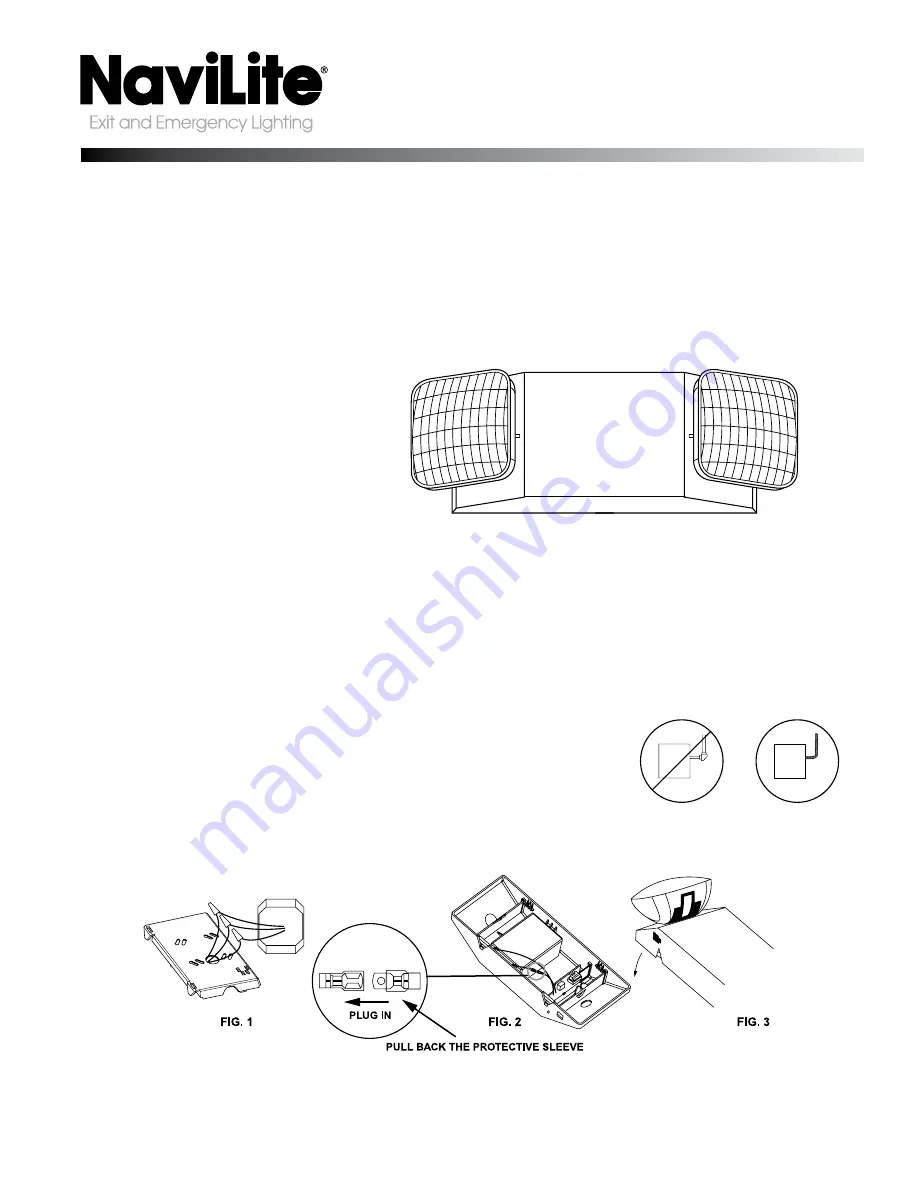
INSTALLATION (WALL MOUNTING)
1. Feed fixture leads through back plate and
connect to AC power supply
(Fig. 1).
2. Connect wires through J-Box. Mount back
plate on J-Box and secure with screws.
3. Connect battery.
4. Align snaps and push housing directly
onto main bottom case (Fig. 3). Apply
continuous AC power and press TEST
button to check operation.
INSTALLATION (FLEXIBLE CONDUIT)
1. Secure back plate to wall surface. Route
wires through hole in conduit flange,
secure conduit and connect to AC power
supply.
2. Connect battery.
3. Align snaps and push housing directly onto
back plate (Fig. 3). Apply continuous
AC power and press TEST
button to check operation.
FLEXIBLE CONDUIT ONLY
IMPORTANT SAFEGUARDS:
When using electrical equipment, always adhere to basic safety precautions including the following:
(Continued on back) pg 1 of 2
INSTALLATION INSTRUCTIONS
FOR EMERGENCY LIGHTING UNITS – N1 SERIES
SAVE THESE INSTRUCTIONS


