13
2. Press MEMORY button on remote, “P01” will flash on the display. Then
press the “NEXT/TUN.+“ or “BACK/TUN.-“ button on unit or press the
TUN./SKIP SEARCH FORWARD/BACKWARD key on remote control to
select the first desired station.
3. Press the M+ or M- key on remote to choose the desired sequence you
want to store, and then press MEMORY key on remote control again to
enter.
4. Search another station, repeat steps (2) & (3) until all desired stations
stored. Up to 30 stations can be programmed (10 for AM and 20 for FM).
5. Press the M+ or M- key on remote to listen to the stored station directly.
USING THE CASSETTE
Understanding the Buttons
RECORD
-
Press to record from the radio or CD/MP3/USB/AUX/BT player.
PLAY
-
Press to play cassettes.
REWIND
-
From stop mode, press to rewind the tape toward the beginning.
F.FWD
-
From stop mode, press to advance the tape toward the end.
STOP/EJ
. -
Press to stop current tape activity or to open the cassette
compartment door when no buttons are active.
PAUSE
-
Press to interrupt tape play or record mode. Press the second time to
resume tape play or tape record mode.
Playing a Cassette Tape
1. Press the STANDBY/FUNCTION button on unit or the FUNCTION key on
remote to TAP.
2. Press STOP/EJ. button to open the cassette compartment door.
3. Insert cassette tape into the player with the open edge facing up and the
full reel on the right.
4. Close the door securely.
5. Press REWIND or F.FWD to move tape to the desired starting point.
6. Press PLAY button to begin playing the tape.
7. Adjust the volume to your desired listening level.
Automatic Stop Feature
When the cassette deck is operating in play or record mode and the end of the
tape is reached, the unit automatically shuts itself off and returns all buttons to
the off position.
Types of Cassettes
Use only good quality cassettes (IEC TYPE 1) for making recordings. May be
used to replay other types of cassette but is unable to make proper recording
on these more specialized tapes.
The use of C120 cassettes is NOT recommended in this machine.
Summary of Contents for NPB-273
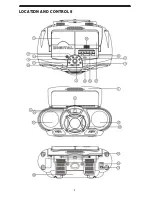
Page 9: ...9 LOCATION AND CONTROLS ...
Page 20: ......
Page 21: ......
Page 29: ...8 Descripción de Partes ...


