background image

Page 20 

Naxa Electronics

17.  Overloading: Do not overload wall outlets, extension cords, or inte-

gral convenience receptacles as this can result in a risk of fire or elec-
tric shock.

18.  Object and Liquid Entry: Never push objects of any kind into this prod-

uct through openings as they may touch dangerous voltage points or 
short-out parts that could result in a fire or electric shock. Never spill 
liquid of any kind on the product.

19.  Servicing: Do not attempt to service this product yourself as open-

ing or removing covers may expose you to dangerous voltage or other 
hazards. Refer all servicing to qualified service personnel.

20. Damage Requiring Service: Unplug this product from the wall outlet 

and refer servicing to qualified service personnel under the follow-
ing conditions: a) when the power-supply or plug is damaged; b) if 
liquid has been spilled or if objects have fallen into the product; c) if 
the product has been exposed to rain or water; d) if the product does 
not operate normally by following the operating instructions. Adjust 
only those controls that are covered by the operating instructions as 
improper adjustment of other controls may result in damage and will 
often require extensive work by a qualified technician to restore the 
product to its normal operation; e) if the product has been dropped or 
damaged in any way; f) when the product exhibits a distinct change in 
performance—this indicates a need for service.

21.  Replacement Parts: When replacement parts are required, be sure 

that  your  service  technician  has  used  replacement  parts  specified 
by the manufacturer or have the same characteristics as the original 
part. Unauthorized substitutions may result in fire, electric shock, or 
other hazards.

22. Safety Check: Upon completion of any service or repairs to this 

product,ask the service technician to perform safety checks to ensure 
that the product is in proper operating condition.

23. Wall or Ceiling Mounting: The product should be mounted to a wall or 

ceiling only as recommended by the manufacturer.

24. Heat: The product should be situated away from heat sources such as 

radiators,heat registers, stoves, or other products (including ampli-
fiers) that produce heat.

FCC NOTICE

This device complies with Part 15 of the FCC Rules. Operation is subject 
to the following two conditions: (1) this device may not cause harmful 
interference, and (2) this device must accept any interference received, 
including interference that may cause undesired operation.
Note: This equipment has been tested and found to comply with the lim-
its for a Class B digital device, pursuant to Part 15 of the FCC Rules. These 
limits are designed to provide reasonable protection against harmful in-
terference in a residential installation. This equipment generates, uses 
and can radiate radio frequency energy and, if not installed and used in 
accordance with the instructions, may cause harmful interference to ra-
dio communications. However, there is no guarantee that interference 
will not occur in a particular installation. If this equipment does cause 
harmful interference to radio or television reception, which can be de-
termined by turning the equipment off and on, the user is encouraged to 
try to correct the interference by one or more of the following measures:
•  Reorient or relocate the receiving antenna.
•  Increase the separation between the equipment and receiver.
•  Connect the equipment into an outlet on a circuit different from that 

to which the receiver is connected.

•  Consult the dealer or an experienced radio/TV technician for help.

Summary of Contents for NS-439

Page 1: ...Digital CD Microsystem with Bluetooth NS 439 Instruction Manual Please read carefully before use and keep for future reference...

Page 2: ...0 CD Mode 11 Basic Operation 11 CD Functions 11 Program Operation 12 Radio Mode 12 Basic Operation 12 Preset Stations 13 Bluetooth Mode 13 Basic Operation 13 AUX Mode 14 Basic Operation 14 Setup Mode...

Page 3: ...material at our website Come visit us on the web at www naxa com and see all that we have to offer In the Box Please take a moment to make sure that you have ev erything in the list below Although we...

Page 4: ...TION button CD Radio BT AUX 3 STANDBY button 4 Standby Bluetooth LED 5 REPEAT M UP button 6 RANDOM M DN button 7 FM ST button 8 BAND 9 LCD display lens 10 SKIP SEARCH 11 SKIP SEARCH 12 VOL 13 VOL 14 O...

Page 5: ...www naxa com Page 5 Bottom View 18 AC IN jack 19 Speaker jacks 20 FM antenna 21 Wall mounting slots Digital Display...

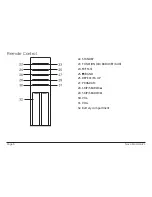
Page 6: ...Page 6 Naxa Electronics Remote Control 22 STANDBY 23 FUNCTION CD RADIO BT AUX 24 FM ST 25 BAND 26 REPEAT M UP 27 PROGRAM 28 SKIP SEARCH 29 SKIP SEARCH 30 VOL 31 VOL 32 Battery compartment...

Page 7: ...perate the remote within 15 feet of the sensor and at an angle of 60 degrees Batteries in the remote will last for approximately 6 months under normal use Replace the batteries if the remote control d...

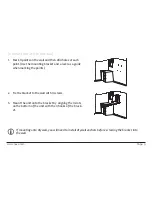
Page 8: ...ing bracket on the stand while making sure that the screw hole positions are aligned with each other refer to the drawing below 2 Use two of the included screws to fix the bracket to the stand Mount t...

Page 9: ...bracket and a level as a guide when marking the points 2 Fix the bracket to the wall with 4 screws 3 Mount the unit onto the bracket by aligning the 4 slots on the bottom of the unit with the 4 hooks...

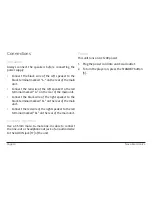
Page 10: ...ain unit Connect the black wire of the right speaker to the black terminal marked R on the rear ofthe main unit Connect the red wire of the right speaker to the red terminal marked R on the rear of th...

Page 11: ...ST again to resume playback Press BAND during playback to stop the disc Scan through the current track Press and hold SKIP SEARCH to scan through the current track in reverse Press and hold SKIP SEAR...

Page 12: ...Program play will display the programmed track number Press BAND twice to clear the program list The pro gram list will also be cleared if you open the CD door or if the unit is unplugged Radio Mode L...

Page 13: ...adio stations press REPEAT M UP or RANDOM M DN Bluetooth Mode Basic Operation This unit can stream audio wirelessly from devices that can transmit stereo audio with Bluetooth technology 1 Press FUNCTI...

Page 14: ...ring again The unit can display and adjust the clock while in Bluetooth mode Refer to the section SETUP MODE for instructions AUX Mode Auxiliary Aux mode allows you to play and audio de vice e g MP3 c...

Page 15: ...art to flash 12 H or 24 H 3 Press SKIP SEARCH or SKIP SEARCH to change between the two display modes then press PROGRAM to confirm The hour digit will flash 4 Press SKIP SEARCH or SKIP SEARCH to adjus...

Page 16: ...tatic sprays benzene or thinners to clean your CDs To reduce the risk of scratches always put CDs back in their case after use Do not subject CDs to prolonged exposure to direct sunlight high humidity...

Page 17: ...ade of the plug to the wide slot of the outlet and insert fully On Protection Against Laser Energy Exposure As the laser beam used in this product is harmful to the eyes do not attempt to disassemble...

Page 18: ...tructions should be read before the product is operated 2 Retain Instructions The safety and operating instruction should be retained for future reference 3 Heed Warnings All warnings on the product a...

Page 19: ...be equipped with an attachment plug with overload protection This is a safety feature See the operating instructions for replacement or directions to reset the protective device If replacement of the...

Page 20: ...may result in fire electric shock or other hazards 22 Safety Check Upon completion of any service or repairs to this product ask the service technician to perform safety checks to ensure that the prod...

Page 21: ...lutions Please refer to this guide before requesting service If you need further assistance please contact Naxa Technical Support www naxa com naxa_support Symptom Possible Solution The sound is disto...

Page 22: ...REPEAT mode is off press RE PEAT to cancel The Function mode is not working Ensure that the CD Compartment lid is closed Try resetting the unit Switch the unit off and unplug it from power Wait three...

Page 23: ...uctions in this manual Please also visit us on the web at www naxa com to get up to the minute news alerts and documentation for your device For additional assistance please contact Naxa Technical Sup...

Page 24: ......

Reviews: