background image

www.naxa.com  

Page 7

8
9

10

11

12

13

14

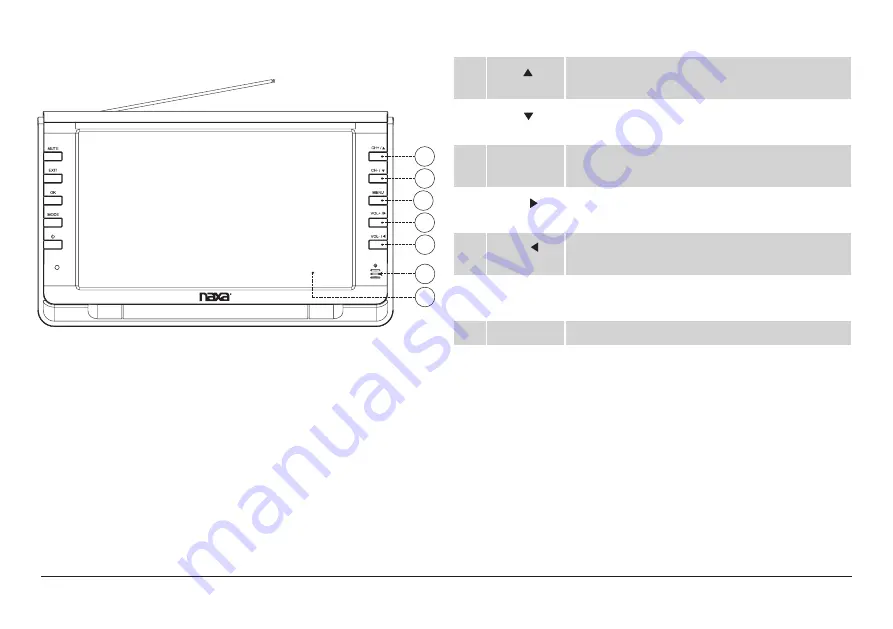
8

CH+/

Channel up/browse up when navigating a 
menu

9

CH-/

Channel down/browse down when navigat-
ing a menu

10

MENU

Access the system menu to adjust the TV’s 
options.

11

VOL+/

Volume up/browse right when navigating a 
menu

12

VOL–/

Volume down/browse left when navigating 
a menu

13

Remote 
sensor

Detects IR signals from the included remote 
control.

14

TV display Color TFT LCD screen

Summary of Contents for NT- 90A

Page 1: ...90A 9 Portable TV Digital Multimedia Player NT Instruction Manual Please read carefully before use and keep for future reference...

Page 2: ...upply 10 Connect the Antenna 11 Connect an External A V player 11 Setting the Input Source 12 Adjusting the Volume 12 Using the Number Keypad 12 TV Menu Operation 12 Channel 13 Picture 13 Sound 13 Tim...

Page 3: ...the web at www naxa com and see all that we have to offer In the Box Please take a moment to make sure that you have ev erything in the list below Although we make every ef fort to ensure that each Na...

Page 4: ...ed with liquids such as vases shall be placed on the apparatus No naked flame sources such as lighted candles should be placed on the apparatus Batteries battery pack or batteries installed shall not...

Page 5: ...vice There may be spe cific laws in your area to prevent distracted driving For your safety and the safety of others do not turn the TV on or watch TV programs while driving Notice The panel used in t...

Page 6: ...urce mode Press to view the Mode menu press CH CH to browse the list of modes then press OK to select and change the mode 6 Power Standby Press to turn the TV on or to place it in standby mode Make su...

Page 7: ...browse down when navigat ing a menu 10 MENU Access the system menu to adjust the TV s options 11 VOL Volume up browse right when navigating a menu 12 VOL Volume down browse left when navigating a men...

Page 8: ...TV is placed in Standby mode 17 AV IN jack Watch video files from an external media player through the AV IN jack with the supplied A V cable and setting source mode to AV IN 18 AV OUT 19 Head phone j...

Page 9: ...ely VOL VOL Increase decrease the volume level respectively MENU View the system menu EXIT Exit the system menu AUDIO Change the default audio language CC Change the closed caption display modes EPG I...

Page 10: ...enu then press VOL or VOL to adjust the volume To return to the system menu press OK Basic Operation Connect the Power Supply Use the supplied power adapter to connect the DC In put jack 20 on the TV...

Page 11: ...enna extension adapter Connect an External A V player A V cable antenna for improved reception The TV can accept composite video and audio signals from external players e g DVD player Using the suppli...

Page 12: ...hen prompted on a menu or option screen To tune to channel 15 1 for instance 1 Press the 1 key then press the 5 key 2 Press the key 3 To go to track 15 for instance 1 Press the 1 key then press the 5...

Page 13: ...nellist thenpress to mark unmark a channel as aFavorite 4 S a t with the numeric keypad 6 DTV Signal Displays the signal quality of the cur rent channel how Hide Choose whether a channel will be selec...

Page 14: ...This option is not adjustable The TV must be connected to an antenna or cable system for Auto Sync to work 6 Time Zone Set the time zone adjustment to match your location Option 1 OSD Language Set the...

Page 15: ...ble or disable the ability to watch un rated programs Lock Use the remote controlto enterthe default password 0000 to access the Lock options 1 2 Set Password Set a new password WHen you change the pa...

Page 16: ...Frequency 87 00 Name CH01 Sele ct Red Button on Remote t erform can Select G reen Butto n R emote toTurn ON OFF TV backlight Pree O K button on remote t elec he Station you want to listen to Use the...

Page 17: ...or future reference 3 Heed Warnings All warnings on the product and in the operating in structions should be adhered to 4 Follow Instructions All operating and usage instructions should be followed 5...

Page 18: ...e receptacles and at the point which they exit from the product 13 Protective Attachment Plug The product may be equipped with an attachment plug with overload protection This is a safety feature See...

Page 19: ...replacement parts specified by the manufacturer or have the same characteristics as the original part Unauthorized substitutions may result in fire electric shock or other hazards 22 Safety Check Upon...

Page 20: ...equipment into an outlet on a circuit different from that to which the receiver is connected Consult the dealer or an experienced radio TV technician for help CAUTION ON MODIFICATIONS Any changes or...

Page 21: ...XATechnical Support 2320 East 49th St Vernon CA 90058 http www naxa com naxa_support 866 411 6292 MADEINCHINA Screen type 9 TFT LCD Screen resolution 800 x 480 Removable Memory Support Memory CARD USB...
Reviews: