background image


Chromebook CX100/CX110 


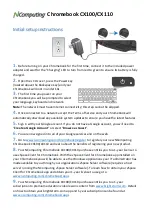
Initial setup instructions 


1.


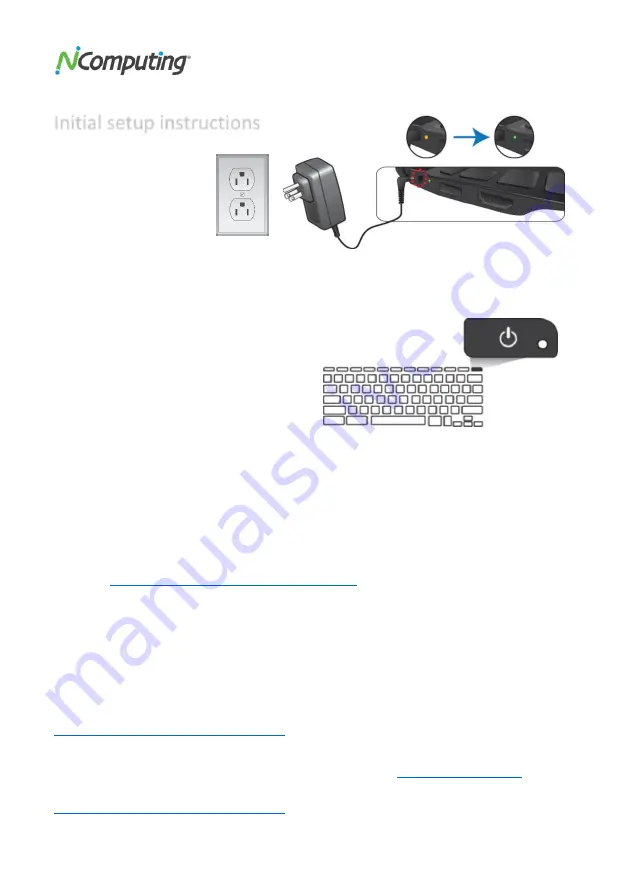
Before turning on your Chromebook for the first time, connect it to the included power 

adapter and wait for the “Charging” LED to turn from red to green to ensure its battery is fully 
charged.  

2.


Open the LCD cover, press the Power key 

(located above the Backspace key) and your 
Chromebook will boot in under 10s.


3.


The first time you power on your 

Chromebook you will be prompted to select 
your language, keyboard and network. 

Note: The network must have Internet connectivity; this step cannot be skipped. 

4.


Once connected to a network accept the Terms of Service and your Chromebook will 

automatically download any available system updates to ensure you have the latest features. 

5.


Sign in with your Google account. If you do not have a Google account, you will need to 

Create a Google Account” or select “Browse as Guest”.  

6.


You are now signed in to all of your Google services and on the web.  

7.


Go to 

www.ncomputing.com/chromebook/register

 to register your new NComputing 

Chromebook CX100/CX110 and learn about the benefits of registering your new product. 

8.


Your NComputing Chromebook CX100/CX110 purchase entitles you to a 1-year license to 

use vSpace Client for Chromebook. With the vSpace Client for Chromebook app installed on 
your Chromebook you will be able to use the Windows applications your IT administrator has 
made available to you through your organizations vSpace Server software (requires a host 
server running the NComputing vSpace Server software). To learn how to obtain your vSpace 
Client for Chromebook app and obtain your 1-year license to use go to 

www.ncomputing.com/chromebook/apps


9.


Your NComputing Chromebook CX100/CX110 purchase entitles you to a 1-year 

subscription to premium education video lesson content fro

www.brightstorm.com

. Details 

on how to obtain your brightstorm.com app and 1-year subscription can be found at 

www.ncomputing.com/chromebook/apps


Summary of Contents for Chromebook CX100

Page 1: ...Chromebook CX100 CX110 NComputing Chromebook CX100 CX110 Quick Start Guide Warranty...

Page 2: ...Chromebook CX100 CX110 Contents Quick Start Guide Warranty Chromebook Power adapter This document...

Page 3: ...6 You are now signed in to all of your Google services and on the web 7 Go to www ncomputing com chromebook register to register your new NComputing Chromebook CX100 CX110 and learn about the benefits...

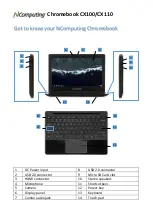
Page 4: ...SB 2 0 connector 9 Micro SD Card slot 3 HDMI connector 10 Stereo speakers 4 Microphone 11 Shortcut keys 5 Camera 12 Power key 6 Display panel 13 Keyboard 7 Combo audio jack 14 Touch pad Get to know yo...

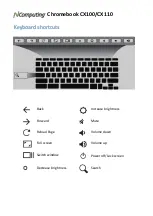
Page 5: ...Chromebook CX100 CX110 Back Increase brightness Forward Mute Reload Page Volume down Full screen Volume up Switch window Power off Lock screen Decrease brightness Search Keyboard shortcuts...

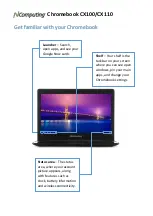
Page 6: ...Google Now cards Shelf Your shelf is the task bar on your screen where you can see open windows pin your main apps and change your Chromebook settings Status area The status area where your account p...

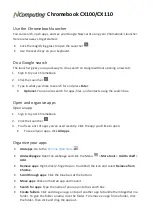
Page 7: ...an app 1 Sign in to your Chromebook 2 Click the Launcher 3 You ll see a list of apps you ve used recently Click the app you d like to open To see all your apps click All Apps Organize your apps Add ap...

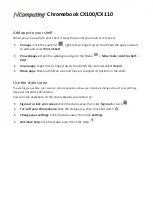
Page 8: ...and select Unpin Move apps Click and hold an icon and move it to adjust its position in the shelf Use the status area The status area where your account picture appears allows you to quickly change so...

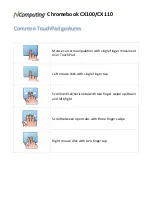
Page 9: ...gle finger movement over TouchPad Left mouse click with single finger tap Scroll vertical horizontal with two finger swipe up down and left right Scroll between open tabs with three finger swipe Right...

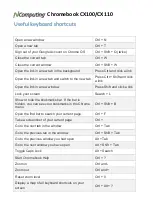
Page 10: ...your screen Search L Show or hide the bookmarks bar If the bar is hidden you can see your bookmarks in the Chrome menu Ctrl Shift B Open the find bar to search your current page Ctrl F Take a screens...

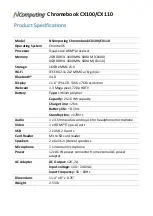
Page 11: ...HDTV Battery Type Lithium polymer Capacity 25 16 Wh capacity Charge time 2hrs Battery life 8 5hrs Standby time 170hrs Audio 1 x 3 5mm audio combo jack for headphone microphone Video 1 x HDMI Type A po...

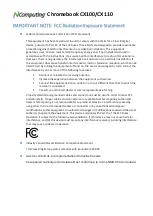
Page 12: ...ipment and receiver Connect the equipment into an outlet on a circuit different from that to which the receiver is connected Consult an authorized dealer or service representative for help Properly sh...

Page 13: ...o be free from defects in material and workmanship for a period of one 1 year after the date of purchase as shown on your sales or delivery receipt Your dated sales or delivery receipt showing the dat...

Page 14: ...haser you have thirty 30 days in which to review the contents of the Product s packaging for any missing or broken items After the first thirty 30 days of ownership beginning from the date of original...

Page 15: ...not warranted by NComputing However non NComputing manufacturers or suppliers may provide their own warranties directly to you To Obtain Service from an Authorized Reseller Before the warranty expires...

Page 16: ...d by a customer All parts and systems are inspected and tested for quality If NComputing determines that the problem is not covered under this warranty NComputing will notify you and inform you of ser...

Reviews: