background image

www.ncomputing.com 

Important Notices 


Please  note  that  reproduction  of  this  User  Guide  in  whole  or  in  part,  without  express 
written permission from NComputing, is not permitted. 

NComputing  reserves  the  right  to  make  improvements  and/or  changes  to  this  User 
Guide and to the products, programs and/or specifications described herein at anytime 
without  notice.    Information  contained  in  this  document  may  have  been  obtained  from 
internal  testing  or  from  a  third  party.  NComputing  shall  not  be  liable  for  any  direct, 
indirect, special, incidental or consequential damages in connection with the use of this 
material. The latest version of this User Guide can be downloaded from the “Download 
center” in the support section of the NComputing website at:  

www.ncomputing.com


Refer  to  the  Limited  Hardware  Warranty  applicable  to  your  region  for  information  on 
what  is  and  what  is  not  covered  by  the  warranty,  your  responsibilities,  exclusions,  and 
how to obtain service.  It is your responsibility to download a copy of the warranty at the 
time of purchase to keep for your records.  The  warranty can be downloaded from the 
“Download center” in the support section of the NComputing website.   

Please refer to the End User License Agreement (EULA) and Terms of Use (TOU) that 
are presented for your review during the software installation process.  The information 
contained  in  these  documents  is  very  important.    The  EULA  and  TOU  constitute 
agreements  between  you  and  NComputing  and  are  accepted  by  you  by  installing  and 
using the product.  It is your responsibility to print a copy of the EULA and TOU directly 
from the installer in order to keep for your records.  

This  product  gives  users  shared  access  to  computer  resources.    It  is  not  a  computer, 
and  may  not  support  all  software  applications,  especially  high-resolution  graphics 
applications or 3D games that are designed to be supported by stand-alone computers.  
Similarly, it may not support all hardware peripherals that are designed to be supported 
by stand-alone computers. 

Refer  to  your  computer  operating  system  and  application  software  vendors’  license 
agreements  for  information  on  using  these  products  in  a  shared  access  environment.  
Additional software licenses may be required. 

The  NComputing  hardware  and  software  products  described  in  this  user  manual  are 
protected by numerous granted and pending U.S. and international patents. 


© 2008


by NComputing Inc. All rights reserved. NComputing is a registered Trademark 

of  NComputing  Inc.  –  USA.    Microsoft  and  Windows  are  registered  trademarks  of 
Microsoft Corporation. All trademarks are the property of their respective owners. 

Summary of Contents for X550

Page 1: ...19 08 X550 X550 X550 X550 Desktop Virtualization Kit Desktop Virtualization Kit Desktop Virtualization Kit Desktop Virtualization Kit with vSpace with vSpace with vSpace with vSpace User Guide User Gu...

Page 2: ...License Agreement EULA and Terms of Use TOU that are presented for your review during the software installation process The information contained in these documents is very important The EULA and TOU...

Page 3: ...Install the Hardware 9 Install the X550 PCI Card 9 Connect Peripheral Devices 11 Install the NComputing vSpace Software 12 Product Registration 18 Online Registration 20 Offline Registration 21 Unins...

Page 4: ...dity Avoid any severe impacts to the product Make sure that the product is not exposed to direct sunlight or any hot machinery Please keep the product away from any items which have strong magnetic pr...

Page 5: ...ipment off and on the user is encouraged to try and correct the interference by one or the following measures Reorient or relocate the receiving antenna Increase the separation between the equipment a...

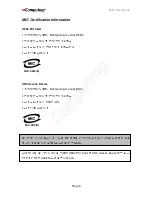
Page 6: ...Guide Page 6 MIC Certification Information X550 PCI Card 1 NComputing X series X550 2 3 4 NCC X550 B XD2 Access Device 1 NComputing X series XD2 2 3 4 NCC XD2 B B X550 PCI Card XD2 Access Device FTP...

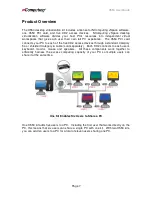
Page 7: ...XD2 access devices through a standard Category 5e or shielded Category 6 cable sold separately Each XD2 connects to each user s keyboard monitor mouse and speakers All these components work together t...

Page 8: ...tor supporting 800x600 1024x768 1280x1024 or 1440x900 resolution Optional speakers or headphones Optional USB devices and USB cables connect directly to host PC and can be assigned to each station via...

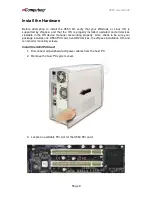
Page 9: ...ted and all devices viewable in the OS device manager are working properly Also check to be sure your package includes one X550 PCI card five XD2 devices the vSpace installation CD and ten monitor mou...

Page 10: ...pecific to your PC Note The X550 is a full height PCI card Optional installation of a second X550 card If the system has a second available PCI slot and you wish to use a second X550 kit insert the se...

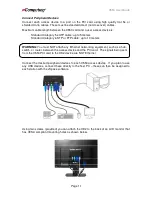
Page 11: ...10 meters WARNING You must NOT attach any Ethernet networking equipment such as a hub switch or router between the access device and the PCI card The signals being sent from the X550 PCI card to the X...

Page 12: ...ler does not automatically launch go to My Computer open the CD drive icon and manually start the Install exe application At the installation screen click on the Install vSpace for X series button Bef...

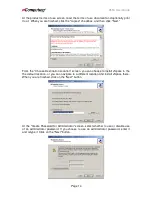
Page 13: ...Next button Read the antivirus and firewall warning screen follow the applicable instructions and click on the Next button At the software license screen read the vSpace software end user license agre...

Page 14: ...nation Location screen you can choose to install vSpace in the the default location or you can navigate to a different location and install vSpace there When you are finished click on the Next button...

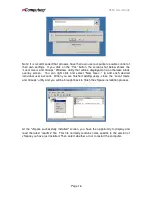
Page 15: ...be displayed If this is the first time vSpace has been installed on this system the Create sys info file will appear on the screen Unless it is requested by support we recommend you leave the box unc...

Page 16: ...een You can right click and select New User to add each desired individual user account When you are finished adding users close the Local Users and Groups utility and you will be brought back to fini...

Page 17: ...X550 User Guide Page 17 Note You must reboot the computer before you can use the vSpace software or the access devices connected to the host PC...

Page 18: ...the card s trial license to expire will not prevent you from registering the card You can always launch the vSpace Registration application from the PC s main screen via Start All Programs vSpace vSpa...

Page 19: ...Collecting information about your system screen enter the name of the person that will be maintaining the vSpace software on this system You must also enter the person s company select a location coun...

Page 20: ...stration skip ahead to that section Online Registration When you select to register online the screen presented allows you to select what serial number s to register The window provides a list of X550...

Page 21: ...led to registration ncomputing com Once a matching registration file has been emailed back you will restart the vSpace Registration program and point the application to the location where you have sto...

Page 22: ...chosen for registration Confirm that the information is correct and click on the Next button to complete the process In the next screen you select where to store the file that must be emailed to NCom...

Page 23: ...ion information reached NComputing If the registration system determines that the file is valid and that the X550 is entitled to be activated you will receive an email within the next 2 or 3 minutes w...

Page 24: ...day time limit from the PCI card s Click on the Finish button to complete the offline registration process Uninstallation and Reinstallation To uninstall the vSpace software select Uninstall vSpace f...

Page 25: ...ned up for extended maintenance Note If the Enter Password window appears enter the administrator password Click the Options button to select whether to you want the update done right now or if you wo...

Page 26: ...options button to select save update program to disk the update will be saved to disk for you to apply later 2 if you didn t use the options button to modify the standard behavior installation of the...

Page 27: ...stem tray Other vSpace options available from a right click on the system tray icon are Station Information tells you about the station where logged in Send Message to other vSpace users on this syste...

Page 28: ...reboot screen Select No and the selected Disable Enable action will take place after the next normal reboot time WARNING SELECTING Yes WILL IMMEDIATELY REBOOT THE SYSTEM WITHOUT WARNING OTHER USERS T...

Page 29: ...ing on Local Settings and selecting Export List lets you export a list tab or comma delimited text file that can be used to keep a record of which users if any are logged in to each station at a point...

Page 30: ...lar PCI Card NOTE All stations attached to the same X550 PCI card will use the same resolution and color depth Right clicking on the Properties option brings up a new window that allows setting the co...

Page 31: ...to stop You can also choose to send a message to the screen of the user session currently running on that station From this window you can only send messages to stations attached to this PC unlike th...

Page 32: ...currently logged in Default user the default username for the terminal session If one is not configured it shows the last user that logged in Status the session status Logon program the filename that...

Page 33: ...X550 User Guide Page 33 The Station Settings tab shows parameters that can be set for each station The parameters configurable from this window are Station name The provisioned name of the station...

Page 34: ...n be idle before the X550 puts the monitor into a sleep state Moving the mouse or hitting a key on the keyboard attached to the corresponding access device will wake the monitor back up Selecting the...

Page 35: ...stalled terminal services software such as product name build date version string and vendor information You cannot modify these values The User information item shows the information entered during t...

Page 36: ...st PC boots You can set this either on or off Allow Shutdown Reboot from stations whether or not the stations are given the option to shutdown or reboot the host PC You can set this either on or off X...

Page 37: ...et to start without the Windows logon screen and what username and password to use to bypass it You can enable or disable autologon and define the username and password The Serial Numbers item shows a...

Page 38: ...the tree to select a connected USB device After selecting a device the following information will be displayed in the right hand window The device s name The device s description A check box for Allow...

Page 39: ...X550 User Guide Page 39...

Page 40: ...pply button changes to the USB Device assignments are saved To discard changes simply navigate to another tree item or close the console without clicking on the Apply button but you will be reminded t...

Page 41: ...he access device when the station is not yet logged in or has logged off I can t connect to the host PC Make sure the access device s cable is connected to the host PC the host PC is running and the X...

Page 42: ...node or a host end point node Host PC a computer in which the vSpace software has been installed Internet a worldwide system of computer networks in which users at any one computer can if they have p...

Reviews: