background image

2.


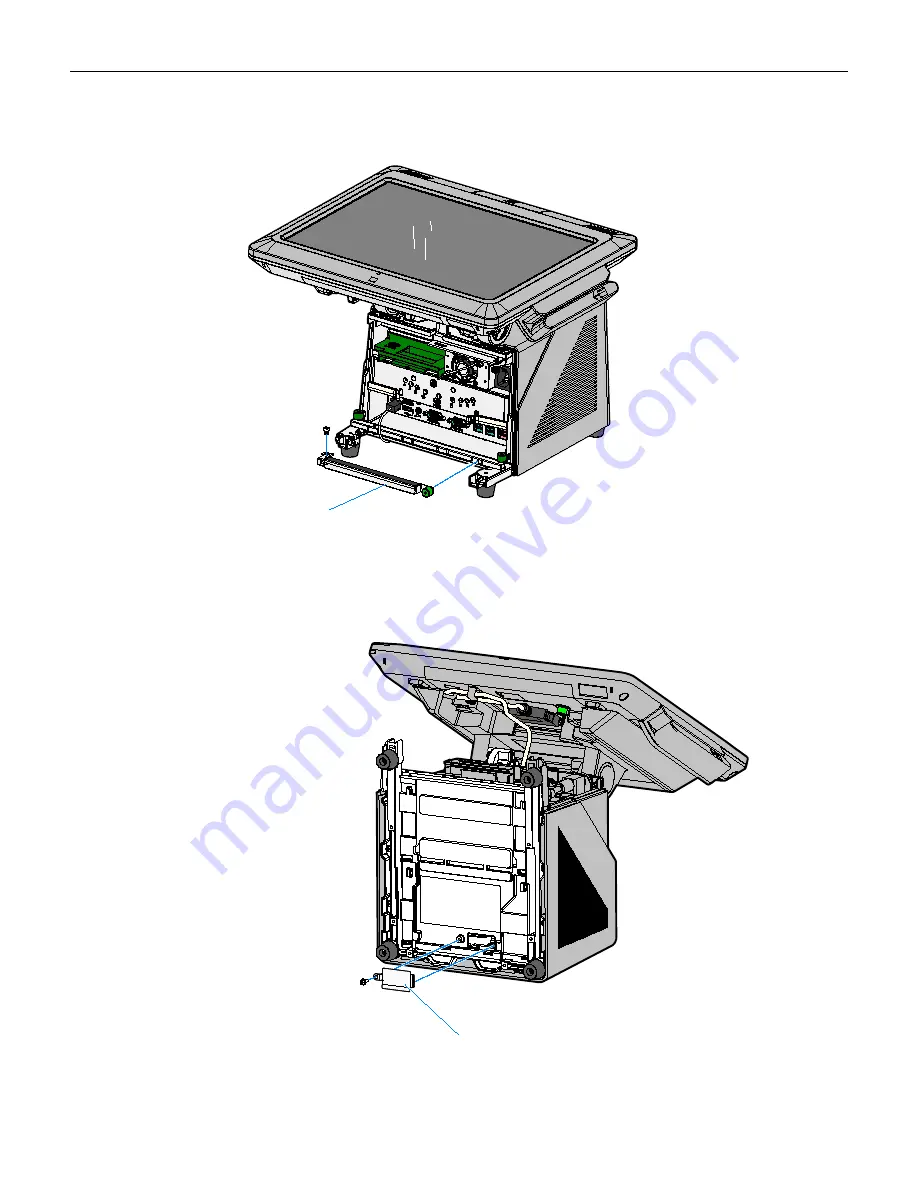
Remove the Cable Clamp. This clamp is not used when the DVD is present. 
Loosen the thumbscrew and remove the screw on the opposite end of the clamp. 

26461

Cable Clamp


3.


Carefully position the terminal on its back. 

4.


Remove the No DVD Cover (1 screw). 

26463

No DVD Cover


Summary of Contents for 7403-K171

Page 1: ...7403 K171 Integrated CD DVD ROM Kit Instructions Issue A...

Page 2: ......

Page 3: ...Revision Record Issue Date Remarks A Nov 2008 First issue...

Page 4: ......

Page 5: ...1 Introduction This kit adds an Integrated CD DVD ROM Drive to the 7403...

Page 6: ...se for a few seconds Avoid any contact with internal parts and handle cards only by their external edges 1 Disconnect power to the terminal Caution Disconnect the AC power cord before disassembling th...

Page 7: ...3 c Pivot the top of the Front Base Cover toward the front of the unit and remove it from the terminal 26032 d Disconnect the Power Cord from the Power Supply 26135 AC Power Cord...

Page 8: ...lamp is not used when the DVD is present Loosen the thumbscrew and remove the screw on the opposite end of the clamp 26461 Cable Clamp 3 Carefully position the terminal on its back 4 Remove the No DVD...

Page 9: ...D Drive 6 Secure the cables to the CD DVD Bracket using a tie wrap 7 Fold the cables as shown below Route the Power Cable as shown to keep it out from under the sheet metal when installing the drive 2...

Page 10: ...SATA Cables to the 7403 Backplane Board 26465 CD DVD Power Cable SATA Cable 9 Install the CD DVD Assembly a Align the tabs 4 on the edge of the DVD Bracket above the slots in the 7403 Base b Slide the...

Page 11: ...Thumbscrew 26147a DVD Bracket Thumbscrew Pivoting Extensions Cable Tie Wrap Anchor Points 11 Route the external cables in the channel s and pivot the extensions to keep the cables secure Secure the ca...

Reviews: