10
Datalogic DSM0422 Scanner (R1.0 and R1.1)
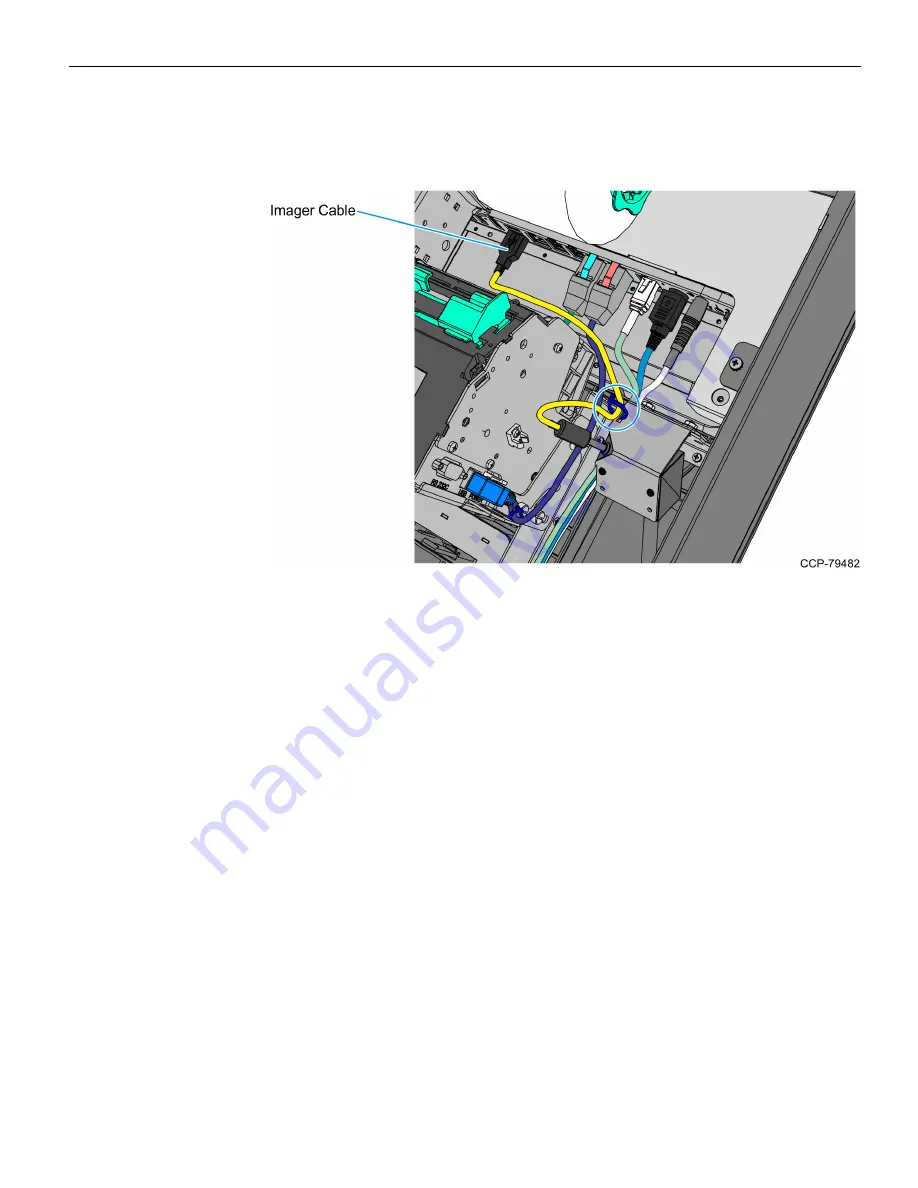
c. Connect the Imaging Scanner cable to the
USB B
port of the motherboard and
use a cable tie to secure the cable to the cable management slot shown in thefollowing image.
Page 1: ...Kit Instructions Datalogic DSM0422 Scanner R1 0 and R1 1 7709 K535 Issue A...
Page 2: ...notice must be included It is the policy of NCR Corporation NCR to improve products as new technology components software and firmware become available NCR therefore reserves the right to change speci...
Page 3: ...iii Revision Record Issue Date Remarks A Jul 2020 First Issue...
Page 4: ...iv...
Page 5: ...Datalogic DSM0422 Scanner R1 0 and R1 1 This publication provides procedures for upgrading the NCR SelfServ 90 7709 Kiosk R1 0 and R1 1 Imaging Scanner from Honeywell N5680 to Datalogic DSM0422...
Page 6: ...ket Imager 7709 009 0007087 Serrated Nut M4 Self Locking 2 pcs 006 8622599 Screw M2x4mm Phil Pan Blk Oxide Nylock 2 pcs 006 8612124 M2 Lock Washer 2 pcs 006 8615143 Cable Tie 142 mm x 3 6 mm 006 10706...
Page 7: ...Shutdown and power off the terminal Disconnect the Kiosk AC Power Cable from the outlet 2 To open the kiosk insert the key into the lock at the back of the kiosk turn the key clockwise and carefully o...
Page 8: ...680 Imaging Scanner assembly from the kiosk a Disconnect the Imaging Scanner Cable from the motherboard and cut off the cable ties along its route b Remove the two nuts that secure the Imaging Scanner...
Page 9: ...assembly a Mount the Imaging Scanner onto the Imager bracket and secure with washers and screws Note For NCR 7709 R1 0 units use the bottom mounting holes of the Imager bracket b Mount the Imaging Sc...
Page 10: ...logic DSM0422 Scanner R1 0 and R1 1 c Connect the Imaging Scanner cable to the USB B port of the motherboard and use a cable tie to secure the cable to the cable management slot shown in the following...
Page 11: ...Shutdown and power off the terminal Disconnect the Kiosk AC Power Cable from the outlet 2 To open the kiosk insert the key into the lock at the back of the kiosk turn the key clockwise and carefully o...
Page 12: ...680 Imaging Scanner assembly from the kiosk a Disconnect the Imaging Scanner Cable from the motherboard and cut off the cable ties along its route b Remove the two nuts that secure the Imaging Scanner...
Page 13: ...r assembly a Mount the Imaging Scanner onto the Imager bracket and secure with washers and screws Note For NCR 7709 R1 1 units use the top mounting holes of the Imager bracket b Mount the Imaging Scan...
Page 14: ...logic DSM0422 Scanner R1 0 and R1 1 c Connect the Imaging Scanner cable to the USB B port of the motherboard and use a cable tie to secure the cable to the cable management slot shown in the following...