Chapter 3: 7401-2xxx and 3xxx Hardware Installation
3-35
1.
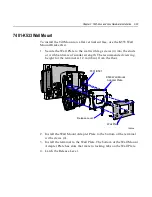
Secure the Wall Plate to the wall with lag screws (4) into the studs
or with hardware of similar strength. The recommended viewing
height for the terminal is 1.2 m (48 in.) from the floor to the center
of the screen.
Note:
Drill a hole in the wall for the cables if you are mounting the
power supply on the opposite side of the wall.
16684
Flush Mounting Bracket
Wall Plate
Cable Routing
Cable Routing
(through wall)
2.
Mount the Power Supply to the wall with screws (4).
3.
Route all cables through the brackets and connect them to the
terminal.
4.
Install the Flush Mounting Bracket to the back of the terminal with
screws (4).
5.
Install the terminal to the Wall Plate. The bottom of the Flush
Mounting Bracket has slots that mate to locking tabs on the Wall
Plate. Secure the unit with the screw.
Summary of Contents for EasyPoint 7401
Page 1: ...NCR EasyPoint 7401 Release 2 5 Hardware User s Guide 19797 NCR B005 0000 1254 Issue H...
Page 18: ...xvi...
Page 24: ...xxii...
Page 98: ......
Page 156: ......
Page 188: ...4 32 Chapter 4 7401 4xxx Hardware Installation...
Page 220: ...5 32 Chapter 5 Setup...
Page 260: ...7 10 Chapter 7 BIOS Updating Procedures...
Page 266: ...8 6 Chapter 8 NCR 7401 7890 or 7892 Scanner Differences...
Page 279: ......
Page 280: ...B005 0000 1254 Dec 2002 Printed on recycled paper...


