Chapter 6: Installing Optional Remote Peripherals
6-3
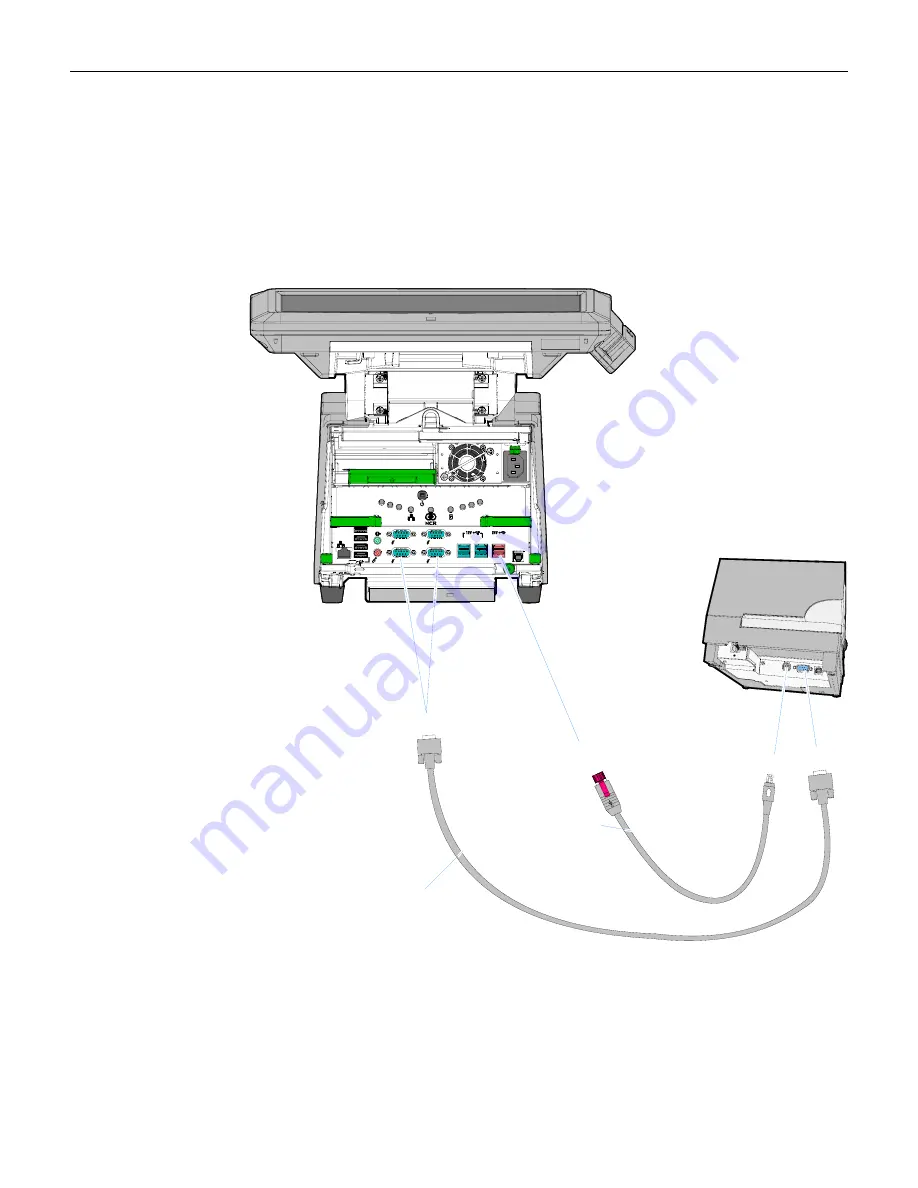
RS-232 Installation w/Power from Powered USB
1.
Connect
the
RS
‐
232
Printer
Interface
Cable
to
the
RS
‐
232
Connector
on
the
printer
and
to
an
RS
‐
232
Connector
on
the
terminal.
2.
Connect
the
Printer
Power
Cable
to
the
Power
Connector
on
the
printer
and
to
the
24
V
Powered
USB
Connector
on
the
terminal.
A B C
D E
F
E
F
G
RS232/ B
RS232/ D
RS232/ A
RS232/ C
MIC
Line Out
A
B
C
D
LAN
Cash
Drawer
26325
Power RS-232
24V USB
RS-232A/B (Set to Non-Powered)
497-0441156 - 1m
(1432-C092-0010)
497-0441157 - 4 m
(1432-C092-0040)
497-0430266 - 1.0 m
(1416-C879-0010)
497-0430265 - 4 m
(1416-C879-0040)
Summary of Contents for RealPOS 70XRT
Page 1: ...NCR RealPOS 70XRT 7403 POS Workstation Release 1 2 User Guide B005 0000 1872 Issue E ...
Page 80: ...4 6 Chapter 4 Installing a Secondary Dual Display ...
Page 124: ...7 10 Chapter 7 Installing a RAID System ...
Page 129: ...Chapter 8 2x20 Customer Display Interface 8 5 CP437 ...
Page 130: ...8 6 Chapter 8 2x20 Customer Display Interface CP858 ...
Page 131: ...Chapter 8 2x20 Customer Display Interface 8 7 CP866 ...
Page 132: ...8 8 Chapter 8 2x20 Customer Display Interface CP932 ...
Page 134: ...9 2 Chapter 9 Cash Drawer Interface ...
Page 142: ...10 8 Chapter 10 Wedge to USB MSR Software Migration ...
Page 146: ...11 4 Chapter 11 Diagnostic LEDs ...
Page 161: ......
Page 162: ......
Page 172: ...15 10 Chapter 15 BIOS Settings ...
Page 178: ...16 6 Chapter 16 Converting the MSR to MagTek Emulation Mode ...
Page 180: ...A 2 Appendix A Memory Map ...
Page 182: ...B 2 Appendix B IRQ Settings ...


