NCR 7199 Thermal Receipt Printer
NCR Proprietary Information – not to be disclosed or reproduced without written consent. © 2019 by NCR Corporation, Global Headquarters, 864 Spring St NW, Atlanta, GA 30308, U.S.A.
http://www.ncr.com. All Rights Reserved.
BCC5-0000-5406
Quick Reference Guide
1
OVERVIEW
This document provides the required basic procedures for installing the
NCR 7199 Thermal Receipt Printer. For more information and detailed
instructions, refer to the following online documents at
•
NCR 7199 Thermal Receipt Printer User Documentation (BCC5-0000-5277)
•
NCR Printer Utilities User Documentations
WHAT'S IN THE BOX?
• NCR 7199 Printer in a plastic bag and foam pack
• Thermal receipt paper roll
The following cables are ordered separately:
• Communication Cable
• DC Power Cable
• Remote Power Supply
• USB Plus Power Cable
• Cash Drawer Cable
CONNECTING CABLES
1. Ensure that the Printer is not connected to a power source.
2. Connect the communication cable to the Printer and to the host
terminal.
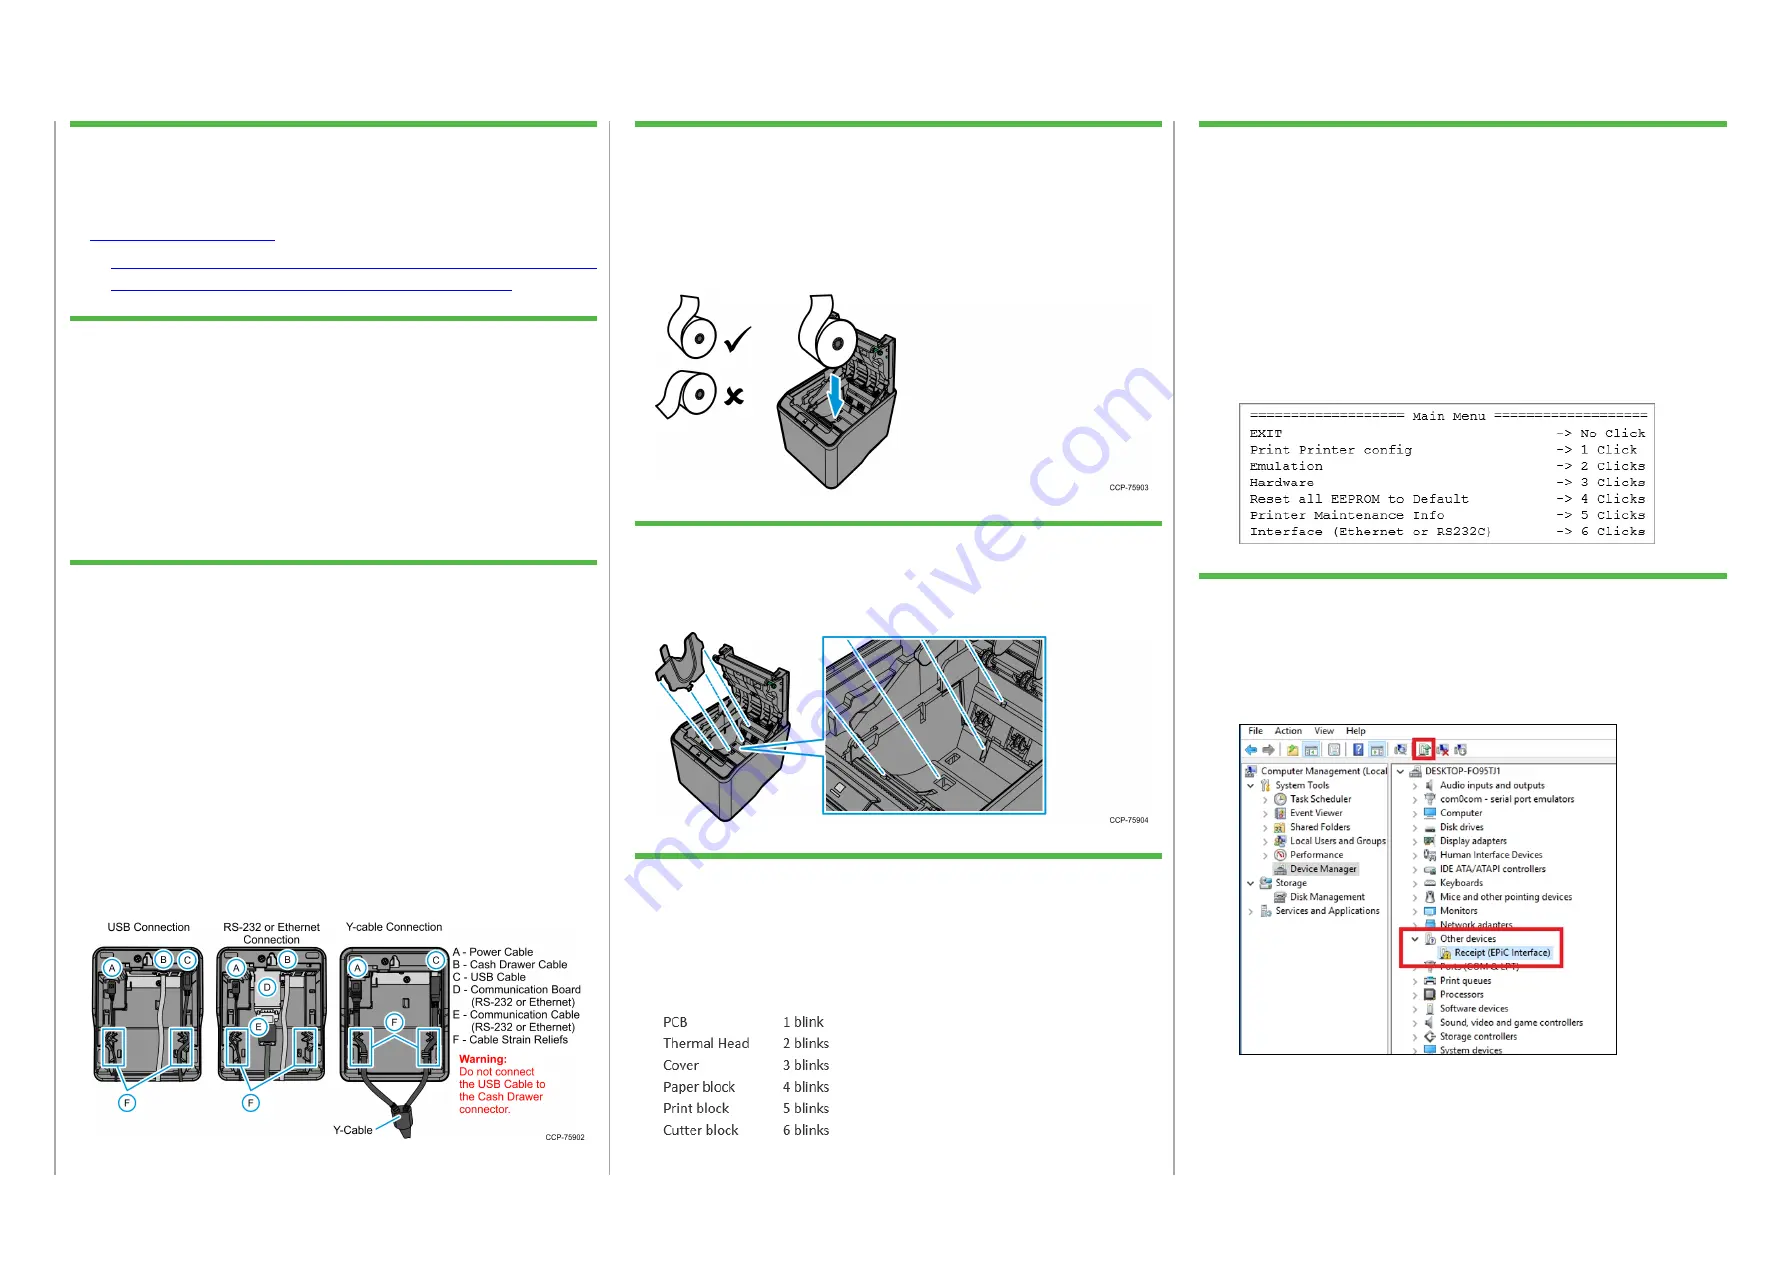
• For USB connection, connect the USB cable (C) to the Printer
USB port and to the host terminal.
• For RS-232 or Ethernet connection, connect the communication
cable (E) to the communication board (D).
3. Connect the cash drawer cable (B) to the Printer and to the cash drawer.
4. Connect the power cable (A) to the Printer.
5. Route the cables through the cable strain relief feature (F) of the Printer.
6. Reconnect the power cable to a power source.
• For remote power supply installation, connect the power cable to the
power supply and connect the power supply to an AC outlet.
• For host powered installation, connect the power cable to the host
terminal.
INSTALLING PAPER ROLLS
1. Tear off the end of the new roll to make the edge loose.
2. Open the receipt cover.
3. Place the new roll inside the Printer, with an extra paper length
extending over the front. Ensure that the paper unrolls from the
bottom.
4. Close the printer cover and tear off excess paper.
INSTALLING 58-MM PAPER GUIDE
1. Open the receipt cover.
2. Insert the 58-mm paper guide to the slots located on the left of the main
cover.
RESOLVING PRINTER PROBLEMS
• Red LED — unrecoverable error
• Amber LED — recoverable error
• Green LED — ready or standby mode
The blink cycle for errors and warnings is 2 Hz. The number of blinks in one
cycle depends on the location of error.
CONFIGURING PRINTER – OFFLINE MODE
1. To know the current settings, print the diagnostics form.
a. Turn on the Printer.
b. Open the receipt cover.
c. While pressing down the paper feed button, close the receipt cover.
The Printer beeps and prints the diagnostics form.
2. Disconnect the power cable from the rear of the Printer.
3. While pressing down the paper feed button, reconnect the power cable.
The Printer beeps and prints the Main Menu.
4. Press the paper feed button according to the number of clicks presented
in the main menu, and then press down the paper feed button for at
least one second to validate.
INSTALLING USB VIRTUAL COM PORT DRIVER
1. Connect the Printer to the host terminal. The Printer beeps to show that
the USB device is recognized. Then, the Device Setup window displays
that the Installing Receipt (EPiC Interface) process is ongoing.
2. Open the Device Manager, select
Receipt (EPiC interface)
and then
select the
Update Driver Software
button.
3. Select
Browse my computer for driver software
.
4. Select
Browse
and then select the
Edgeport Driver
folder.
5. To start the installation process, select
Next
. The application displays a
notification when the installation is complete.


