background image

2-8

Hardware Installation

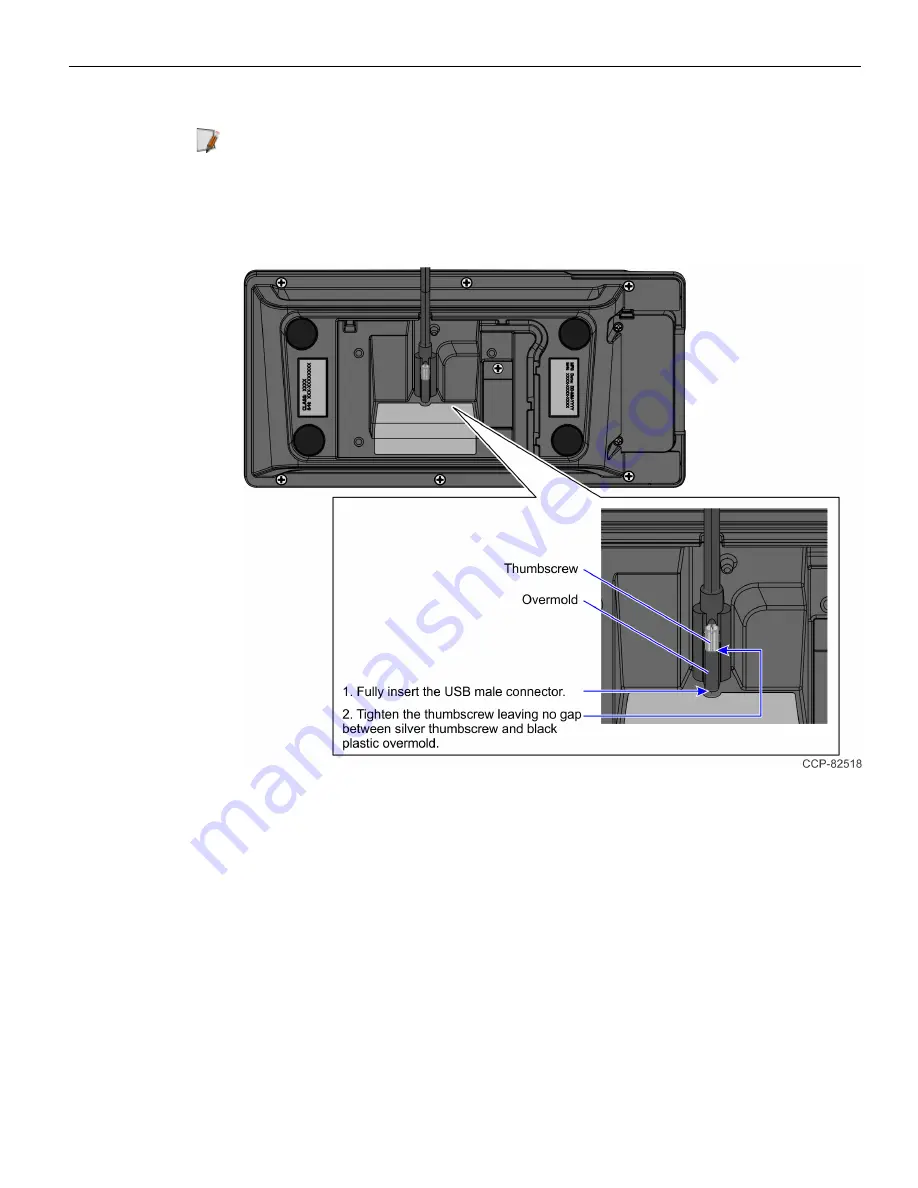
2. Tighten the thumbscrew.

Note:

Avoid excessive tightening of the thumbscrew. Fully insert the USB male

connector against the housing and tighten the thumbscrew only until the silver
knurled portion touches the black plastic overmold. There should be no gap
between the thumbscrew and the overmold, and no looseness in the overmold once
the thumbscrew is properly tightened.

Summary of Contents for XL55P

Page 1: ...User Guide NCR XL55P Payment Display 1607 BCC5 0000 5560 Issue A...

Page 2: ...ations or copies of this NCR copyrighted documentation is permitted under the terms and conditions of an agreement you have with NCR NCR s copyright notice must be included It is the policy of NCR Cor...

Page 3: ...lt in system damage Grounding Instructions In the event of a malfunction or breakdown grounding provides a path of least resistance for electric current to reduce the risk of electric shock This produ...

Page 4: ...ansport the product in its original packaging to prevent impact damages If you do not have access to a computer you may leave a voice message at 1 800 528 8658 USA or International 1 770 623 7400 When...

Page 5: ...the defective equipment Serial Number of the defective equipment Equipment location in the store Description of the problem including any system error codes error condition or guidance to the area of...

Page 6: ...iv...

Page 7: ...estrictions 7 Ergonomic Workplace 7 Installing the XL55P Payment Display 7 Installing the Moby 5500M 11 Removing the Moby 5500M 12 Servicing the XL55P Payment Display 12 Chapter 3 Operation and Cleani...

Page 8: ...etected Panel 19 Center Panel 19 Control Buttons 20 Display Adjustment Procedures 22 Resetting Factory Defaults 23 Running the Utility Console Version 24 Revision Record Issue Date Remarks A July 2022...

Page 9: ...0M is connected internally for an integrated design and clean countertop The NCR XL55P Payment Display 1607 can connect to the NCR PX10 PX15 POS 7746 via a USB Cable that has connectors compatible wit...

Page 10: ...olution 1024x600 16 9 16 7 colors Additional Resolutions Supported Dependent on graphics driver capability User Adjustable OSD Controls Allows for adjustments through software OSD Viewing Direction 12...

Page 11: ...lay Area 154 21mm H x 85 92mm V Operating Temperature 5 to 40 C Operating Humidity 10 to 90 non condensing Dimensions w x d x h 248 9 mm 9 80 x 122 7 mm 4 83 x 72 5 mm 2 85 Weight Without Moby 5500M 1...

Page 12: ...5500M payment device accepts swipe EMV Chip and contactless payments in a single device It is a bi directional card reader with long guide length ensuring maximum read performance It has LED and beep...

Page 13: ...ayment Display Mount The NCR XL55P Payment Display 1607 VESA mounting pattern is 75 mm by 50 mm 1607 Tabletop Bracket 1607 K001 The XL55P Payment Display can be mounted on a tabletop using the 1607 Ta...

Page 14: ...1 6 Product Overview Label Locations XL55P Payment Display Moby 5500M...

Page 15: ...XL55P Payment Display 1607 refer to the following recommendations for an ergonomic workstation Avoid direct glaring and reflective glaring light When installed next to windows position the device so i...

Page 16: ...rew Fully insert the USB male connector against the housing and tighten the thumbscrew only until the silver knurled portion touches the black plastic overmold There should be no gap between the thumb...

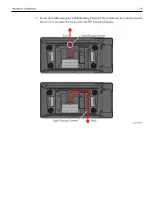
Page 17: ...Hardware Installation 2 9 3 Route the Cable along the Cable Routing Channel The Cable can be routed towards the front or towards the back of the XL55P Payment Display...

Page 18: ...2 10 Hardware Installation 4 Connect the other end of the Cable to the USB port of the Host Terminal...

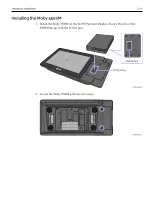
Page 19: ...rdware Installation 2 11 Installing the Moby 5500M 1 Install the Moby 5500M on the XL55P Payment Display Ensure the pins of the 5500M line up with the POGO pins 2 Secure the Moby 5500M with two 2 scre...

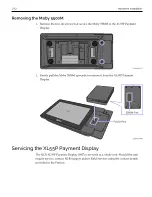
Page 20: ...ayment Display 2 Gently pull the Moby 5500M upwards to remove it from the XL55P Payment Display Servicing the XL55P Payment Display The NCR XL55P Payment Display 1607 is serviced as a whole unit Shoul...

Page 21: ...conductive pencils with hands and with thin gloves Multi touch capability 10 finger High resolution Improved legibility and display brightness due to optimal light transmission In addition the active...

Page 22: ...s to clean around the edges of the touchscreen Do not use abrasive cleaners powders or abrasive cleaning materials scrub brush scouring pad Warning Do not use Windex or any similar alkaline weak base...

Page 23: ...compressed air Do not use any other types of cleaners such as vinegar solvents degreasers or ammonia based cleaners These can damage the unit 2 Wipe the cabinet using a non abrasive cloth microfiber c...

Page 24: ...entification information such as the name serial number and manufacturer Supported Features Note Not all features are supported on every monitor The button is inactive and grayed out when the feature...

Page 25: ...customers who want to run the application from a Command Line to many systems concurrently Windows NCR_Software_OSD_GUI_x86 32 Bit NCR_Software_OSD_Console_x86 32 Bit NCR_Software_OSD_GUI_x64 64 Bit...

Page 26: ...these steps 1 Unzip the application to a preferred folder in the target system 2 In the unzipped folder navigate to the OSD executable Example 32 Bit version NCR_Software_OSD_GUI_x86_V2 2 23 5 x86 3 E...

Page 27: ...etected Panel The Monitors Detected Panel lists all the monitors connected to the system If more than one monitor is connected the first monitor is selected by default Center Panel The Center Panel di...

Page 28: ...or Information includes Device manufacturer Date manufactured EDID version Input type Dimensions Monitor name Monitor serial number Preferred timing Controller type Firmware level Firmware version for...

Page 29: ...ical position clock and phase Auto Color sets red green blue gain Factory Defaults restores all factory defaults including brightness contrast and color Brightness Contrast restores factory defaults f...

Page 30: ...ent shown below is an example 1 Select the Colour button The default Colour Settings menu has the 6500K radio button selected 2 Select the User1 radio button to activate the color slides 3 Drag the sl...

Page 31: ...e button 2 Select a button in the Restore window Note All settings or just specific groups can be reset Auto Setup resets the window position to the center of the display Factory Defaults resets every...

Page 32: ...ble Example 32 Bit version NCR_Software_OSD_Console_x86_V2 2 23 5 x86 3 Open a Command Line dialog window 4 From the Command Line dialog navigate to the OSD executable exe file 5 Execute the file to s...

Reviews: