background image

Dome GX2MP Plus

User’s Guide

Summary of Contents for Dome GX2MP Plus

Page 1: ...Dome GX2MP Plus User s Guide ...

Page 2: ...ference to products from other vendors does not imply any recommendation or endorsement This document contains proprietary information protected by copyright No part of this manual may be reproduced by any mechanical electronic or other means in any form without prior written permission of NDSsi NDS Surgical Imaging NDSsi the NDSsi logo Dome the Dome by NDSsi logo Dome GX2MP Dome CXtra and DICal a...

Page 3: ...Product Information iv About the Display 1 Installing the Display 6 Using Display Controls 11 Technical Information 16 Index 22 Appendix A Regulatory Compliance 23 Appendix B Warranty and Service Terms Conditions 26 ...

Page 4: ...isted Symbol explanations CAUTION Read the accompanying text carefully for proper operation and maintenance of the display system DANGEROUS VOLTAGE Important precautions about electric shock Read the accompanying text carefully to prevent damage to components of the display system and for your safety DIRECT CURRENT BAROMETRIC PRESSURE Transport and storage 12 000 meters 39 400 feet maximum in unpr...

Page 5: ...ure the display is electrically grounded You must connect the third grounding pin on the US power cord to a grounded outlet The European power cord does not have a third grounding pin but it must be plugged into a grounded outlet Avoid using overloaded AC outlets extension cords frayed power cords or broken plugs If you cannot insert the plug into the outlet you plan to use have a licensed electri...

Page 6: ...operly secured Do not set up the display near strong light or heat sources Do not block the vents on the back of the display or install the display in a built in enclosure Blocked vents cause excessive heat to build up inside the display increasing risk of fire When installing components turn off your computer but leave it plugged into a grounded outlet Do not remove the back cover or disassemble ...

Page 7: ...ge to the display case and the screen Do not use aerosol directly on the display screen Overspraying may cause electric shock Shipping storing the display Keep the display in its shipping container until installation Return the display to its original container whenever you need to store the unit move it to another location or return it for repair The packaging supplied by the manufacturer protect...

Page 8: ...board x16 or 1x ships with a DMS59 to DVI I cable adapter supporting two single link DVI connections Dome GX2MP Plus display mounted on desk stand Display controller DVI cable Power cord Quick reference Display driver and calibration software ...

Page 9: ...16 7 million colors The Dome GX2MP Plus display includes a backlight stabilization or BLS feature that maintains 185 cd m2 luminance with an internal backlight sensor Bundled with the display system the Dome CXtra software enhances the functionality of the Dome GX2MP Plus display with a range of value added services such as DICOM calibration error reporting and backlight saver Network management o...

Page 10: ...information The light emitting diode or LED indicates display status as follows Blue The display is connected and running properly Amber The display is in Sleep power saving mode or the video signal is not being received Improper cable connections could cause no image to appear on the display screen or the LED to glow amber See Troubleshooting on page 16 for more information Legend 1 Onscreen menu...

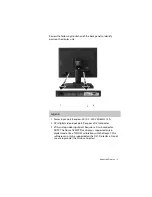
Page 11: ...100 240V 50 60Hz 1 2A 2 DVI digital video input port Requires a DVI connector 3 VGA analog video input port Requires a D sub connector NOTE The Dome GX2MP Plus display is supported only in digital mode Use of DICOM calibration with the Dome CXtra software can only be supported on the DVI D interface Do not use analog mode the D sub connector 1 3 2 ...

Page 12: ...l and clean surface near a wall outlet Tilt range Height range To adjust the tilt use both hands to pull the display head forward or push it backward To adjust the height unfasten the stand lock then raise the display head Viewing angle Orientation mode To adjust the viewing angle use both hands to swivel the display head from side to side To rotate the display use both hands to turn the head cloc...

Page 13: ...nother hub with a USB cable Even if the display is in power saving mode the USB devices function when connected to the USB ports of the display Stand height lock Move the stand lock lever to the left to adjust the height of the display Stand cable cover Press the PUSH button at the bottom of the desk stand and pull the stand cable cover down and out to remove it USB hub Use the integrated bus powe...

Page 14: ...dapter for each connector port Warning In locations where 240V outlets are used connect the display to a center tapped 240V single phase supply only for Canada and the United States If you leave the computer turned on you could suffer electric shock or cause damage to system components Remove the display controller slowly from its package and static shielding bag to prevent an electrostatic discha...

Page 15: ...rd down until it is firmly seated 3 Secure the mounting bracket and reattach the computer cover Installation Tips Graphics card If you are using the display with another graphics card and without the Dome CXtra software use the instructions shipped with that graphics card Video mode Although the Dome GX2MP Plus display can be used with either a digital or analog video cable the installation instru...

Page 16: ...port on the installed display controller Secure the connection 3 Plug the power cord into a grounded AC outlet 4 Repeat steps 1 to 3 to connect a second display to the controller 5 Power on the display first then the computer Installation Tips Access to ports For displays mounted on a desk stand rotate the LCD panel from landscape to portrait for access to the ports Cable management Thread the vid...

Page 17: ...een instructions to complete the installation Dome recommends that you select the Express installation option 6 When the Setup complete message appears select Yes I want to restart my computer now and click Finish 7 If the Digital Signature Not Found message appears click Yes or Continue to complete the driver installation To configure the display For Windows 7 1 Right click the desktop and select...

Page 18: ...ke sure that the check box for Hide modes that this monitor cannot display is empty unchecked 4 Click the Adapter tab then click the List All Modes button 5 Choose the mode and click OK Click OK to finish To use a dual display configuration For Windows 7 1 Right click the desktop and select Screen resolution 2 Click the display icon 2 Then select Extend desktop to this display 3 Set the resolution...

Page 19: ...e computer is off or in power saving mode the menu is inaccessible IMPORTANT Allow the display to stabilize for at least 30 minutes before making image adjustments Legend 1 MENU Entry to or exit from onscreen commands and functions 2 MINUS Selection or adjustment of function 3 PLUS SOURCE Selection or adjustment of function 4 AUTO SET Selection of command or function 5 POWER ON OFF function 6 POWE...

Page 20: ...nnector active Use this feature when two computers are connected to the display Default setting D Sub AUTO SET Use to enter a selection on the menu Auto Image Adjustment When adjusting your display settings always press the AUTO SET button before entering the menu This automatically adjusts your display image to the ideal settings for the current screen resolution size display mode The best resolu...

Page 21: ...justments To adjust the display screen 1 Press the MENU button The main menu appears Press MENU again to access controls 2 Use the MINUS or PLUS button to access a menu control 3 Press Down arrow AUTO SET button to access the submenu Use the MINUS or PLUS buttons to adjust the value of a parameter Press the AUTO SET button to select other submenu items then use the MINUS or PLUS button to adjust 4...

Page 22: ...100 Sharpness Set sharpness value from 0 to 10 Color Temp Set to Preset or User for screen color adjustment Preset Set to Warm reddish Medium sRGB standard color specification or Cool bluish User Set Red Green or Blue color level from 0 to 100 Gamma Set black white level of response output to Gamma 0 black Gamma 1 or Gamma 2 white DICOM Gamma Set gamma values for medical characteristics and lumina...

Page 23: ...ive with DVI D input Language Set language of OSD menu Power Indicator Turn LED luminance on Yes or off No White Balance Function inactive with DVI D input Factory Reset Restore factory default Yes or not No Main Menu Submenu Description ...

Page 24: ...splay again to prevent Out of Range message Erroneous settings When the power indicator is blue adjust the brightness and the contrast Display is in power saving mode Move the mouse or strike a key on the keyboard to activate the screen Make sure the computer is turned on OSD LOCKED message on the screen MENU is locked Press MENU for several seconds The OSD UNLOCKED message appears Display is not ...

Page 25: ...ay Horizontal noise appears in an image or characters are not clearly portrayed Press AUTO SET to automatically adjust the display image to the ideal setting If the results are unsatisfactory decrease the horizontal bars using the PHASE icon in the menu Check Control Panel Display Settings to adjust the display to the recommended resolution or adjust the display image to the ideal setting Set the ...

Page 26: ...ting Sync Input Horizontal frequency Analog 28 83 kHZ automatic Digital 28 83 kHz automatic Vertical frequency 56 86 Hz automatic Interface Digital Video In DVI D 24 pin connector Analog Video In VGA D sub 15 pin connector Display brightness contrast Front button controls with multi language onscreen display Display identification EDID read using DDC2B Display status LED on display front Input for...

Page 27: ...ing 10 to 90 Relative Humidity noncondensing storage 10 to 90 Relative Humidity noncondensing Altitude transport and storage 12 000 meters 39 400 feet maximum in unpressurized container Mode LED Color ON Blue Sleep Amber OFF None Item Resolution Horizontal Frequency kHz Vertical Frequency Hz 1 2 640x480 640x480 31 47 37 50 59 94 75 00 3 720x400 31 46 70 08 4 800x600 37 88 60 32 5 1024x768 48 36 60...

Page 28: ... Ground 4 T M D S Data4 16 Hot Plug Detect 5 T M D S Data4 17 T M D S Data0 6 DDC Clock 18 T M D S Data0 7 DDC Data 19 T M D S Data0 5 Shield 8 Analog Vertical Sync 20 T M D S Data5 9 T M D S Data1 21 T M D S Data5 10 T M D S Data1 22 T M D S Clock Shield 11 T M D S Data1 3 Shield 23 T M D S Clock 12 T M D S Data3 24 T M D S Clock T M D S Transition Minimized Differential Signaling Return for 5V H...

Page 29: ...ng system Activate the power saver when you anticipate periods of inactivity such as at the end of the work day Once activated Backlight Saver or Screen Saver automatically turns the backlight off during the period of inactivity Backlight Saver and Screen Saver both extend the life of the backlight and reduce burn in of images Do not use the Backlight Saver and Screen Saver concurrently ...

Page 30: ...nformation disposal vii product iv recycling 25 technical 18 installing display 6 display controller 7 display driver 9 interface plate 3 L LED indicator 2 19 M managing power usage 21 menu onscreen 11 12 14 P package contents viii power cord connecting 8 power management 21 precautions v product about 1 cleaning vii disposal vii information iv preventive measures vi recycling 25 shipping storing ...

Page 31: ...ot installed and used in accordance with the instruction may cause harmful interference to radio communications However there is no guarantee that interference will not occur in a particular installation If this equipment does cause harmful interference to radio or television reception which can be determined by turning the equipment off and on the user is encouraged to try to correct the interfer...

Page 32: ...et appareil numérique respecte les limites de bruits radioelectriques applicables aux appareils numériques de Classe B prescrites dans la norme sur le materiel brouilleur Appareils Numériques NMB 003 edictée par le ministre des Communications Japan VCCI Class B Statement Safety Certification Canada and the United States European Union according to 73 23 EEC and 89 336 EEC Directives China Compulso...

Page 33: ...liance at WWW EIAE ORG For lamp specific disposal information check WWW LAMPRECYCLE ORG RECYCLING Do not use household or municipal waste collection services for disposal of electrical and electronic equipment EU countries require the use of separate recycling collection services ENVIRONMENT FRIENDLY USE PERIOD The number encircled by the recycling symbol indicates the safe use period in years of ...

Page 34: ... or replace the display at its sole discretion The displays must have been run at or below the CXtra default brightness setting as configured from the factory If within 5 years of initial purchase the maximum output of the Dome EX SX color display excluding the DOME E4c is determined by NDSsi to be less than 250 cd m NDSsi will repair or replace the display at its sole discretion The displays must...

Page 35: ...ny NDSsi products purchased through a distributor reseller or medical device manufacturer other than NDSsi each an Intermediary where such Intermediary provides direct warranty service to its end user customers in connection with such product DISCLAIMER This limited product warranty sets forth your sole and exclusive remedy and NDSsi s sole and exclusive liability under the Standard Limited Warran...

Page 36: ...s warranty gives you specific legal rights You may have other rights which may vary from locality to locality Some localities do not allow limitations on implied warranties and or do not allow the exclusion of incidental or consequential damages so the above limitations might not apply to you WARRANTY SERVICE REPAIR RETURN US AND CANADA ONLY Our standard warranty service is Repair and Return Repai...

Page 37: ...s not provide a problem description and the service technician cannot determine the failure no problem found NPF NDSsi s then current evaluation fee will apply in addition to return shipment PAYMENT FOR NONWARRANTY EVALUATIONS AND REPAIRS AND OTHER EVALUATION CHARGES Nonwarranty repairs requested by customer will be performed at NDSsi s then current rates for any nonwarranty repairs and will inclu...

Page 38: ...NDS Surgical Imaging LLC 5750 Hellyer Avenue San Jose CA 95138 1000 USA www ndssi com ...

Reviews: