Section 2: PCB Installation and Startup
Aspila EX Hardware Manual
Section 2: PCB Installation and Startup
2-39
2
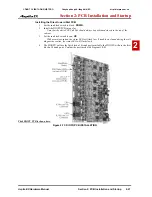
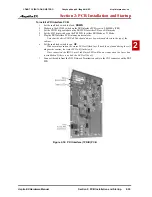
To install a PRI Interface PCB:
1. Set the run/block switch to block,
DOWN
.
2. Make sure the SW100 switch on the PRI Interface PCB is set to 2.048Mb/s (PRI).
3. Set the SW101 dip switches on the PRI PCB for either T-Bus or S-Bus mode.
4. Set the SW3 dip switches on the PRI PCB for either PRI Mode or T1 Mode.
5. Plug the PRI Interface PCB into any universal slot.
Note that the white PCB Pull Tab should always be positioned closest to the top of the
cabinet.
6. Set the run/block switch to run,
UP
.
With normal operation, the status LED will flash fast. If trouble was found during the self
diagnostics routine, the status LED will flash slowly.
Once connected, the ISDN Layer Link Status LEDs will be on steady when the Layer link
is established. If there is no link, the LED will be off.
7. Connect the cable from the NT1 Network Termination cable to the CN3 connector on the PRI
PCB.
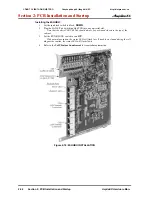
Figure 2-16: PRI Interface (1PRIU) PCB
CÔNG TY VIỄN THÔNG VIỆT PRO
Chuyên phân phối tổng đài NEC
http://vietpro.com.vn


