4-16 System Configuration
Ex.: If the wait time for the completion of the Fibre Channel disk array
device initialization is 4 minutes, change the value of "Boot
Monitoring Time-out Period" from 8 (default) to
1
2 minutes.
Option ROM
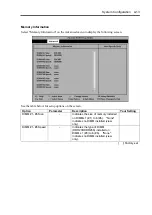
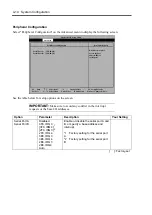
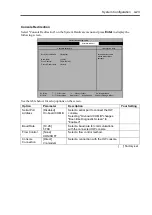
Select "Option ROM" on the Advanced menu to display the following screen and enable/disable
expansion of Option Rom BIOS on the PCI bus.
See the table below for setup options on the screen.
Option Parameter
Description
Your
Setting
On Board SCSI
Disabled
[Enabled]
Enable or disable expansion of SCSI
BIOS on the motherboard.
On Board LAN 1, 2
Disabled
[Enabled]
LAN1: Enable or disable 10/100BASE
LAN controller on the
motherboard.
LAN2: Enable or disable 1000BASE
LAN controller on the
motherboard.
PCI Slot 1 - PCI Slot 3
Disabled
[Enabled]
Enable or disable BIOS on a device
(board) connected to the PCI bus.
Select "Enabled" for the graphic
accelerator board. Always select
"Enabled" for the SCSI PCI device to
which the hard disk that contains OS
is connected.
Select "Disabled" for Option ROM of
PCI LAN device when the network
boot feature is not used.
#1:
#2:
#3:
[ ]: Factory-set
On Board SCSI:
On Board LAN 1:
On Board LAN 2:
PCI Slot 1:
PCI Slot 2:
PCI Slot 3:
Disables/enables the
mapping of the on-board
SCSI BIOS.
Item Specific Help
Option ROM
[Enabled]
[Enabled]
[Enabled]
[Enabled]
[Enabled]
[Enabled]
F1 Help
-/+ Change Values
F9 Setup Defaults
F10 Save Changes & Exit
Sub-Menu
Enter Select
Esc Exit
Phoenix BIOS Setup Utility
Advanced
Select Item
Select Menu
Summary of Contents for Express5800/320Lb FT Linux
Page 10: ...iv This page is intentionally left blank ...
Page 16: ...x This page is intentionally left blank ...
Page 19: ...Precautions for Use 1 3 Label A Label B Label C Label E Label D ...
Page 20: ...1 4 Precautions for Use Rack mount model Label B Label A Label C Label D ...
Page 21: ...Precautions for Use 1 5 Label D Label C Label B Label A ...
Page 22: ...1 6 Precautions for Use PCI CPU Modules PCI Module CPU Module Label A Label A Label A ...
Page 36: ...1 20 Precautions for Use This page is intentionally left blank ...
Page 44: ...2 8 General Description Front View inside Tower model Rack mount model ...
Page 70: ...2 34 General Description This page is intentionally left blank ...
Page 118: ...3 48 Setup This page is intentionally left blank ...
Page 162: ...4 44 System Configuration This page is intentionally left blank ...
Page 294: ...6 14 Maintenance This page is intentionally left blank ...
Page 336: ...7 42 Troubleshooting This page is intentionally left blank ...
Page 355: ...System Upgrade 8 19 15 Check the disk you selected and click Next 16 Click Complete ...
Page 399: ...System Upgrade 8 63 Cable ties included with cabinet ...
Page 410: ...8 74 System Upgrade This page is intentionally left blank ...
Page 412: ...A 2 Specifications This page is intentionally left blank ...

