4-18 System Configuration
Security
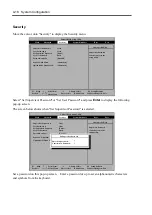
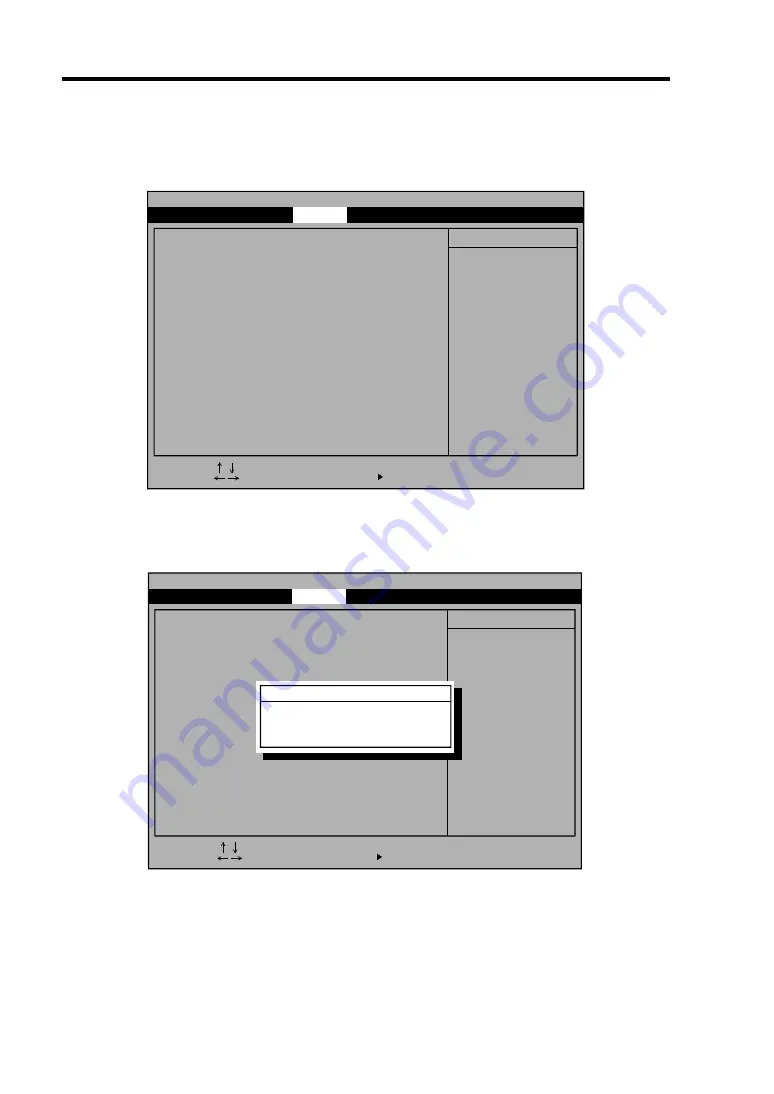
Move the cursor onto "Security" to display the Security menu.
Select "Set Supervisor Password" or "Set User Password" and press
Enter
to display the following
pop-up screen.
The screen below shows when "Set Supervisor Password" is selected.
Phoenix BIOS Setup Utility
Supervisor Password is
User Password is
Set Supervisor Password
Set User Password
Password on boot:
Power Switch Mask:
Option ROM Menu Mask:
Supervisor Password
controls access to the
setup utility.
Item Specific Help
Clear
Clear
[Enter]
Enter
[Disabled]
[Unmasked]
[Unmasked]
[Disabled]
[ ]
[ ]
Set Supervisor Password
Enter new password:
Confirm new Password:
Main
Advanced
Security
System Hardware
Boot
Exit
F1 Help
-/+ Change Values
F9 Setup Defaults
F10 Save Changes & Exit
Sub-Menu
Enter Select
Esc Exit
Select Item
Select Menu
Set a password on this pop-up screen. Enter a password of up to seven alphanumeric characters
and symbols from the keyboard.
Supervisor Password is
User Password is
Set Supervisor Password
Set User Password
Password on boot:
Power Switch Mask:
Option ROM Menu Mask:
Supervisor Password
controls access to the
setup utility.
Item Specific Help
Clear
Clear
[Enter]
Enter
[Disabled]
[Unmasked]
[Unmasked]
Main
Advanced
Security
System Hardware
Boot
Exit
Phoenix BIOS Setup Utility
F1 Help
-/+ Change Values
F9 Setup Defaults
F10 Save Changes & Exit
Sub-Menu
Enter Select
Esc Exit
Select Item
Select Menu
Summary of Contents for Express5800/320Lb FT Linux
Page 10: ...iv This page is intentionally left blank ...
Page 16: ...x This page is intentionally left blank ...
Page 19: ...Precautions for Use 1 3 Label A Label B Label C Label E Label D ...
Page 20: ...1 4 Precautions for Use Rack mount model Label B Label A Label C Label D ...
Page 21: ...Precautions for Use 1 5 Label D Label C Label B Label A ...
Page 22: ...1 6 Precautions for Use PCI CPU Modules PCI Module CPU Module Label A Label A Label A ...
Page 36: ...1 20 Precautions for Use This page is intentionally left blank ...
Page 44: ...2 8 General Description Front View inside Tower model Rack mount model ...
Page 70: ...2 34 General Description This page is intentionally left blank ...
Page 118: ...3 48 Setup This page is intentionally left blank ...
Page 162: ...4 44 System Configuration This page is intentionally left blank ...
Page 294: ...6 14 Maintenance This page is intentionally left blank ...
Page 336: ...7 42 Troubleshooting This page is intentionally left blank ...
Page 355: ...System Upgrade 8 19 15 Check the disk you selected and click Next 16 Click Complete ...
Page 399: ...System Upgrade 8 63 Cable ties included with cabinet ...
Page 410: ...8 74 System Upgrade This page is intentionally left blank ...
Page 412: ...A 2 Specifications This page is intentionally left blank ...


