4-32 System Configuration
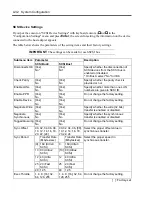
SCSI Device Settings
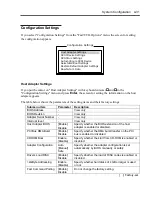
If you put the cursor on "SCSI Device Settings" with keyboard cursors (
↓↓↓↓
and
↑↑↑↑
) in the
"Configuration Settings" menu and press
Enter
, the screen for setting the information on the device
connected to the host adapter appears.
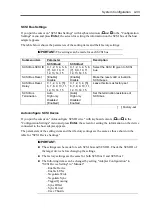
The table below shows the parameters of the setting items and their factory settings.
IMPORTANT:
The settings can be made for each SCSI bus.
Parameter
Submenu item
SCSI Bus0
SCSI Bus1
Description
Disconnects OK [Yes]
No*
[Yes]
No*
Specify whether the disconnection of
SCSI devices from the SCSI bus is
enabled or disabled.
* On Bus0, select "No" for ID8.
Check Parity
[Yes]
No
[Yes]
No
Specify whether the parity check is
provided or not.
Enable LUNs
[Yes]
No
[Yes]
No
Specify whether more than one LUN
numbers are given to SCSI ID.
Enable PPR
[Yes]
No
[Yes]
No
Do not change the factory setting.
Enable Device
[Yes]
No
[Yes]
No
Do not change the factory setting.
Negotiate Wide [Yes]
No
[Yes]
No
Specify whether the wide (32 bits)
transfer is enabled or disabled.
Negotiate
Synchronous
[Yes]
No
[Yes]
No
Specify whether the synchronous
transfer is enabled or disabled.
Tagged Queuing [Yes]
No
[Yes]
No
Do not change the factory setting.
Sync Offset
00, 02, 04, 06, 08,
10, 12, 14, 16, 18,
20, 22, [24]
00, 02, 04, 06, [08],
10, 12, 14, 16, 18,
20, 22, 24
Select the proper offset value in
synchronous transfer.
Transfer Rate
(Mbytes/sec)
Transfer Rate
(Mbytes/sec)
[9] 160 (Ultra3
SCSI)
9
160 (Ultra3
SCSI)
10 80 (Ultra2
SCSI)
[10] 80 (Ultra2
SCSI)
12 40 (Ultra
SCSI)
12
40 (Ultra
SCSI)
25 20 (Fast
SCSI)
25
20 (Fast
SCSI)
Sync Period
40 12.5
40
12.5
Select the proper speed in
synchronous transfer.
Exec Throttle
1, 4, 8, [16], 32,
64, 128, 255
1, 4, 8, [16], 32, 64,
128, 255
Do not change the factory setting.
[ ]: Factory-set
Summary of Contents for Express5800/320Lb FT Linux
Page 10: ...iv This page is intentionally left blank ...
Page 16: ...x This page is intentionally left blank ...
Page 19: ...Precautions for Use 1 3 Label A Label B Label C Label E Label D ...
Page 20: ...1 4 Precautions for Use Rack mount model Label B Label A Label C Label D ...
Page 21: ...Precautions for Use 1 5 Label D Label C Label B Label A ...
Page 22: ...1 6 Precautions for Use PCI CPU Modules PCI Module CPU Module Label A Label A Label A ...
Page 36: ...1 20 Precautions for Use This page is intentionally left blank ...
Page 44: ...2 8 General Description Front View inside Tower model Rack mount model ...
Page 70: ...2 34 General Description This page is intentionally left blank ...
Page 118: ...3 48 Setup This page is intentionally left blank ...
Page 162: ...4 44 System Configuration This page is intentionally left blank ...
Page 294: ...6 14 Maintenance This page is intentionally left blank ...
Page 336: ...7 42 Troubleshooting This page is intentionally left blank ...
Page 355: ...System Upgrade 8 19 15 Check the disk you selected and click Next 16 Click Complete ...
Page 399: ...System Upgrade 8 63 Cable ties included with cabinet ...
Page 410: ...8 74 System Upgrade This page is intentionally left blank ...
Page 412: ...A 2 Specifications This page is intentionally left blank ...

