Installing and Using Utilities 5-99
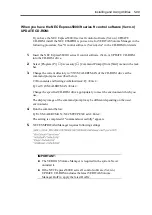
When you have the NEC Express5800/ft series ft control software (Ver:n.n)
UPDATE CD-ROM:
If you have the NEC Express5800/ft series ft control software (Ver:n.n) UPDATE
CD-ROM, install the NEC ESMPRO report service for VERITAS Volume Manager in the
following procedure. See "ft control software (Ver:n.n).doc" in the CD-ROM for details.
1.
Insert the NEC Express5800/ft series ft control software (Ver:n.n) UPDATE CD-ROM
into the CD-ROM drive.
2.
Select [Program (P)]
→
[Accessory]
→
[Command Prompt] from [Start] menu in the task
bar.
3.
Change the current directory to \VXVM\ALERTMAN of the CD-ROM drive at the
command prompt as described below.
C:\Documents and Settings\Administrator>Q: <Enter>
Q:\>cd VxVM\ALERTMAN <Enter>
Change the specified CD-ROM drive appropriately to meet the environment which you
use.
The display image of the command prompt may be different depending on the used
environment.
4.
Run the commend below:
Q:\VxVM\ALERTMAN> NECSETUP.EXE add <Enter>
The setting is completed if "command successfully" appears.
5.
NEC ESMPRO/AlertManager requires following settings.
IMPORTANT:
The VERITAS Volume Manager is required in the system. Never
uninstall it.
If the NEC Express5800/ft series ft control software (Ver:n.n)
UPDATE CD-ROM includes the latest VERITAS Volume
Manager HotFix, apply the latest HotFix.
Summary of Contents for Express5800/320Lb FT Linux
Page 10: ...iv This page is intentionally left blank ...
Page 16: ...x This page is intentionally left blank ...
Page 19: ...Precautions for Use 1 3 Label A Label B Label C Label E Label D ...
Page 20: ...1 4 Precautions for Use Rack mount model Label B Label A Label C Label D ...
Page 21: ...Precautions for Use 1 5 Label D Label C Label B Label A ...
Page 22: ...1 6 Precautions for Use PCI CPU Modules PCI Module CPU Module Label A Label A Label A ...
Page 36: ...1 20 Precautions for Use This page is intentionally left blank ...
Page 44: ...2 8 General Description Front View inside Tower model Rack mount model ...
Page 70: ...2 34 General Description This page is intentionally left blank ...
Page 118: ...3 48 Setup This page is intentionally left blank ...
Page 162: ...4 44 System Configuration This page is intentionally left blank ...
Page 294: ...6 14 Maintenance This page is intentionally left blank ...
Page 336: ...7 42 Troubleshooting This page is intentionally left blank ...
Page 355: ...System Upgrade 8 19 15 Check the disk you selected and click Next 16 Click Complete ...
Page 399: ...System Upgrade 8 63 Cable ties included with cabinet ...
Page 410: ...8 74 System Upgrade This page is intentionally left blank ...
Page 412: ...A 2 Specifications This page is intentionally left blank ...

