6-4 Maintenance
6.
Soak a soft cloth in water, squeeze it firmly and wipe the server with it once again.
7.
Wipe the server with a dry cloth.
8.
Wipe off dust from the fan exhaust opening on the rear of the server with a dry cloth.
Cleaning the Keyboard and Mouse
Make sure that the server and peripheral devices are all off-powered (the POWER LED goes off),
and then wipe the keyboard surface with a dry cloth.
The mouse operation depends on the degree of smoothness of the internal ball rotation. To keep
the mouse ball clean, use the mouse in a place with little dust. Follow the steps below to clean the
mouse regularly:
1.
Make sure that the server is off-powered (the POWER LED goes off).
2.
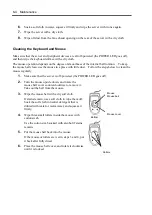
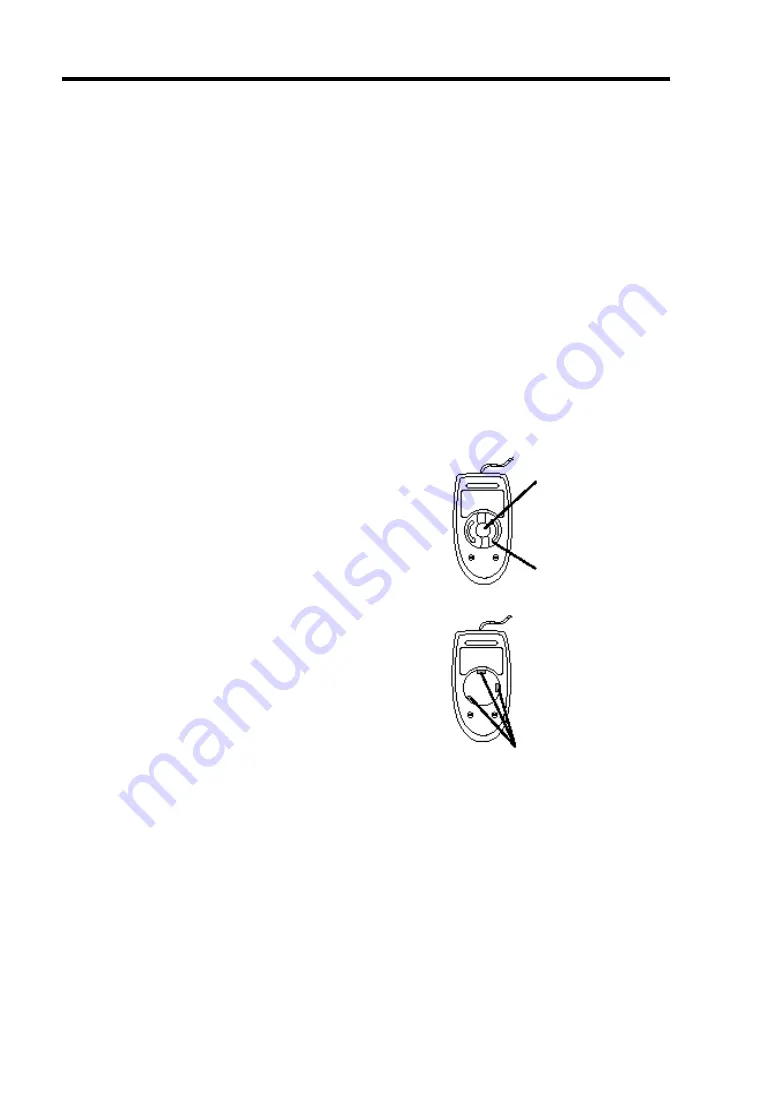
Turn the mouse upside down, and rotate the
mouse ball cover counterclockwise to remove it.
Take out the ball from the mouse.
3.
Wipe the mouse ball with a dry soft cloth.
If stains remain, use a soft cloth to wipe them off.
Soak the soft cloth in neutral detergent that is
diluted with water or warm water, and squeeze it
firmly,.
4.
Wipe three small rollers inside the mouse with
cotton swab.
Use the cotton swab soaked with alcohol if stains
remain.
5.
Put the mouse ball back into the mouse.
If the mouse or rollers are wet in steps 3 and 4, put
it back after fully dried.
6.
Place the mouse ball cover, and rotate it clockwise
until it is locked.
Bottom
Mouse
Mouse cover
Mouse ball
Rollers
Summary of Contents for Express5800/320Lb FT Linux
Page 10: ...iv This page is intentionally left blank ...
Page 16: ...x This page is intentionally left blank ...
Page 19: ...Precautions for Use 1 3 Label A Label B Label C Label E Label D ...
Page 20: ...1 4 Precautions for Use Rack mount model Label B Label A Label C Label D ...
Page 21: ...Precautions for Use 1 5 Label D Label C Label B Label A ...
Page 22: ...1 6 Precautions for Use PCI CPU Modules PCI Module CPU Module Label A Label A Label A ...
Page 36: ...1 20 Precautions for Use This page is intentionally left blank ...
Page 44: ...2 8 General Description Front View inside Tower model Rack mount model ...
Page 70: ...2 34 General Description This page is intentionally left blank ...
Page 118: ...3 48 Setup This page is intentionally left blank ...
Page 162: ...4 44 System Configuration This page is intentionally left blank ...
Page 294: ...6 14 Maintenance This page is intentionally left blank ...
Page 336: ...7 42 Troubleshooting This page is intentionally left blank ...
Page 355: ...System Upgrade 8 19 15 Check the disk you selected and click Next 16 Click Complete ...
Page 399: ...System Upgrade 8 63 Cable ties included with cabinet ...
Page 410: ...8 74 System Upgrade This page is intentionally left blank ...
Page 412: ...A 2 Specifications This page is intentionally left blank ...


