Maintenance 6-5
Cleaning the Floppy Disk Drive
A read/write error may occur due to stains on the read/write head of the floppy disk drive.
Use the cleaner dedicated for floppy disk drive to clean the read/write head. It is recommended to
clean the head on regular basis.
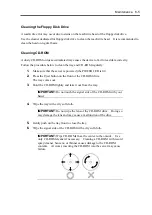
Cleaning CD-ROM
A dusty CD-ROM or dust-accumulated tray causes the device to fail to read data correctly.
Follow the procedure below to clean the tray and CD-ROM regularly:
1.
Make sure that the server is powered (the POWER LED is lit).
2.
Press the Eject button on the front of the CD-ROM drive.
The tray comes out.
3.
Hold the CD-ROM lightly and take it out from the tray.
IMPORTANT:
Do not touch the signal side of the CD-ROM with your
hand.
4.
Wipe the tray with a dry soft cloth.
IMPORTANT:
Do not wipe the lens of the CD-ROM drive. Doing so
may damage the lens and may cause a malfunction of the drive.
5.
Gently push on the tray front to close the tray.
6.
Wipe the signal side of the CD-ROM with a dry soft cloth.
IMPORTANT:
Wipe CD-ROMs from the center to the outside. Use
only CD-ROM cleaner if necessary. Cleaning a CD-ROM with record
spray/cleaner, benzene, or thinner causes damage to the CD-ROM
contents. At worst, inserting the CD-ROM into the server may cause
failure.
Summary of Contents for Express5800/320Lb FT Linux
Page 10: ...iv This page is intentionally left blank ...
Page 16: ...x This page is intentionally left blank ...
Page 19: ...Precautions for Use 1 3 Label A Label B Label C Label E Label D ...
Page 20: ...1 4 Precautions for Use Rack mount model Label B Label A Label C Label D ...
Page 21: ...Precautions for Use 1 5 Label D Label C Label B Label A ...
Page 22: ...1 6 Precautions for Use PCI CPU Modules PCI Module CPU Module Label A Label A Label A ...
Page 36: ...1 20 Precautions for Use This page is intentionally left blank ...
Page 44: ...2 8 General Description Front View inside Tower model Rack mount model ...
Page 70: ...2 34 General Description This page is intentionally left blank ...
Page 118: ...3 48 Setup This page is intentionally left blank ...
Page 162: ...4 44 System Configuration This page is intentionally left blank ...
Page 294: ...6 14 Maintenance This page is intentionally left blank ...
Page 336: ...7 42 Troubleshooting This page is intentionally left blank ...
Page 355: ...System Upgrade 8 19 15 Check the disk you selected and click Next 16 Click Complete ...
Page 399: ...System Upgrade 8 63 Cable ties included with cabinet ...
Page 410: ...8 74 System Upgrade This page is intentionally left blank ...
Page 412: ...A 2 Specifications This page is intentionally left blank ...

