Troubleshooting 7-3
ERROR MESSAGES
If the NEC Express5800/ft series enters the abnormal state, the error is posted by various means.
This section explains the types of error messages.
Error Messages by LED Indication
The LEDs on the front and rear panels of the NEC Express5800/ft series and near the handles of
hard disks inform the user of the various server statuses by the colors and the patterns of going on,
going off, and flashing. If trouble seems to have occurred, check the LED indication. For the
LED indication and meanings, see Chapter 2.
Error Messages on the Liquid Crystal Display (LCD)
The LCD on the front panel of the NEC Express5800/ft series displays the NEC Express5800/ft
series status all the time. If an error occurs, the LCD displays the error message.
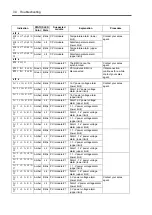
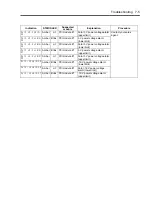
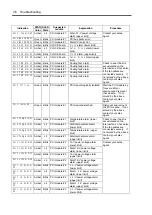
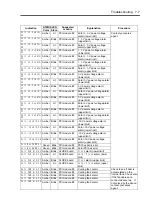
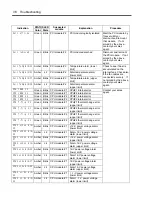
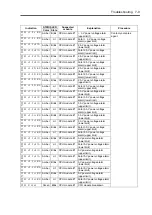
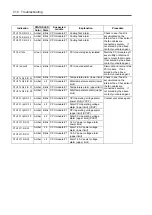
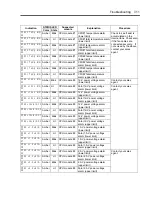
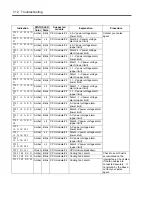
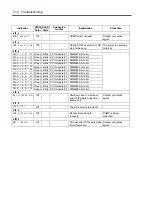
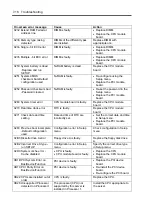
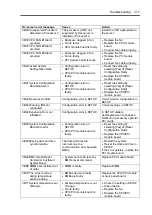
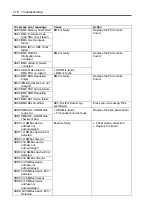
The following tables show the messages that are to be displayed on the LCD, and explain the
meanings and procedures:
IMPORTANT:
Although NEC Express5800/320Lb(-R) does not have
an LCD on its front, you can check error messages from MWA or NEC
ESMPRO Manager as follows:
MWA: On a desired server, select [Start BMC dialog] from the
Server menu. BMC dialog box will show the LCD status as well
as server power status and LED status.
NEC ESMPRO Manager: On Joint Viewer, select a desired server
and start Data Viewer. You can check the messages on Data
Viewer.
Summary of Contents for Express5800/320Lb FT Linux
Page 10: ...iv This page is intentionally left blank ...
Page 16: ...x This page is intentionally left blank ...
Page 19: ...Precautions for Use 1 3 Label A Label B Label C Label E Label D ...
Page 20: ...1 4 Precautions for Use Rack mount model Label B Label A Label C Label D ...
Page 21: ...Precautions for Use 1 5 Label D Label C Label B Label A ...
Page 22: ...1 6 Precautions for Use PCI CPU Modules PCI Module CPU Module Label A Label A Label A ...
Page 36: ...1 20 Precautions for Use This page is intentionally left blank ...
Page 44: ...2 8 General Description Front View inside Tower model Rack mount model ...
Page 70: ...2 34 General Description This page is intentionally left blank ...
Page 118: ...3 48 Setup This page is intentionally left blank ...
Page 162: ...4 44 System Configuration This page is intentionally left blank ...
Page 294: ...6 14 Maintenance This page is intentionally left blank ...
Page 336: ...7 42 Troubleshooting This page is intentionally left blank ...
Page 355: ...System Upgrade 8 19 15 Check the disk you selected and click Next 16 Click Complete ...
Page 399: ...System Upgrade 8 63 Cable ties included with cabinet ...
Page 410: ...8 74 System Upgrade This page is intentionally left blank ...
Page 412: ...A 2 Specifications This page is intentionally left blank ...


