Troubleshooting 7-41
14.
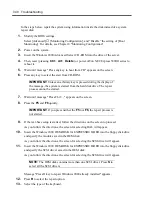
If the selection is prompted, press
R
to select the system repair processing.
15.
If the selection is prompted, select either of the following options:
[Manual repair]
(press
M
)
Do not select this option unless you are skilled user or system
Administrator. The use of this option allows the problems of
system files, partition boot sectors, and startup environment to be
repaired.
[High speed repair]
(press
F
)
This option can be used quite simply. The user may not do
anything. If this option is selected, the system repair disk program
starts repairing the problems associated with system file, system
disk partition boot sector, and startup environment (when more
than one operating system are installed in the system).
16.
Followi the directions on the screen. Press
L
on the screen prompting you to insert the
system repair disk.
After the disk is reviewed, the system is restarted once.
NOTE:
The processes without use of the system repair disk are
performed.
17.
Repeat Steps 1 to 15 above.
The repair process is started.
During the repair process, unfound or defected files are replaced with the corresponding
files in C:\1386 of the hard disk or the systemroot\ Repair folder of the system partition.
The configuration changes performed after the setup are notupdated to the replaced files .
18.
Follow the directions on the screen.
Write down the names of files in which faults are detected. This helps to diagnose how the
system has been defected.
19.
Terminate the process if it succeeds in the system repair.
If the computer is restarted without any problem, the replaced files are copied to the hard
disk appropriately.
20.
Execute system update.
For details, see Chapter 3 "Updating the System".
21.
Change the BIOS setup.
Select [Advanced]
→
[Monitoring Configuration], and select “Enable” the setting of
[Boot Monitoring]. For details, see Chapter 4 "Monitoring Configuration".
Summary of Contents for Express5800/320Lb FT Linux
Page 10: ...iv This page is intentionally left blank ...
Page 16: ...x This page is intentionally left blank ...
Page 19: ...Precautions for Use 1 3 Label A Label B Label C Label E Label D ...
Page 20: ...1 4 Precautions for Use Rack mount model Label B Label A Label C Label D ...
Page 21: ...Precautions for Use 1 5 Label D Label C Label B Label A ...
Page 22: ...1 6 Precautions for Use PCI CPU Modules PCI Module CPU Module Label A Label A Label A ...
Page 36: ...1 20 Precautions for Use This page is intentionally left blank ...
Page 44: ...2 8 General Description Front View inside Tower model Rack mount model ...
Page 70: ...2 34 General Description This page is intentionally left blank ...
Page 118: ...3 48 Setup This page is intentionally left blank ...
Page 162: ...4 44 System Configuration This page is intentionally left blank ...
Page 294: ...6 14 Maintenance This page is intentionally left blank ...
Page 336: ...7 42 Troubleshooting This page is intentionally left blank ...
Page 355: ...System Upgrade 8 19 15 Check the disk you selected and click Next 16 Click Complete ...
Page 399: ...System Upgrade 8 63 Cable ties included with cabinet ...
Page 410: ...8 74 System Upgrade This page is intentionally left blank ...
Page 412: ...A 2 Specifications This page is intentionally left blank ...

