System Upgrade 8-51
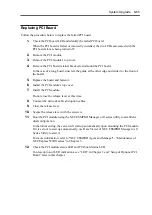
Precautions
If you remove a PCI module during operation, dual configuration of its internal hard disks
will be cancelled. If you mount the module again, the dual configuration will be restored
automatically. However, do not perform a system shutdown or remove any of the PCI
modules before the dual configuration is completed. Otherwise, hard disk data could be
corrupted.
Removing the primary (active) module will cause unexpected trouble. Be sure to
remove the secondary (inactive) module.
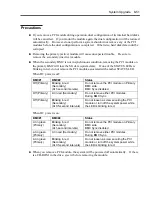
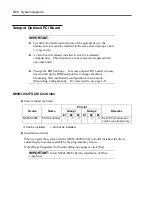
When the secondary BMC is not in synchronous condition, removing the PCI module on
the primary BMC will lose the SG data (system data). If one of the STATUS LEDs is
blinking in red, do not remove the PCI module associated with another STATUS LED.
When DC power is off:
BMC#1 BMC#2
Status
Off (Primary)
Blinking in red
(Secondary)
(At 1-second intervals)
Do not remove the PCI module on Primary
BMC side.
BMC Sync disabled.
Off (Primary)
Lit in red (Secondary)
Do not remove either PCI modules.
During BMC Sync.
Off (Primary)
Blinking in red
(Secondary)
(At 0.5-second intervals)
Do not loosen a screw securing the PCI
module or turn off the system power while
the LED is blinking in red.
When DC power is on:
BMC#1 BMC#2
Status
Lit in green
(Primary)
Blinking in red
(Secondary)
(At 1-second intervals)
Do not remove the PCI module on Primary
BMC side.
BMC Sync disabled.
Lit in green
(Primary)
Lit in red (Secondary)
Do not remove either PCI modules.
During BMC Sync.
Lit in green
(Primary)
Blinking in red
(Secondary)
(At 0.5-second intervals)
Do not loosen a screw securing the PCI
module or turn off the system power while
the LED is blinking in red.
When you remove a PCI module, the system will be powered off automatically. If there
is a CD-ROM in the drive, eject it before removing the module.
Summary of Contents for Express5800/320Lb FT Linux
Page 10: ...iv This page is intentionally left blank ...
Page 16: ...x This page is intentionally left blank ...
Page 19: ...Precautions for Use 1 3 Label A Label B Label C Label E Label D ...
Page 20: ...1 4 Precautions for Use Rack mount model Label B Label A Label C Label D ...
Page 21: ...Precautions for Use 1 5 Label D Label C Label B Label A ...
Page 22: ...1 6 Precautions for Use PCI CPU Modules PCI Module CPU Module Label A Label A Label A ...
Page 36: ...1 20 Precautions for Use This page is intentionally left blank ...
Page 44: ...2 8 General Description Front View inside Tower model Rack mount model ...
Page 70: ...2 34 General Description This page is intentionally left blank ...
Page 118: ...3 48 Setup This page is intentionally left blank ...
Page 162: ...4 44 System Configuration This page is intentionally left blank ...
Page 294: ...6 14 Maintenance This page is intentionally left blank ...
Page 336: ...7 42 Troubleshooting This page is intentionally left blank ...
Page 355: ...System Upgrade 8 19 15 Check the disk you selected and click Next 16 Click Complete ...
Page 399: ...System Upgrade 8 63 Cable ties included with cabinet ...
Page 410: ...8 74 System Upgrade This page is intentionally left blank ...
Page 412: ...A 2 Specifications This page is intentionally left blank ...

