2-26 General Description
POST Check
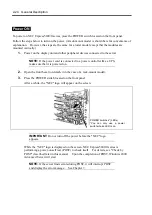
POST (power-on self test) is a self-test function stored on the motherboard of NEC Express5800/ft
series.
When you power on the server, POST will start automatically to check the motherboard, ECC
memory modules, CPU modules, keyboard, mouse, etc. It also shows startup messages for various
BIOS setup utilities.
According to the factory default settings, the “NEC” logo appears on the display while POST is
being performed. (To view POST’s details, press
Esc
.)
Tips:
You can view POST details from the beginning without the need to
press
Esc
when the BIOS menu is displayed: select [System
Configuration]
→
[Advanced], and set [Boot-time Diagnostic
Screen] to "Enabled" (see Chapter 4).
You can view the test items and details from a management PC
where NEC ESMPRO Manager or MWA is installed.
You don't always need to check POST details. You will need to check messages when:
You install a new NEC Express5800/ft series.
A failure is suspected.
You hear several beeps between the time of the power-on and OS start-up.
The display unit or the LCD* shows an error message.
*For details, see “Error Messages on LCD” in Chapter 7.
Summary of Contents for Express5800/320Lb FT Linux
Page 10: ...iv This page is intentionally left blank ...
Page 16: ...x This page is intentionally left blank ...
Page 19: ...Precautions for Use 1 3 Label A Label B Label C Label E Label D ...
Page 20: ...1 4 Precautions for Use Rack mount model Label B Label A Label C Label D ...
Page 21: ...Precautions for Use 1 5 Label D Label C Label B Label A ...
Page 22: ...1 6 Precautions for Use PCI CPU Modules PCI Module CPU Module Label A Label A Label A ...
Page 36: ...1 20 Precautions for Use This page is intentionally left blank ...
Page 44: ...2 8 General Description Front View inside Tower model Rack mount model ...
Page 70: ...2 34 General Description This page is intentionally left blank ...
Page 118: ...3 48 Setup This page is intentionally left blank ...
Page 162: ...4 44 System Configuration This page is intentionally left blank ...
Page 294: ...6 14 Maintenance This page is intentionally left blank ...
Page 336: ...7 42 Troubleshooting This page is intentionally left blank ...
Page 355: ...System Upgrade 8 19 15 Check the disk you selected and click Next 16 Click Complete ...
Page 399: ...System Upgrade 8 63 Cable ties included with cabinet ...
Page 410: ...8 74 System Upgrade This page is intentionally left blank ...
Page 412: ...A 2 Specifications This page is intentionally left blank ...

