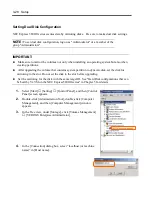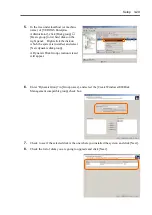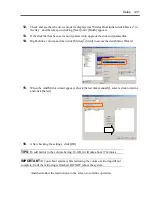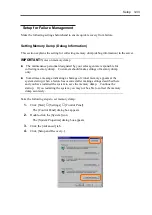
Setup 3-19
About Windows 2000 Advanced Server
Use the ft series Setup program to install Windows 2000 Advanced Server. Note the following at
installation
IMPORTANT:
Complete all the setups such as the memory expansion and BIOS setting before installing
Windows 2000 Advanced Server.
NEC software package, which is to be purchased separately, is also provided with the
documentation for installation. However, see this User's Guide for installation into this server.
After completing the ft series Setup program, make settings for failure management (e.g.,
memory dump (debug information) setting) according to Chapter 3.
Installation into a Mirrored Volume
To install Windows 2000 Advanced Server into mirrored volumes by using [Volume Manager for
Windows], disable volume mirroring to return to the basic disk before starting the installation, and
mirror the volumes when completing the installation.
To create mirrored volumes or disable/delete them, select [Volume Manager for Windows] from
[Computer Management].
Size of the Partition to be Created
The required minimum size of a partition to install the system can be obtained from the following
formula:
paging file size + dump file size
2048MB
= size required for installation
Paging file size (recommended)
= size of memory mounted*
×
1.5
Dump file size
= size of memory mounted* + 12MB
IMPORTANT:
The above paging file size is necessary for collecting debug information (memory dump). If
a value smaller than the [Recommended] value is set for the initial size of the paging file,
correct debug information (memory dump) may not be collected.
The maximum paging file size is 4095MB in a partition. If 1.5 times the size of mounted
memory is larger than 4095MB, set the size at 4095MB.
If the size of mounted memory is larger than 2GB, the maximum size of dump file is
“12MB.”
NOTE:
The mounted memory size means the total of memory installed on a single CPU module
For example, if memory of 512MB is mounted, the required minimum partition size obtained from
Summary of Contents for Express5800/320Lb FT Linux
Page 10: ...iv This page is intentionally left blank ...
Page 16: ...x This page is intentionally left blank ...
Page 19: ...Precautions for Use 1 3 Label A Label B Label C Label E Label D ...
Page 20: ...1 4 Precautions for Use Rack mount model Label B Label A Label C Label D ...
Page 21: ...Precautions for Use 1 5 Label D Label C Label B Label A ...
Page 22: ...1 6 Precautions for Use PCI CPU Modules PCI Module CPU Module Label A Label A Label A ...
Page 36: ...1 20 Precautions for Use This page is intentionally left blank ...
Page 44: ...2 8 General Description Front View inside Tower model Rack mount model ...
Page 70: ...2 34 General Description This page is intentionally left blank ...
Page 118: ...3 48 Setup This page is intentionally left blank ...
Page 162: ...4 44 System Configuration This page is intentionally left blank ...
Page 294: ...6 14 Maintenance This page is intentionally left blank ...
Page 336: ...7 42 Troubleshooting This page is intentionally left blank ...
Page 355: ...System Upgrade 8 19 15 Check the disk you selected and click Next 16 Click Complete ...
Page 399: ...System Upgrade 8 63 Cable ties included with cabinet ...
Page 410: ...8 74 System Upgrade This page is intentionally left blank ...
Page 412: ...A 2 Specifications This page is intentionally left blank ...

