3-22 Setup
Installing Windows 2000 Advanced Server
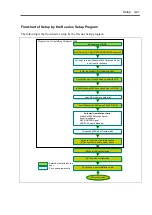
The following explains the setup procedure using the ft series Setup program:
IMPORTANT:
Be sure to apply the required version of Windows2000 Service Pack.
Other service packs cannot be applied.
If you apply the service pack again after the setup, see “Apply Windows2000 Service
Pack.”
NOTE:
For the latest information on support for Windows 2000 Service Pack, contact your sales
agent.
You need the following to install Windows 2000 Advanced Server:
NEC EXPRESSBUILDER (CD-ROM)
ft Control Software UPDATE CD-ROM
This CD-ROM is used to update ft control software; it may not be included with the equipment.
(Not included if “NEC EXPRESSBUILDER” CD-ROM contains the latest version of software
programs at the time of shipment.)
Microsoft Windows 2000 Advanced Server CD-ROM
Windows 2000 Service Pack CD-ROM
User’s Guide (this manual)
IMPORTANT:
For the latest release of ft control software and purchase of the latest version of
its Update CD-ROM, contact your sales agent.
1.
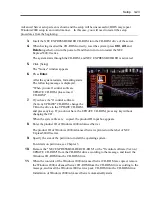
Turn on the peripheral equipment, and then the NEC Express5800/ft series.
IMPORTANT:
You can mount only one disk into Slot #1 of the PCI module (for Group 1); the PCI module
(for Group2) must be detached. If more than one disk is mounted, you cannot specify the
disk to perform installation. If the PCI module (for Group2) is attached, the system may not
recognize the hard disk during installation.
Before starting setup, attach all CPU modules.
Detach all LAN cables.
Detach all optional PCI boards before starting setup.
2.
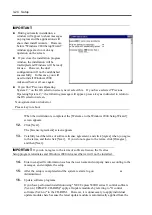
Change the BIOS setup.
Select [Advanced]
→
[Monitoring Configuration], and select [Disable] for [Boot
Monitoring]. For details, see Chapter 4.
IMPORTANT:
If you skip this setting, BIOS will be restarted forcefully while Windows2000
Summary of Contents for Express5800/320Lb FT Linux
Page 10: ...iv This page is intentionally left blank ...
Page 16: ...x This page is intentionally left blank ...
Page 19: ...Precautions for Use 1 3 Label A Label B Label C Label E Label D ...
Page 20: ...1 4 Precautions for Use Rack mount model Label B Label A Label C Label D ...
Page 21: ...Precautions for Use 1 5 Label D Label C Label B Label A ...
Page 22: ...1 6 Precautions for Use PCI CPU Modules PCI Module CPU Module Label A Label A Label A ...
Page 36: ...1 20 Precautions for Use This page is intentionally left blank ...
Page 44: ...2 8 General Description Front View inside Tower model Rack mount model ...
Page 70: ...2 34 General Description This page is intentionally left blank ...
Page 118: ...3 48 Setup This page is intentionally left blank ...
Page 162: ...4 44 System Configuration This page is intentionally left blank ...
Page 294: ...6 14 Maintenance This page is intentionally left blank ...
Page 336: ...7 42 Troubleshooting This page is intentionally left blank ...
Page 355: ...System Upgrade 8 19 15 Check the disk you selected and click Next 16 Click Complete ...
Page 399: ...System Upgrade 8 63 Cable ties included with cabinet ...
Page 410: ...8 74 System Upgrade This page is intentionally left blank ...
Page 412: ...A 2 Specifications This page is intentionally left blank ...

