Setup 3-25
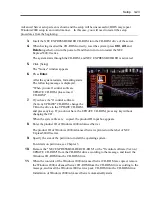
NEC Express5800/ft series ft control software (Ver:n.n) UPDATE CD-ROM.
– ft control software (Ver:n.n) update module
– VERITAS Volume Manager
– ESMPRO Report Service for VERITAS Volume Manager
Although NEC ESMPRO Agent is automatically installed at ft series setup, the latest
module is not applied. You need to apply an update module separately from NEC
Express5800/ft series ft control software (Ver:n.n) UPDATE CD-ROM.
17.
Register VERITAS Volume Manager’s authentic license key.
Perform replacement of the license key by referring to [General Procedures] – [License
Procedures] – [Using the System License Command] of
VM3.1_Win2k_Users_Guide.pdf
stored on the included NEC EXPRESSBUILDER CD-ROM. This pdf file is located in
the following directory:
CD-ROM: \VXVM\VM Documentation
You will find VERITAS Volume Manager’s authentic license key in an ID label that is
placed on NEC Express5800/ft series. The license key does not use the following
alphanumeric characters: 1, 5, and Q.
IMPORTANT:
Do not use VERITAS Volume Manager’s dynamic relocation and hot spare
functions for this server.
18.
After the re-startup, log on to the system as Administrator.
19.
Insert a PCI module (for Group 2).
IMPORTANT:
Do not mount disks in advance into the module you are going to insert. You
will mount disks in the procedures of setting dual disk configuration.
Installation of Windows2000 Advanced Server is completed. After checking if there are
four icons for “Network and Dial-up Connections,” go on to dual configuration of LAN
and disk.
Summary of Contents for Express5800/320Lb FT Linux
Page 10: ...iv This page is intentionally left blank ...
Page 16: ...x This page is intentionally left blank ...
Page 19: ...Precautions for Use 1 3 Label A Label B Label C Label E Label D ...
Page 20: ...1 4 Precautions for Use Rack mount model Label B Label A Label C Label D ...
Page 21: ...Precautions for Use 1 5 Label D Label C Label B Label A ...
Page 22: ...1 6 Precautions for Use PCI CPU Modules PCI Module CPU Module Label A Label A Label A ...
Page 36: ...1 20 Precautions for Use This page is intentionally left blank ...
Page 44: ...2 8 General Description Front View inside Tower model Rack mount model ...
Page 70: ...2 34 General Description This page is intentionally left blank ...
Page 118: ...3 48 Setup This page is intentionally left blank ...
Page 162: ...4 44 System Configuration This page is intentionally left blank ...
Page 294: ...6 14 Maintenance This page is intentionally left blank ...
Page 336: ...7 42 Troubleshooting This page is intentionally left blank ...
Page 355: ...System Upgrade 8 19 15 Check the disk you selected and click Next 16 Click Complete ...
Page 399: ...System Upgrade 8 63 Cable ties included with cabinet ...
Page 410: ...8 74 System Upgrade This page is intentionally left blank ...
Page 412: ...A 2 Specifications This page is intentionally left blank ...

