background image


Getting started 


21 

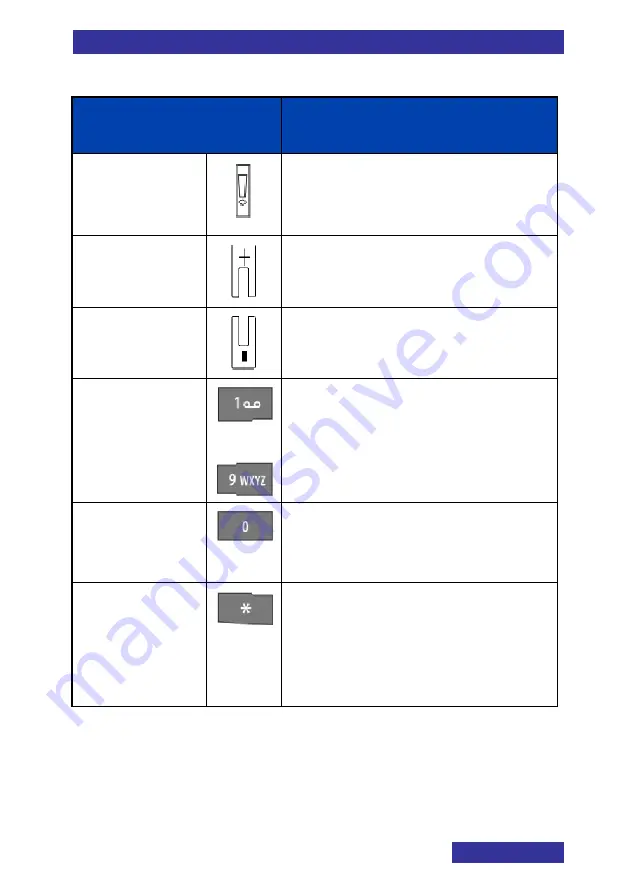
Table 2: Keys of the Handset 

Key 

Description 

SOS


Long press the (on I755: red) SOS 
key to make an emergency call (if 
configured). 

VOLUME UP


To increase the handset volume. 

VOLUME DOWN


Decrease the handset volume. 

1–9 


Use 

1

 – 

9

 to 


Insert a digit in a number; 


Insert a character; 


Select a 

Speed dial

 number 


Use 

0

 to 


Insert a 0 in a number; 


Insert a character. 


Use 

*

 to 


Insert a * in a number; 


Insert a character 


Insert a decimal point 
(Calculator feature). 

Summary of Contents for G355

Page 1: ...Business Mobility IP DECT DECT G355 G955 and I755 Handsets Basic User Guide...

Page 2: ...gestion for improving this handbook they are invited to send the relevant details to NEC Nederland B V P O BOX 32 1200 JD HILVERSUM THE NETHERLANDS NEC Nederland B V 2012 All right are reserved Reprod...

Page 3: ...ser manual or to this user manual itself at any time without obligation to notify any person of such revision or improvements The pictures icons screen shots and diagrams used in this user manual have...

Page 4: ...M card added August 2008 New features of Feature Pack 2 added o Possible to determine whether normal message are displayed immediately upon receipt or not o Set up of enquiry call using the Central Di...

Page 5: ...cluded November 2011 o Basic User Guide created from the October 2009 User Manual o All non basic parts moved to additional manuals o Basic User Guide based on software v03 09 o Manual made more pictu...

Page 6: ...ging the batteries 16 Charging a spare battery I755 only 16 Charging guidelines 17 Charging and operating times 18 Charge display 18 Handset keys and display areas 19 Handset keys 20 Display 22 Icon l...

Page 7: ...ne mute 35 Activate the microphone unmute 35 Using Loudspeaker 35 Activate the loudspeaker 35 Deactivate the loudspeaker 35 Transferring a call 36 Dialling second destination then transfer 36 Using th...

Page 8: ...essages 52 Confirming receipts 53 Message list full 53 Message Menu Sections 54 Open Message menu section 54 Actions on the messages 54 Reading a message 54 Writing changing and saving a message 55 Se...

Page 9: ...menu 77 Profiles 77 Selecting an active profile 77 Switching quickly to and from the Silent profile 78 Editing a profile 78 Resetting profiles to factory settings 79 Setting the time and date 79 Sett...

Page 10: ...configuration 100 Caller filter configuration 101 Adding an entry to the Caller filter list 101 Editing entries in the Caller filter list 102 Deleting an entry from the Caller filter list 103 Deletin...

Page 11: ...headset 114 Rename a Bluetooth headset 115 Retrieve Information Bluetooth headset 115 Delete Bluetooth headset 116 Delete All Bluetooth headsets 117 Handset accessories 118 Installing the belt clip on...

Page 12: ...e present or that appropriate measures are taken The functionality of the mandown alarm is based on a horizontal handset position Situations can occur in which the end user requires help but the mando...

Page 13: ...uction 13 Furthermore the I755x complies to EN60079 0 EN60079 11 And the following ATEX IEC information holds 0 C Ta 45 C Ui 4 2V li 0 75A Pi 3 15W Ci 196uF Li 22uH II 3 G Ex ic IIC T4 Gc T V 12 ATEX...

Page 14: ...5 G955 1 Place the handset face down on a flat surface 2 Remove the battery compartment cover 3 Push the battery pack into the casing as shown in Figure 1 4 Press the battery pack down until it locks...

Page 15: ...tery has correctly and completely locked into the handset before going into hazardous area 1 Place the handset face down on a flat surface 2 Push the battery pack into the casing as shown in Figure 2...

Page 16: ...set in the charger as shown in Figure 3 Attention The handset if switched off automatically switches on when placed in the charger Charging a spare battery I755 only The I755 Desktop Charger can be us...

Page 17: ...batteries marked with Battery Pack for RTX8050 Ex for the RTX8050 Ex IP54 ATEX Handset Do not use any battery WITHOUT marked with Battery Pack for RTX8050 Ex since this may present a risk of leakage...

Page 18: ...hours stand by time I755x 8 hours talk time 100 hours stand by time Charge display The battery charge status appears on the display screen When the battery is nearly discharged the battery symbol fla...

Page 19: ...ments of the G355 G955 and I755 1 Volume up key 2 Volume down key 3 SOS key 4 OK key 5 Call green key 6 Headset jack connector 7 Microphone 8 Earpiece 9 Colour display 10 Soft keys 11 CLR red key 12 N...

Page 20: ...right of the display UP Use the navigation keys to Select the required menu icon or menu element Navigate the cursor In some cases change increase decrease a given value Access the shortcut assigned...

Page 21: ...l if configured VOLUME UP To increase the handset volume VOLUME DOWN Decrease the handset volume 1 9 Use 1 9 to Insert a digit in a number Insert a character Select a Speed dial number 0 Use 0 to Inse...

Page 22: ...a in a number Switch between the current active profile and the Silent profile by long pressing more than 2 seconds the key Display Figure 6 shows the three areas of the display Icon line Dialogue are...

Page 23: ...ge received Attention This icon if active replaces the Bluetooth connection icon Voice message waiting indication Keypad locked Activated alarm Attention This icon if active replaces the Keypad locked...

Page 24: ...gue area displays information like DECT system name handset s DNR time and date and so on Call mode In Call mode the dialogue area displays information related to the call like number and name of the...

Page 25: ...eaker on Microphone muted while loudspeaker off Dialogue mode In Dialogue mode the dialogue area displays dialogues regarding missed calls see Figure 8 messaging and menu settings Menu mode In Menu mo...

Page 26: ...tings screen Edit mode In Edit mode you can use the dialogue area to enter and edit digits e g for numbers and text Table 5 shows the key to press to insert letters numbers or symbols Figure 10 Contac...

Page 27: ...L 5 j k l 5 6 M N O 6 m n o 6 7 P Q R S 7 p q r s 7 8 T U V 8 t u v 8 9 W X Y Z 9 w x y z 9 0 space 0 _ space 0 _ Soft key line Soft keys appear below the handset dialogue area The key functions chang...

Page 28: ...ey selection Select the appropriate left or right soft key to execute the indicated action or Press the indicated key Use the keypad Use one of the NAVIGATION keys Use LEFT and or RIGHT NAVIGATION key...

Page 29: ...o set of actions to be taken are marked by an orange line at the beginning of the actions When you have the option to change a number name or text Use the NAVIGATION keys to move the cursor to the ins...

Page 30: ...ndset off 1 Long press 2 Keypad lock Use the keypad lock feature to prevent accidental operation of the handset Attention You can dial 911 and 112 when the keypad lock is active The keypad lock does n...

Page 31: ...General functions 31 Unlocking 1 2...

Page 32: ...Enter edit Number Using Predial mode 1 Enter edit Number 2 Using Speed dial 1 Long press the digit key assigned to the phone number Using the Private or Central Directory2 1 2 3 2 Central Directory i...

Page 33: ...aking an SOS call To define the SOS number see Configuring emergency or SOS calls page 105 To make a voice call no SOS text message should be defined 1 Mandown Call I755 only To define the mandown cal...

Page 34: ...e is available only when configured see Answer mode configuration page 100 Loudspeaker off Or Or Loudspeaker on Auto answering mode This feature is available only when configured see Answer mode confi...

Page 35: ...andset Volume up Volume down Using mute during a call Deactivate the microphone mute 1 Activate the microphone unmute 1 Using Loudspeaker Attention Using the loudspeaker enhances the possibility that...

Page 36: ...edit Number Optional step s 3 Await answer 4 Using the Private or Central Directory then transfer 1 Private Or Central directory 2 Enter the first character s of the required name 3 4 Select required...

Page 37: ...Call features 37 Shuttle the call To alternate between the two parties before transfer 1...

Page 38: ...on Tab All calls Answered call Dialed call Missed call because it was unanswered or rejected One combined call list Missed call because of Caller filter block When there is more than one call to or fr...

Page 39: ...Checking the details of a call Open Calls list Or Or Or 1 Select required entry 2 3 4 5 n Dialling the number of the call list entry Open Calls list Or Or Or 1 Select required entry 2 Or First edit th...

Page 40: ...2 3 4 5 Enter edit Number 6 Transferring a number to your contacts list Open Calls list Or Or Or 1 Select required entry 2 3 4 5 6 7 Optional step s 8 Enter edit Number 9 Optional step s 10 Enter edi...

Page 41: ...14 n Transferring a number to the caller filter list3 Open Calls list Or Or Or 1 Select required entry 2 3 4 5 6 7 Optional step s 8 Enter edit Number 9 Optional step s 10 Enter edit Name 11 12 n 3 G9...

Page 42: ...Missed calls list entries will also be deleted from the list if You answer a call from the to the entry related number entry moved to the Answered calls list You dial the to the entry related number e...

Page 43: ...s Contact number maximum 32 digits Each contact can contain up to 4 numbers Each number has a type indication Table 7 Contact s number type indication Icon Description Home Mobile Work Other Open the...

Page 44: ...edit Name 7 8 9 n Changing information of a contact Open the Contacts menu 1 Select required contact 2 3 4 Depending on the required action continue with the appropriate step 5 Adding a contact numbe...

Page 45: ...Contacts 45 Deleting a contact number Editing a contact name Editing a contact ringtone VIP call Adding a contact number 5 6 7 Or Or Or 8 9 Enter edit Number 10 11 12 13 n...

Page 46: ...er or type indication 5 Select appropriate number 6 7 Or Or Or 8 9 Enter edit Number 10 11 12 13 n Deleting a contact number You can delete a number only if there is more than one number for the conta...

Page 47: ...Contacts 47 8 n 9 10 11 12 n Editing a contact name 5 6 7 Enter edit Name 8 9 10 n Editing a contact ringtone VIP call 5 6...

Page 48: ...Contacts 48 7 Note 4 Optional step s 8 9 10 11 12 13 n Deleting a contact Open the Contacts menu 1 Select required contact 2 3 4 4 For the G355 the maximum number of melodies is 10...

Page 49: ...re to place calls by dialling a one digit code see Using Speed dial page 32 Attention Only the first number added to the contact can be assigned to a Speed dial key Assigning changing or deleting a sp...

Page 50: ...ntacts 50 4 5 assign change delete assign 6 7 n change 6 7 n delete 6 7 n Transferring phone numbers to the caller filter list5 Open the Contacts menu 1 Select required contact 2 3 5 G955 and I755 onl...

Page 51: ...Contacts 51 4 Optional step s 5 Enter edit Number 6 Optional step s 7 Enter edit Name 8 7 n...

Page 52: ...less you disable the ringer the melody assigned to Ring normal msg plays when you receive a normal message If you receive a normal message during a call a short alert tone sounds Urgent messages The h...

Page 53: ...receipt of urgent and emergency messages If you do not confirm the message within 60 seconds the initiator receives a message that indicates the message was not delivered To confirm7 Positively Or Neg...

Page 54: ...r of sections Table 8 Menu section icons Icon Description New and draft Inbox Sent messages Settings Open Message menu section 1 2 3 4 Actions on the messages Reading a message Open Message menu secti...

Page 55: ...d saving a message Open Message menu section 1 Or Select required message 2 3 Enter edit Message 4 5 6 n Sending a new message or draft Open Message menu section 1 Or Select required message 2 Optiona...

Page 56: ...Messaging 56 6 Lookup contact 7 8 Select required contact 9 Optional step s 10 11 n Enter number 7 8 Enter edit Number 9 Optional step s 10 11 n Send to many...

Page 57: ...ptional step s 9 Select appropriate number 10 Optional step s 11 Repeat previous steps for all destinations 12 n Central directory 7 8 Enter the first character s of the required name 9 Optional step...

Page 58: ...message 2 3 4 Optional step s 5 Enter edit Message 6 7 Or 8 Lookup contact See Sending a new message or draft Enter number Send to many Central directory Replying to an incoming message Open Message m...

Page 59: ...9 6 Or Optional step s 7 8 n Deleting a message Open Message menu section Or Or 1 Select required message Optional step s 2 3 4 5 6 7 n Deleting all messages Open Message menu section Or Or 1 Select a...

Page 60: ...ing 60 Optional step s 2 3 4 5 6 7 n Saving sender to the contacts list Open Message menu section 1 Select required message Optional step s 2 3 4 5 6 Optional step s 7 Enter edit Number 8 9 Enter edit...

Page 61: ...on the phone is overwritten Off new message is not stored An Urgent or Emergency message is shown on the display a Normal message is rejected Sent messages to control whether sent messages are stored...

Page 62: ...ng situations if your handset is switched off if your handset is busy if your handset is out of the coverage area A new voice message dialogue appears only once i e when a caller leaves a first new me...

Page 63: ...Yes soft key to listen directly or press the No soft key to close the dialogue Defining a Voicemail number Open Message menu section 1 2 3 Lookup contact 4 5 Select required contact 7 8 n Figure 12 Vo...

Page 64: ...Messaging 64 Enter number 4 5 Enter edit Number 6 7 n Listening to voicemail Open Message menu section 1 2 3 Listen to your voicemail 4 n...

Page 65: ...65 Calendar Use the calendar to set up reminders appointments and meeting alerts Open the Calendar 1 2 3 Changing the calendar format Open the Calendar 1 2 Or 3 4 n Open a day schedule Open the Calend...

Page 66: ...Calendar 66 4 3 4 Enter edit Go to date 5 6 Adding an appointment Open a day schedule 1 2 Optional step s 3 Enter edit Start date 4 5 Enter edit Start time 6 6a Enter edit End date...

Page 67: ...Calendar 67 6b 6c Enter edit End time 7 Enter edit Subject 8 7 Enter edit Location 8 9 Optional step s 9a Enter edit Reminder date 9b 9c Enter edit Reminder time...

Page 68: ...day schedule 1 Select required appointment 2 Editing an appointment Open a day schedule 1 Select required appointment Optional step s 2 3 4 5 6 Make the necessary changes like in Adding an appointmen...

Page 69: ...69 Optional step s 2 3 4 5 6 Make the necessary changes like in Adding an appointment page 66 from step 3 Deleting an appointment Open a day schedule 1 Select required appointment Optional step s 2 3...

Page 70: ...all arrives while using one of the additional features the feature will be disrupted e g on ongoing stopwatch measurement will be stopped When you answer the incoming call you will automatically leave...

Page 71: ...Use of the stopwatch soft keys Table 9 Stopwatch soft keys Soft key Description Start a new measurement Halt the measurement Save the intermediate result and continue the measurement Continue a stoppe...

Page 72: ...Additional features 72 Alarms alarm clock Assigning or change a daily alarm 1 2 3 4 5 6 Assign Change 7 8 Enter edit Alarm time 9 10 n Turning off a daily alarm 1 2 3 4 5...

Page 73: ...8 9 n Assigning or change a recurrent alarm 1 2 3 4 5 6 Assign Change 7 Optional step s 8 Enter edit Recurrent alarm time 9 For the required days of the week 10 Note Already selected days are marked...

Page 74: ...Additional features 74 13 n Turning off a recurrent alarm 1 2 3 4 5 6 7 8 9 n...

Page 75: ...gs The following table gives the settings you can configure on your handset Table 10 Telephone setting Icon Description See Page General settings 76 Sounds Alerts settings 87 Display settings 94 Calls...

Page 76: ...e current Time date 79 Set the Language 81 Create Shortcuts to the handset menus and features by pressing a navigation key 81 Assign a certain condition to one of the three LEDs I755 only 82 Set the s...

Page 77: ...86 View information about e g software release hardware version frequency power level and so on 87 Open the General settings menu 1 2 3 4 5 Profiles You can use the following profiles Normal default...

Page 78: ...Switching quickly to and from the Silent profile Long press the key in Idle mode to switch between the active profile and the Silent profile Editing a profile Only the active profile can be edited Ope...

Page 79: ...settings Open the General settings menu 1 2 3 4 5 n Setting the time and date Note If your communication system provides the date and time then setting the date and time has only a temporary effect an...

Page 80: ...Telephone settings 80 5 Enter edit Time 6 7 Or 8 9 10 n Setting the date Open the General settings menu 1 2 3 4 5 Enter edit Date 6 7 8 9 10 n...

Page 81: ...Telephone settings 81 Setting the language Open the General settings menu 1 2 3 4 5 n Configuring shortcuts Open the General settings menu 1 2 3 Or Or Or 4 5 6 7 n...

Page 82: ...conditions to the user Missed call Text message Voice message Text or voice msg Mandown Low battery Open the General settings menu 1 2 3 Or Or 4 5 6 7 n Security options Setting the Phone lock feature...

Page 83: ...Telephone settings 83 1 2 3 4 5 6 7 Or 8 9 n Setting the Automatic keypad lock feature Open the General settings menu 1 2 3 4 5 Or 6...

Page 84: ...ne settings 84 7 n Changing the PIN code Open the General settings menu 1 2 3 4 5 6 n Changing the Proxy password Used to change the Proxy password used at SIP authentication Open the General settings...

Page 85: ...elephone settings 85 2 3 4 Optional step s 5 6 7 8 9 10 n Defining the handset name Open the General settings menu 1 2 3 Enter edit Handset name 4 5 n Resetting settings Open the General settings menu...

Page 86: ...5 6 7 n Resetting the memory card CAUTION When you reset the memory card you ll also loose the system registrations and you will not be able to make or receive calls with your DECT handset Open the Ge...

Page 87: ...al settings menu 1 2 4 5 n Sounds Alerts settings Table 12 Sounds Alerts settings Item Description See Page Set the Ring volume 89 Define the ring melody for incoming calls from an external source 90...

Page 88: ...or an incoming urgent message 90 Define the ring melody for an incoming emergency message 90 Used to determine whether the Ring volume increases gradually 91 Set the Alert volume 89 Define the Alert t...

Page 89: ...set moves out the coverage area 92 Define whether or not a sound is given when the handset is put on the charger 93 Define the time after which an unanswered incoming call is added to the missed calls...

Page 90: ...hone settings 90 3 Or 4 5 n Setting the ring and alert melodies Open the Sounds and alerts menu 1 Or Or Or Or Or Or 2 3 Note 9 Optional step s 4 5 6 7 n 9 For the G355 the maximum number of melodies i...

Page 91: ...alerts menu 1 Or 2 3 Or 4 5 n Setting the vibrator feature Attention The vibrator feature is available only on the G955 and I755 DECT Handset Open the Sounds and alerts menu 1 2 3 Or No vibrator Or Vi...

Page 92: ...tting the key sound feature Open the Sounds and alerts menu 1 2 3 Or Or 4 5 n Setting confirmation sound Open the Sounds and alerts menu 1 2 3 Or 4 5 n Setting the coverage warning feature Open the So...

Page 93: ...e settings 93 3 Or 4 5 n Setting the charger warning feature Open the Sounds and alerts menu 1 2 3 Or 4 5 n Setting the Missed call time Open the Sounds and alerts menu 1 2 3 Enter edit Missed call ti...

Page 94: ...he screen of your handset in the idle state 95 Select a theme a combination of images and colour gradations for the wallpaper startup screen and menu 96 Select the startup screen image which displays...

Page 95: ...n the Display settings menu 1 2 3 4 5 Selecting Wallpaper or Startup screen According to the selected theme Open the Display settings menu 1 Or 2 3 4 5 n Other than the selected theme Open the Display...

Page 96: ...Telephone settings 96 5 Optional step s 6 7 8 9 n No wallpaper or startup screen Open the Display settings menu 1 Or 2 3 4 5 n Selecting a theme Open the Display settings menu 1 2 3...

Page 97: ...med Display off Figure 13 Display intensity levels On Dimmed and Off The various levels are used to save energy and are applied based on the Power save setting Open the Display settings menu 1 2 3 To...

Page 98: ...Telephone settings 98 4 5 n...

Page 99: ...e answered o Normal using Or o By pressing Any key o Automatically Auto answer 100 Selectively block or accept calls from specified phone numbers upto 10 101 Configure the Emergency call feature to di...

Page 100: ...hone settings 100 Open the Calls settings menu 1 2 3 4 5 View Statistics information Open the Calls settings menu 1 2 3 Or Optional step s 4 5 6 n Answer mode configuration Open the Calls settings men...

Page 101: ...1 3 Or Or 4 5 n Caller filter configuration Attention The Caller filter feature is available only on the G955 and I755 DECT Handset Adding an entry to the Caller filter list Open the Calls settings me...

Page 102: ...Telephone settings 102 10 11 12 n 7 8 Select required contact 9 10 n Editing entries in the Caller filter list Open the Calls settings menu 1 2 3 4 5 Select required entry 6 7 8...

Page 103: ...Telephone settings 103 9 10 11 12 13 n Deleting an entry from the Caller filter list Open the Calls settings menu 1 2 3 4 5 Select required entry 6 7 8 9 10 n...

Page 104: ...Telephone settings 104 Deleting all entries in the Caller filter list Open the Calls settings menu 1 2 3 4 5 6 7 8 9 10 11 n Activating Caller filter Open the Calls settings menu 1 2 3...

Page 105: ...calls from callers in the Caller filter Don t accept calls from callers in the Caller filter Caller filter not used 5 6 n Configuring emergency or SOS calls Assigning emergency call number Open the C...

Page 106: ...uired contact 8 9 n Assigning an emergency message G955 and I755 only Open the Calls settings menu 1 2 3 4 5 Enter edit Message 6 7 n Configuring mandown calls I755 only Activating or Deactivating Man...

Page 107: ...ettings 107 3 4 5 Activate mandown Deactivate mandown 6 7 n Assigning a Mandown message Open the Calls settings menu 1 2 3 4 5 Enter edit Message 6 7 n Assigning Mandown number Open the Calls settings...

Page 108: ...Telephone settings 108 4 5 6 7 8 9 n 6 7 Select required contact 8 9 n Setting the Mandown Auto Answer option Open the Calls settings menu 1 2 3 4...

Page 109: ...ontal position before the mandown situation arises Delay time between start of the mandown situation and the time the mandown call is set up Within this period the mandown call can be cancelled by pre...

Page 110: ...brator while in the charger 4 5 n Connectivity settings Table 15 Connectivity settings Item Description See Page Register handset to a DECT system see G355 G955 and I755 Administrator Guide Remove reg...

Page 111: ...ettings Item Description See Page Set up the Bluetooth feature 112 Open the Connectivity menu 1 2 3 4 5 DECT system selection Open the Connectivity menu 1 2 3 Select required DECT system e g DECT01 Ha...

Page 112: ...e G955 and I755 DECT Handset and requires physical installation of the Bluetooth module refer to the G355 G955 and I755 Administrator Guide Table 16 Bluetooth headset status Icon Description Connected...

Page 113: ...en the Connectivity menu 1 2 3 4 5 6 n Pairing Bluetooth headset Open the Connectivity menu and Enable Bluetooth 1 2 3 Start pairing mode on your Bluetooth headset refer to your headset documentation...

Page 114: ...9 10 n Connecting a paired Bluetooth headset Open the Connectivity menu and Enable Bluetooth 1 2 3 4 5 Select required headset e g BT 30M 6 7 n Disconnecting a paired Bluetooth headset Open the Conne...

Page 115: ...s 115 5 6 n Rename a Bluetooth headset Open the Connectivity menu 1 2 3 4 5 Select required headset e g BT 30M 6 7 8 9 10 11 n Retrieve Information Bluetooth headset Open the Connectivity menu and Ena...

Page 116: ...Telephone settings 116 3 4 5 Select required headset e g BT 30M 5 6 7 8 9 10 n Delete Bluetooth headset Open the Connectivity menu and Enable Bluetooth 1 2 3 4 5 Select required headset e g BT 30M 6...

Page 117: ...Telephone settings 117 7 8 9 10 n Delete All Bluetooth headsets Open the Connectivity menu and Enable Bluetooth 1 2 3 4 5 6 7 8 9 n...

Page 118: ...Use the plastic tool to unlock the fastening of the belt clip compartment cover as shown in Figure 14 3 The plastic tool is shipped in the box with the handset 4 Use your thumb to slide the belt clip...

Page 119: ...Handset accessories 119 Figure 14 Using plastic tool Figure 15 Installed swivel belt clip...

Page 120: ...steps 1 Place the handset face down on a flat surface 2 Use the plastic tool to unlock the belt clip fastening 3 The plastic tool is shipped in the box with the handset 4 Slide the belt clip upward 5...

Page 121: ...ur DECT handset and will void any warranty Installing the belt clip on the I755 When the I755 is used with a vertical pouch the belt clip is to be replaced by the belt clip cover when used with the ho...

Page 122: ...ver to the handset To replace the belt clip 1 Place the handset face down on a flat surface 2 Use a screwdriver type Pozidriv 0 or PZ0 to unscrew the two screws by which the belt clip cover is attache...

Page 123: ...enter the I755x Handset and present a risk of leakage fire explosion or other hazardous situation To use the optional headset with your G355 G955 and I755 DECT Handsets insert the headset plug in the...

Reviews: