11
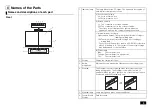
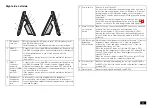
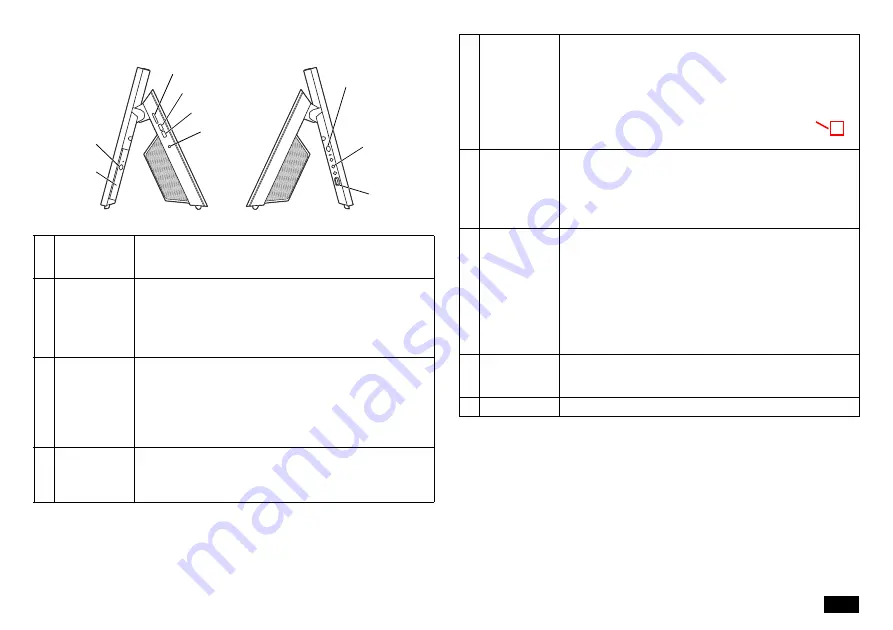
Right side, Left side
1
SD memory
card slot
Slot for installing the "SD memory card", "SDHC memory card",
and "SDXC memory card".
Insert the memory card with the front side front side facing up.
2
USB3.0
connector
Connector for connecting USB compatible devices. Supports up
to USB 3.0 standard. Check with the manufacturer or distributor
of the peripheral device to see if it can be used with this
computer.
If the plug has a mark, insert it so that the mark faces the front of
the main unit.
3
USB3.0
connector
(supports
power-off USB
charging
function)
Connector for connecting USB compatible devices. Supports up
to USB 3.0 standard. This connector can be charged using a
USB cable even when the computer is turned OFF. Check with
the manufacturer or distributor of the peripheral device to see if it
can be used with this computer.
If the plug has a mark, insert it so that the mark faces the front of
the main unit.
4
Headphone /
headphone
microphone
jack
A terminal for connecting headphones or a headphone
microphone(4-pole mini plug) for smartphones. A terminal for
connecting external speakers and audio equipment to output and
input audio signals.
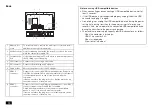
1
2
3
4
8
9
5
6
7
5
Power switch
A switch to turn ON the PC.
It is also used to return from the power saving mode. However, to
turn off the power (shut down), and click "Shutdown". Note that
turning the power OFF/ON puts a burden on the computer, so
wait at least 5 seconds when turning OFF the power and turning
it ON again.
If Windows has clearly stopped, the computer can be forced to
power OFF by pressing the power switch for more than 10
seconds. In this case, the data being created will be deleted.
6
Wake-on-Voice
on/off switch
button
Button to switch voice activation ON/OFF. When voice activation
is turned ON, the computer can be activated by voice.
When voice activation is OFF (voice activation lamp is OFF),
pressing this button turns ON voice activation and lights up the
voice activation lamp. Press the button again to turn OFF voice
activation.
7
LCD Back Light
Brightness
Control button
A dial to adjust the brightness of the display. There are 11 levels of
brightness. When operated to the "+" side, the brightness
increases by 1 level, and when operated to the "• " side, the
brightness decreases by 1 level.
When the screen OFF mode is off (screen OFF lamp is OFF),
pressing this dial straight turns ON the screen OFF mode and the
screen OFF lamp lights up. Press the dial again to cancel the
screen OFF mode.
When the screen off mode is turned ON, you can turn OFF the
image and sound while the computer is turned ON.
8
Disc tray eject
button
Button for inserting and removing the disc tray for loading CDs
and DVDs. The disc tray can be ejected only when the computer
is turned ON.
9
Optical drive
A drive for reading and writing CDs and DVDs.
4

