Release 6.0
71
User Guide
Chapter 3 Installing the Disk Array System
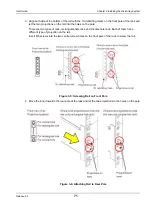
3. Align both side of the bottom of the rail with the 1U delimiting marks on the front pole of the rack and
let the two projections on the rail into the holes on the pole.
There are two types of rack, rectangular-hole rack and circular-hole rack. Each of them has a
different type of projection on the rail.
Insert M5 screws into the two central screw holes on the front pole of the rack to screw the rail.
Figure 3-5: Screwing Rail on Front Pole
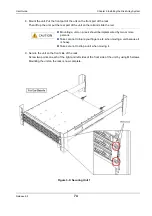
4. Move the inner towards the rear pole of the rack and let the two projections in the holes on the pole.
Figure 3-6: Attaching Rail to Rear Pole
Summary of Contents for M100
Page 25: ...Release 6 0 25 User Guide About Warning Labels Power Supply AC Power Supply ...
Page 27: ...Release 6 0 27 User Guide About Warning Labels Battery ...
Page 29: ...Release 6 0 29 User Guide About Warning Labels Power Cable AC Power Supply ...
Page 40: ...Release 6 0 40 User Guide Chapter 1 Overview 1 2 1 4 Controller CONT ...
Page 48: ...Release 6 0 48 User Guide Chapter 1 Overview 1 2 3 3 Controller CONT ...
Page 260: ...Release 6 0 260 User Guide Chapter 8 Installing Optional Parts Figure 8 12 Removing the DIMMs ...
Page 459: ...NEC Corporation 7 1 Shiba 5 chome Minato ku Tokyo 108 8001 Japan URL http www necstorage com ...

