background image

E-48

Setting LAN Mode

This feature allows you to set various setting items when the projector is
used on your network.
Consult with your network administrator about these settings.

NOTE:

• A LAN card is required for LAN connection; NEC's optional wireless LAN card

is available. For more information on inserting or ejecting a LAN card, see
page E-28.

• Either PC Card Slots 1 or 2 can accept LAN card. If two LAN cards are in-

serted into both PC card slots, the first inserted one is effective.

CAUTION: Make sure that the LAN card is removed during Standby
mode (NOT Idle mode) or with the main power off.
Failure to do so may cause damage to the data on your PC card.

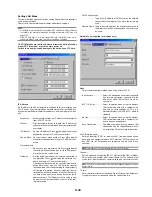
IP Address

An IP address can be automatically assigned to this projector by your
DHCP server. If your network does not automatically assign IP address,
ask your network administrator for an address, and then register it manu-
ally.

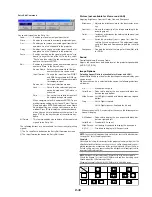
Automatic ....... Automatically assigns an IP address to the projector

from a DHCP server.

Manual ........... Provides a space for you to register the IP address or

subnet mask number obtained from your network ad-
ministrator.

IP Address ..... Set your IP address. Press 

 to display the software

keyboard and type in 12 numeric characters.

Subnet Mask .. Set your subnet mask number. Press 

 to display

the software keyboard and type in 12 numeric char-
acters.

Projector Name

....................... Specify a unique projector name. Press 

 to display

the software keyboard and type in. Up to 16 alphanu-
meric characters can be used.

Gateway ......... Set the default gateway of the network connected to

the projector. Press 

 to display the software key-

board and type in 12 numeric characters.
Checking this box will make the set default route valid.
When data is sent from the LAN card, the transfer
location will be searched according to the previously
set routing information; however, when the transfer
location has not been found as a result of the search,
the data will be sent to the device that holds the IP
address set here. The IP address that is set here must
be one that can be identified by a search of the rout-
ing information.

DNS Configuration

....................... Type in the IP address of DNS server on the network

connected to the projector. 12 numeric characters are
used.

Domain Name Type in domain name of the network connected to

the projector. Up to 60 alphanumeric characters can
be used.

Network Type (required for wireless only)

Mode:

Select communication method when using wireless LAN.

Infrastructure ................ Select this option when communicating with

one or more equipment connected to the
wireless or wired LAN network via an ac-
cess point.

802.11 Ad Hoc .............. Select this option when using the wireless

LAN to communicate with a computer in a
one-to-one correspondence. This is a
method that meets the IEEE802.11 wireless
standard.

Ad Hoc .......................... Select this option when using the wireless

LAN to communicate with a computer in a
one-to-one correspondence.

Easy Connection .......... This allows you to easily set up wireless LAN

connection. See the supplied Software Util-
ity Installation Guide for more information.

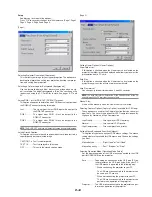
SSID (Network name):

Enter an identifier (SSID) for wireless LAN. Communication can be
done only with equipment whose SSID matches SSID for your wire-
less LAN. Up to 16 alphanumeric characters can be used (Case-
sensitive).

NOTE: 

To disable SSID, select a space (null) or "ANY"(All caps).

Channel:

Set this option when selecting [802.11 Ad Hoc] or [Ad Hoc] in [Mode].
Select a channel number from the pull-down list. The channel must
match for all wireless devices communicating on your wireless LAN.

NOTE: 

Channels in the pull-down list are different depending on which coun-

try you live in.

TX rate:

Select a wireless transmission speed. Normally leave it as Automatic.
Try another transmission speed when the connection fails.

Summary of Contents for MT1065 - MultiSync XGA LCD Projector

Page 1: ...Portable Projector MT1065 MT1060 MT860 User s Manual English Deutsch Français Italiano Español Svenska ...

Page 2: ... equipment generates uses and can radiate radio frequency energy and if not installed and used in accordance with the instructions may cause harmful interference to radio communications However there is no guar antee that interference will not occur in a particular installa tion If this equipment does cause harmful interference to radio or television reception which can be determined by turning th...

Page 3: ...utive days From the Advanced menu select Projector Options Setup Page 4 High Speed Fan Mode 4 Do not unplug the power cable from the wall outlet under any one of the following circumstances Doing so can cause damage to the projector While the Hour Glass icon appears While the message Please wait a moment appears This mes sage will be displayed after the projector is turned off While the cooling fa...

Page 4: ...B Video S Video DVI DIGITAL Viewer LAN Entry List Picture E 38 Sound E 38 Image Options E 38 Selecting Aspect Ratio E 38 Masking Unwanted Area Blanking E 39 Adjusting Position and Clock E 39 Horizontal Vertical Position E 39 Selecting Resolution E 39 Selecting Overscan Percentage E 39 Selecting Video Filter Level E 39 Selecting Noise Reduction Level E 39 Signal Type E 39 Picture Management E 39 Us...

Page 5: ... in image sensor the projector adjusts the colors for screen sizes between 40 and 150 diagonally Variable audio out control via projector The built in Viewer allows you to start your presentation even when a PC is not available at the site A high bright 275 watt DC lamp 220W Eco mode The Standby mode reduces standby power consumption significantly The supplied wireless remote control that operates...

Page 6: ...ctive wall outlet See page E 17 Main Power Switch When you plug the supplied power cable into an active wall outlet and turn on the Main Power switch the POWER indicator turns orange and the projector is in standby mode See page E 18 Remote Sensor See page E 11 PC Card Slot 1 PC Card Slot 2 Lamp Cover See page E 53 PC Card Eject Button 1 Thread the string through the hole on the lens cap and then ...

Page 7: ... button is pressed for a minimum of ONE second the input source will change as follows RGB1 RGB2 Video S Video DVI DIGITAL Viewer RGB1 If no input signal is present the input will be skipped 6 AUTO ADJUST Button Use this button to adjust Position H V and Pixel Clock Phase for an optimal picture See page E 22 Also press and hold this button for a minimum of 2 seconds to enable the Auto Focus or Aut...

Page 8: ...minal Panel Features 8 9 10 13 12 3 2 1 5 6 4 7 11 5 S VIDEO IN Connector Mini DIN 4 Pin Here is where you connect the S Video input from an external source like a VCR NOTE S Video provides more vivid color and higher resolution than the tra ditional composite video format S VIDEO AUDIO Input Jacks R L RCA These are your left and right channel audio inputs for stereo sound from an S Video source 6...

Page 9: ... button is pressed and held for a minimum of 2 seconds the drag mode is set When you are in the Projector mode which is indicated by lighting the PJ button Use this button to enter your menu selection It works the same way as the ENTER button on the cabinet See page E 7 15 CANCEL Right Click Button When you are in the Computer mode this button works as the mouse right button When you are in the Pr...

Page 10: ...nify ing icon When the pointer is not displayed the image is magnified about the center of the screen See page E 25 25 ZOOM Button Zoom the lens in and out 26 FOCUS Button Adjust the lens focus 27 SLIDE Button Press to select the next folder or slide and to select the previ ous folder or slide See page E 29 28 FOLDER LIST Button Press this button to select Viewer source to display a list of folder...

Page 11: ...atteries Do not place the batteries upside down Do not use new and old batteries together or use different types of batteries together Operating Range for Wireless Remote Control 7m 22 feet 7m 22 feet Remote control Remote sensor on the projector cabinet The infrared signal operates by line of sight up to a distance of about 22 feet 7 m and within a 60 degree angle of the remote sensor on the proj...

Page 12: ...ur computer or video equip ment to the projector See page E 14 17 c Connect the supplied power cable See page E 17 NOTE Ensure that the power cable and any other cables are disconnected before moving the projector When moving the projector or when it is not in use cover the lens with the lens cap 300 240 406 4 W X304 8 H 160 W X120 H 365 8 W X274 3 H 144 W X108 H 304 8 W X228 6 H 120 W X90 H 243 8...

Page 13: ... 72 90 108 120 126 144 157 162 180 210 240 270 300 Screen Size B C Wide Tele Diagonal Width Height inch 39 6 35 1 47 8 47 4 64 4 72 1 97 6 80 7 109 2 86 9 117 5 96 8 130 8 101 7 137 4 109 1 147 4 121 4 164 0 146 1 197 2 183 1 246 9 220 1 296 7 244 8 329 9 257 1 346 5 294 1 396 3 320 0 431 1 331 1 446 0 368 1 495 8 429 8 578 7 491 5 553 2 614 8 degree 10 7 14 4 10 7 14 2 10 5 14 0 10 4 14 0 10 4 14...

Page 14: ...le should be within 5 m 196 long The DVI DIGITAL connector accepts VGA 640x480 SVGA 800x600 1152x864 XGA 1024x768 and SXGA 1280x1024 up to 60Hz PHONE PHONE DVI IN RGB 2 IN RGB 1 IN Connecting Your PC or Macintosh Computer Audio cable not supplied IBM VGA or Compatibles Notebook type or Macintosh Notebook type IBM PC or Compatibles Desktop type or Macintosh Desktop type RGB signal cable supplied To...

Page 15: ...Rs and DVD players It is also referred to as Euro connector NOTE The ADP SC1 SCART adapter is obtainable from your NEC dealer in Eu rope Contact your NEC dealer in Europe for more information To RGB IN 1 Connecting an External Monitor You can connect a separate external monitor to your projector to simul taneously view on a monitor the RGB analog image you re projecting To do so 1 Turn off the pow...

Page 16: ... RCA female 3 cable to connect your DVD player to the RGB IN1 or IN2 connector on the projector Component video RCA 3 cable not supplied For a DVD player without component video Y Cb Cr output use com mon RCA cables not provided to connect a composite VIDEO out put of the DVD player to the Video Input of the projector 3 Turn on the projector and DVD player NOTE Refer to your DVD player s owner s m...

Page 17: ...r audio equipment if your VCR or laser disc player has this capability Be careful to keep your right and left channel connections correct for stereo sound 3 Turn on the projector and the VCR or laser disc player NOTE Refer to your VCR or laser disc player owner s manual for more informa tion about your equipment s video output requirements NOTE An image may not be displayed correctly when a Video ...

Page 18: ... Italian Spanish Swedish and Japa nese To select a menu language follow these steps 1 Use the SELECT or button to select one of the seven languages for the menu MENU E NTER CANCE L SELECT MENU E NTER CANCE L SELECT 2 Press the ENTER button to execute the selection 3 The Basic menu will be displayed in the language you have selected To close the menu press the CANCEL button After this has been done...

Page 19: ...al Viewer If no input signal is present the input will be skipped When the input source you wish to project is displayed release the button Press the ENTER button NOTE The functions flagged with an asterisk are not available on MT860 Adjusting the Picture Size and Position Place your projector on a flat level surface and ensure that the projector is square to the screen Lift the front edge of the ...

Page 20: ...and Wall Color Correction When the AUTO ADJUST or AUTO ADJ button is pressed and held for a mini mum of 2 seconds either item can be executed You can decide in advance which item will be enabled at the time of execution From the Advanced menu select Projector Options Auto Functions You can turn on or off Focus and Wall Color Correction See page E 47 NOTE Just pressing quickly the AUTO ADJUST butto...

Page 21: ...remote control or cabinet buttons 1 Project an image so that the screen is smaller than the area of the raster 2 Pick up any one of the corners and align the corner of the screen with the one of the image 4 Use the SELECT button to select one icon which points in the direction you wish to move the projected image frame 6 To complete the procedure right click anywhere on the screen The confirmation...

Page 22: ...e on MT860 NOTE During 3D Reform adjustment Aspect Ratio and Screen may not be available Should this happen first reset the 3D Reform data and then do each setting Second repeat the 3D Reform adjustment Changing Aspect Ratio and or Screen setting can limit 3D Reform in its adjustable range The adjustable ranges for 3D Reform are as follows Horizontal Max 35 approx Vertical Max 50 25 approx The fol...

Page 23: ...abinet or the POWER OFF button on the remote control for a minimum of two seconds The power indicator will glow or ange After the projector turns off the cooling fans keep operating for 90 seconds Cooling off time Second turn off the Main Power switch The power indicator will go out Last unplug the power cable CAUTION Do not unplug the power cable from the wall outlet or do not turn off the main p...

Page 24: ...the Computer mode the PJ button is not lit Not lit Works as a mouse for your computer Works as a right click button for your computer Works as the SELECT button on the projector Lit red Works as the CANCEL button on the projector Works as a left click button for your com puter Works as the ENTER button on the projector When using the USB Port For PC the mouse receiver function can only be used wit...

Page 25: ...e pointer POINTER Press the Pointer button to display the pointer Use the Select button to move the pointer SELECT Use the Select button to move the pointer Enlarging and Moving a Picture You can enlarge the area you want up to 400 percent To do so 1 Press the Pointer button to display the pointer POINTER SELECT MAGNIFY MAGNIFY 2 Move the pointer to the area you want to enlarge 3 Enlarge the selec...

Page 26: ...ent and setting menu or dialog box you will get the main menu at the clicking point USB MOUSE HUB Using the USB HUB Function When using the projector with a PC via the supplied USB cable both the USB port type A on the projector can be connected to a USB sup ported scanner or other USB supported device USB Hub Function Example When connecting a PC and a scanner to each USB port re spectively USB P...

Page 27: ...write and draw messages on a projected image NOTE The ChalkBoard feature is available only when a USB mouse is used From the menu select Tools ChalkBoard to display the ChalkBoard tool bar that contains the following icons Drag Pen Eraser Drive Exit Clear Color Drag Drags to move the tool bar by clicking on the blue part for USB mouse operation only Pen Left click and drag to draw Left click or ri...

Page 28: ... list of slides or any specific slide High quality images High resolution up to 1024 x 768 dots 24 bit full color playback Viewing of digital camera images Simple utility software for computer Dynamic Image Utility 2 0 operable on Windows 98 Me XP 2000 Slides can be created by capturing the currently displayed im age Control screen for displaying lists of slides and editing Microsoft Windows and P...

Page 29: ...to resume playing from the selected slide or folder when Auto Play is selected Jump Displays a list of slides while you are playing back Select Displays a list of folders while you are playing back Drive Switches between PC Card slot 1 and 2 Setup Displays the Viewer Options dialog box on Page 2 of the Setup dialog box Delete Deletes a captured slide s or all the captured slides in the Capture spe...

Page 30: ...JPEG in the PC card When you select Capture from the menu you will get a tool bar You can capture an image directly using the tool bar when the menu is not displayed NOTE Unless a PC card is inserted into the PC Card slot of the projector the Capture feature is not available The Card Error display means that the free space of the PC card is insufficient for saving images Make more space available ...

Page 31: ... You can also sort files by file name or date or display the file Although a list of all the files in the PC card is displayed you can view files in idx text HTML JPEG and BMP format only Selecting BMP and JPEG files automatically switches to the Viewer source See also page E 37 NOTE This option is not available for selection unless a PC card is inserted properly Selecting Execute displays the fil...

Page 32: ... button again to clear the check box If you select an item with a solid triangle and press the ENTER button on the remote control or the projector cabinet you can enable all the items within that submenu Also you can turn on an item within the submenu without placing a check mark on the main menu item NOTE Up to 12 main menu items within Custom Menu Edit not including submenu items can be selected...

Page 33: ...u Source Select Picture Sound Image Options Picture Management Projector Options Tools Help Factory Default RGB1 RGB2 Video S Video DVI DIGITAL Viewer LAN more Aspect Ratio Blanking Position Clock Resolution Overscan Video Filter Noise Reduction Signal Type Picture Presentation sRGB Graphic Video Movie User 1 User 2 User 3 User 4 Picture Management Volume Bass Treble User1 User2 User3 Entry List N...

Page 34: ...ng Front Blue Black Logo Last RGB1 RGB2 Off Caption1 4 Text1 4 Page 3 Signal Select RGB1 RGB2 Video S Video RGB Component RGB Component Scart RGB Component RGB Component Scart Auto PAL M PAL N NTSC3 58 NTSC3 58 NTSC4 43 PAL PAL M PAL N PAL60 SECAM Page 5 Remote Sensor S Video Mode Select Front Back Left Right Off S2 Page 6 Communication Speed Default Source Select Control Panel Key Lock 4800 9600 ...

Page 35: ...sition LAN Mode IP Address Automatic Manual Projector Name DNS Configuration Domain Name IP Address Subnet Mask Gateway Lamp Mode Lamp Type Normal Eco Standard Lamp Extended Life Lamp Network Type Mode SSID Channel TX rate Infrastructure 802 11 Ad Hoc Ad Hoc Easy Connection 1 14 Automatic 11M 5 5M 2M 1M 1M 2M Automatic WEP WEP Key Select Key1 4 Disable 64bit 128bit Key1 4 Mail Alert Mail Sender s ...

Page 36: ...dicates settings or the direction of adjustment OK button Press to confirm your setting You will return to the previous menu Menu Elements Title bar Highlight Check box Drag Tab Help Button Close Button OK Button Cancel Button Solid triangle Radio button Slide bar Tool bar Cancel button Press to cancel your setting You will return to the previous menu Close button Click to close the window with sa...

Page 37: ... will appear when you press the MENU button A press of the MENU button displays the toolbar a press of the MENU button again displays the Menu and hereafter each press of the MENU button switches displaying between the Menu and the toolbar The launcher is a tool bar including the following buttons Drag Drags to move the tool bar for USB mouse opera tion only Prev Returns to the previous slide or f...

Page 38: ...ent of copyrights which are protected by copyright law NOTE During 3D Reform adjustment Aspect Ratio may not be available Should this happen first reset the 3D Reform data and then do setting again Second repeat the 3D Reform adjustment Changing the aspect ratio can limit 3D Reform in its adjustable range Input Signal Screen Type 4 3 Screen 16 9 Screen 4 3 4 3 4 3 Window 4 3 Fill Letterbox Squeeze...

Page 39: ...hile you are displaying an image with higher resolution than the projector s native resolution Resolution is not available Selecting Overscan Percentage Select overscan percentage 0 5 10 and 25 for signal NOTE When Resolution is set to Native this feature is not available and the stored settings and adjustments are invalid NOTE When 4 3 Fill or Crop is selected in Aspect Ratio this feature is not ...

Page 40: ...re and White Balance are a trade off The White Balance is not available for Viewer and LAN Selecting Base Setting This feature allows you to use color correction or gamma values as reference data to optimize for various types of images You can select one of the following five settings Presentation sRGB Graphic Video Movie Keystone 1 Press the SELECT button to adjust the horizontal keystone 2 Press...

Page 41: ...sensor on the projector There are two ways for color correction Automatic and Manual Automatic correction affects all colors Manual correction allows you to correct each color R G B and W respectively Off Disables this function User 1 to 4 Executes correction Four settings can be saved User 4 AutoAdjustButton not available on MT860 stores settings when the Auto Function is executed by pressing and...

Page 42: ...mplete correcting White the Exit Adjustment screen is displayed 10 Highlight the Correction Level bar and then use the SELECT or button to finely adjust 11 Highlight OK and press the ENTER button NOTE The size of the above Manual Wall Color Correction screen changes de pending on the screen size 5 Use the SELECT or button to move the blue frame to the work ing area and then press the ENTER button ...

Page 43: ...e lected area on the screen See page E 25 for more details NOTE There may be cases where the Pointer function is not available ex a non interlace signal at 15kHz such as video game Selecting Menu Display Time This option allows you to select how long the projector waits after the last touch of a button to turn off the menu The preset choices are Manual Auto 5 sec Auto 15 sec and Auto 45 sec The Au...

Page 44: ...s you to select the presentation from a PC card Auto Play If this option is checked when the Viewer source is selected on the projector any given slide will start to play automatically Auto Play Interval You can specify interval time between 5 and 300 seconds NOTE The Auto Play Interval time set on Slide Show Settings of the Dy namic Image Utility 2 0 overrides the one set here Manual Play Views a...

Page 45: ...er a confirmation dialog for turning off the projector will appear or not NOTE When the confirmation message is displayed you must be in the Pro jector mode to operate your projector using the remote control If not press the PJ button on the remote control to change your projector to the Projector mode The button lights to indicate that you are in the Projector mode Enabling Horizontal and Vertica...

Page 46: ...l Panel Key Lock does not affect the remote control and the PC Control functions When the cabinet buttons are disabled pressing and holding the CANCEL button for about 10 seconds will change the setting to enabled Selecting Lamp Mode and Lamp Type Lamp Setting Page 5 Remote Sensor This option determines which remote sensors on the projector are enabled in wireless mode The options are front rear r...

Page 47: ...etween 40 and 150 diagonal Also in some cases Auto Functions may not work correctly depending on projection conditions such as textured material of the screen or ambient light Selecting Aspect Ratio and Position for Screen Screen Screen Type Select either 4 3 Screen or 16 9 Screen for the screen to be used See also Aspect Ratio on page E 38 NOTE When Resolution is set to Native this selection is i...

Page 48: ... to the previously set routing information however when the transfer location has not been found as a result of the search the data will be sent to the device that holds the IP address set here The IP address that is set here must be one that can be identified by a search of the rout ing information DNS Configuration Type in the IP address of DNS server on the network connected to the projector 12...

Page 49: ... a LAN card in the PC card slot of the projector Alert Mail Checking this box enables Alert Mail feature This option notifies your computer of an error message via e mail when using wireless or wired LAN The error message will be notified when the projector lamp has reached the end of its usable life or an error occurs in the projector Sample of a message sent from the projector The lamp is at the...

Page 50: ...rd screen and press the ENTER button The Confirm Password screen will be displayed 2 Type the same password again Highlight OK on the Enter the Pass word screen and press the ENTER button Your password will be assigned Delete To delete your password 1 Highlight Delete and press the ENTER button The Current Pass word screen will be displayed 2 Use the Software keyboard to type your password Highlig...

Page 51: ...r a keyword NOTE To use a PC card as a protect key you must also set up a keyword Please make a note of your keyword This completes registration of your PC card To enable Security use the SELECT button to select Enable and use the SELECT button to select OK and Security function will be enabled An Are you sure message will appear Use the SELECT button and press the ENTER button The Security functi...

Page 52: ...on by entering the Release Code your Se curity will be disabled NOTE Some types of PC cards cannot be registered as your protect key It is recommended that you register two or more PC cards in case you lose or damage your registered PC card Formatting your registered PC card will disable your protect key function NOTE For additional information visit US http www necvisualsystems com Europe http ww...

Page 53: ...ouch them as the pieces of glass may cause injury If this happens contact your NEC dealer for lamp replacement To replace the lamp NOTE The optional lamp comes with a flat head screwdriver 1 Remove the lamp cover by pushing two grooves lightly with the flat head screwdriver 2 Loosen the two screws securing the lamp housing until the screw driver goes into a freewheeling condition The two screws ar...

Page 54: ... filter cover with a vacuum cleaner Do not attempt to operate the projector without the filter cover To clean the air filter Vacuum the filter through the filter cover Catch To reset the filter usage time from the menu select Projector Options Setup Page 4 Clear Filter Usage Meter OK See also page E 45 for resetting the filter usage time To replace the filter sponge 1 Remove the filter cover by pu...

Page 55: ...ec OFF 6 cycle 0 5 sec ON 0 5 sec OFF 7 cycles 0 5 sec ON 0 5 sec OFF Normal Lamp cover error or lamp housing error Temperature error Power error Fan error Lamp error Fails to read lamp data Re firing the lamp Control key locked Idle condition Replace the lamp cover or lamp housing correctly The projector is overheated Move the projector to a cooler location Power unit will not work cor rectly Fan...

Page 56: ...rojector and screen is within the adjustment range of the lens See page E 12 and 13 Condensation may form on the lens if the projector is cold brought into a warm place and is then turned on Should this happen let the projector stand until there is no condensation on the lens Use menus or Source button on the remote control or the cabinet to select the source you want to input Install new batterie...

Page 57: ...l Resolution NTSC NTSC4 43 PAL PAL M PAL N PAL60 550 TV lines SECAM 350 TV lines YCbCr 800 TV lines RGB 1024 dots H 768 dots V External Control RS232 IR USB LAN optional Sync Compatibility Separate Sync Composite Sync Sync on G Built in Speakers 5W 2 stereo Power Requirement 100 120V AC 200 240V AC 50 60 Hz Input Current 4 0A 100 120V AC 2 0A 200 240V AC Power Consumption 1 0W in Standby mode 390W...

Page 58: ...reen Ground Y Ground 8 Blue Ground Cb Ground 9 No Connection 10 Sync Signal Ground 11 SCART Sync Sync 12 Bi directional DATA SDA 13 Horizontal Sync or Composite Sync 14 Vertical Sync 15 Data Clock Signal Level Video signal 0 7Vp p Analog Sync signal TTL level RGB 1 Input only 5 1 4 2 3 10 11 12 13 14 15 6 9 7 8 334 13 15 16 0 63 92 2 3 63 323 12 7 139 5 47 115 4 53 78 6 3 1 Lens center Lens center...

Page 59: ...4 63 981 60 02 MAC 1280 1024 69 89 65 2 HP 1280 1024 78 125 72 01 SUN 1280 1024 81 13 76 11 VESA 1280 1024 79 976 75 03 VESA 1280 1024 91 146 85 02 SXGA 1400 1050 HDTV 1080p 1920 1080 67 5 60 SDTV 576i 625i 15 6 50 SDTV 576p 625p 31 5 50 HDTV 1080i 1125i 1920 1080 33 75 60 Interlace HDTV 1080i 1125i 1920 1080 28 13 50 Interlace HDTV 720p 750p 1280 720 45 60 Progressive SDTV 480p 525p 31 47 59 94 P...

Page 60: ...0H 00H 00H 00H 12H PICTURE MUTE OFF 02H 11H 00H 00H 00H 13H SOUND MUTE ON 02H 12H 00H 00H 00H 14H SOUND MUTE OFF 02H 13H 00H 00H 00H 15H ON SCREEN MUTE ON 02H 14H 00H 00H 00H 16H ON SCREEN MUTE OFF 02H 15H 00H 00H 00H 17H NOTE Contact your local dealer for a full list of PC Control Codes if needed NOTE The DVI connector is not available on MT860 Using Software Keyboard 1 to 0 and Characters Use to...

Page 61: ...projector has been set in the HOSTS file of the computer being used Example 1 When the host name of the projector has been set to pj nec co jp http pj nec co jp index html is specified for the ad dress or the entry column of the URL Example 2 When the IP address of the projector is 192 168 73 1 access is gained to the HTTP server functions by specifying http 192 168 73 1 index html for the address...

Page 62: ...model name serial number and name of the store of purchase are not indicated on the warranty or have been altered 2 Problems or damage caused by dropping or shocks during ship ment or movement by the customer or by improper handling by the customers 3 Problems or damage caused by improper usage or unwarrant able alterations or repairs by the customer 4 Problems or damage caused by fire salt damage...

Page 63: ...x Line 65 6 274 2226 Email Address daniel rsc necsin nec com sg WEB Address http www nec com sg Regions Covered Singapore Hyosung Data System Ltd Address 7th Floor Cheongdam Building 52 Cheongdam Dong Kangnam Ku Seoul Korea 135 100 Telephone 82 2 510 0234 Fax Line 82 2 540 3590 Email Address hds ykc hyosung com Regions Covered South Korea Lenso Communication Co Ltd Address 292 Lenso House 4 1st Fl...

Page 64: ... I also confirm following information is correct Regards Application Sheet for TravelCare Service Program Date P 1 Country product purchased User s Company Name User s Company Address Phone No Fax No User s Name User s Address Phone No Fax No Local Contact office Local Contact office Address Phone No Fax No User s Model Name Date of Purchase Serial No on cabinet Problem of units per User Required ...

Page 65: ...n 1 Accidents transportation neglect misuse abuse water dust smoke or default of or by the Customer its employees or agents or any third party 2 Failure or fluctuation of electrical power electrical circuitry air condi tioning humidity control or other environmental conditions such as use it in smoking area 3 Any fault in the attachments or associated products or components whether or not supplied...

Page 66: ...ojector MT1060R MT860R User s Manual Important Information 2 What s in the Box 3 Part Names of the Projector 4 Throw Distance and Screen Size 5 To adjust the focus 5 Cabinet Dimensions 6 Specifications 7 ...

Page 67: ...re is no guar antee that interference will not occur in a particular installa tion If this equipment does cause harmful interference to radio or television reception which can be determined by turning the equipment off and on the user is encouraged to try to correct the interference by one or more of the following measures Reorient or relocate the receiving antenna Increase the separation between ...

Page 68: ...con appears While the message Please wait a moment appears This mes sage will be displayed after the projector is turned off While the cooling fans are running The cooling fans continue to work for 90 seconds after the projector is turned off 5 Do not eject the PC card while its data is being accessed Doing so can damage your PC card data Lamp Replacement To replace the lamp follow all instruction...

Page 69: ...Carrying Handle Lens Adjustable Tilt Foot See page E 19 Stereo Speaker 5W AC Input Connect the supplied power cable s three pin plug here and plug the other end into an active wall outlet See page E 17 Main Power Switch When you plug the supplied power cable into an active wall outlet and turn on the Main Power switch the POWER indicator turns orange and the projector is in standby mode See page E...

Page 70: ...knob 3 Rotate the focus ring until the best focus is obtained and tighten the focus lock knob 4 From the Advanced menu select the Projector Options Setup Page 1 Orientation Desktop Rear or Ceiling Rear to project an image from the rear NOTE Do not use the projector where temperatures vary greatly The projector must be used at temperatures between 32 F to 104 F 0 C and 40 C Focus lever 80 2 0 100 2...

Page 71: ...6 334 13 15 13 0 51 95 3 7 92 3 62 323 12 7 131 5 16 110 4 33 21 0 83 71 2 8 Cabinet Dimensions Unit mm inch Lens center Lens center ...

Page 72: ...RGB MT1060R 1024 dots H 768 dots V MT860R 800 dots H 600 dots V External Control RS232 IR USB LAN optional Sync Compatibility Separate Sync Composite Sync Sync on G Built in Speakers 5W 2 stereo Power Requirement 100 120V AC 200 240V AC 50 60 Hz Input Current 4 0A 100 120V AC 2 0A 200 240V AC Power Consumption 1 0W Standby mode 390W Lamp Normal mode 320W Lamp Eco mode 250W optional Extended Life l...

Page 73: ...th the Supplied Software 3 Supported Projectors 5 Operating Environment 5 2 Equipment Connections and Settings 6 When Using a Network Environment 6 When Making Connections with Serial Cable 7 3 Software Installation 8 Installation 8 Uninstalling 9 4 Starting Exiting the Software 10 Dynamic Image Utility 2 0 10 Viewer PPT Converter 2 0 11 Image Express Utility 1 0 12 5 Troubleshooting 13 Please see...

Page 74: ...Guides with incorrect collating or missing pages will be replaced AccuBlend is a registered trademark of NEC Viewtechnology Ltd IBM and PC AT are registered trademarks of International Business Machines Corporation Microsoft Windows and PowerPoint are registered trademarks or trademarks of Microsoft Corporation in the U S A and other countries Other manufacturers names and trademark names appearin...

Page 75: ... Notwithstanding the foregoing NECVT may terminate EULA at any time upon User failing to abide by any terms of EULA Upon the termination of the EULA by NECVT the license granted to User shall be terminated automatically User agrees to destroy the Software to gether with all copies of it upon such termination 2 License User use the Software on personal computers only for operating NECVT s projector...

Page 76: ...g but not limited to implied warranties for fitness for a particular purpose mer chantability title and non infringement of any third party rights 2 If User finds a material defect which effects to the proper operation of the Software in the media of the Software NECVT will replace such defective media at no charge if such media is returned to distributor from which such User purchased it within 1...

Page 77: ...namic Image Utility 2 0 Converts PowerPoint files JPEG images and other files and creates slides that can be displayed with the viewer function of the projector Captures portions of the image from the screens of word processors spreadsheets browsers and other programs for use in presentations By saving the created slides on a flash memory card 1 and inserting the card into the PC Card slot of the ...

Page 78: ... the personal computer at a fixed interval Single Frame Transmit sends the screen image by clicking the screen button or pressing a key 1 Please purchase a commercially available PCMCIA Type 2 ATA specification flash memory card 2 Please check the network environment on the next page 3 USB cable connection is supported by the MT1065 and MT1060 only 1 Introduction 4 Software that can abbreviate the...

Page 79: ... necessary when other applications are run at the same time A LAN that supports TCP IP or a wireless LAN environment is a requirement For information on supported LAN cards visit http www nec pj com For wireless LAN connection use NEC optional wireless LAN card SWL 2100N N Last digit of the model code varies depending on which country you live in For more information visit the above Website Window...

Page 80: ...into the PC Card slot of the projector Inserting and Removing a PC card in the user s manual 2 Switch on the projector power and project to the screen Projecting an Image in the user s manual 3 Switch to the advanced menu Menu in the User s manual Press the MENU button The menu will be displayed Use the SELECT button to align the cursor with Projector Options then press the ENTER button The sub me...

Page 81: ...o Be Prepared Projector This unit Personal computer USB cable included with the projector Connection at the Projector Side Plug the B type connector of the USB cable to the USB port PC type B NOTE When switching the power of the projector on off with the projector control function please set Projector Options 씮 Setup 씮 Page 4 씮 Idle Mode to On Connection at the Personal Computer Side Plug the A ty...

Page 82: ... the supplied CD ROM in the CD ROM drive The Welcome screen will appear Click Next at the Welcome screen The End User License Agreement screen will appear Please carefully read the contents of the End User License Agreement If you agree click Yes If you do not agree please click No and exit the installer Now follow the operations described in the screen messages Please remove the CD ROM from the C...

Page 83: ...click Add Remove Programs The Add Remove Programs Properties screen will appear Click NEC Projector User Supportware from the list Click Add Remove The Confirm File Deletion screen will appear Check the message and click Yes Now follow the operations described in the screen messages When the uninstall procedure is completed there will be a return to the Add Remove Programs Properties screen Click ...

Page 84: ...lecting a PowerPoint file with Dynamic Image Utility 2 0 and clicking Tools 씮 Converting PowerPoint file the function equivalent to Viewer PPT Converter 2 0 can be executed Image Express Utility 1 0 can be started by clicking Tools 씮 Image Express Utility 1 0 Start of Dynamic Image Utility 2 0 Display Help Preparation Please start Dynamic Image Utility 2 0 Click Help The Help menu will appear Clic...

Page 85: ...ick Program 씮 NEC Projector User Supportware 씮 Viewer PPT Converter 2 0 Dynamic Image Utility 2 0 will start Reference A function equivalent to Viewer PPT Converter 2 0 can also be executed from the Dynamic Image Utility 2 0 Tools 씮 Converting PowerPoint file menu Viewer PPT Converter 2 0 can also be started from the Microsoft PowerPoint 2000 2002 Tools 씮 NEC Projector User Supportware 씮 Output Vi...

Page 86: ...ge Express Utility 1 0 can also be started from the Tools 씮 Image Express Utility 1 0 Start menu of Dynamic Image Utility 2 0 Display Help Preparation Please start Image Express Utility 1 0 Click the or icon of the Windows screen task tray The main menu of Image Express Utility 1 0 will appear Click Help The Help screen will appear Exit the Software Click the or icon of the Windows screen task tra...

Page 87: ... PowerPoint however the installation of this projector software will be completed normally To have add in registration made to PowerPoint please install this projector software to a personal computer on which PowerPoint 2000 2002 has been installed Problem Viewer PPT Converter 2 0 does not function PPTC 2 0 Check Points Countermeasures Has Microsoft PowerPoint been installed on the personal comput...

Page 88: ...ther one of the LAN connections When a built in type is used set it to not used under Properties Image Express Utility 1 0 does not support the following 1 Software using Direct X 2 MS DOS screens 3 Microsoft Office assistant 4 IME 5 Moving pictures Problem Operation of this projector software becomes unstable DIU 2 0 IEU 1 0 Check Points Countermeasures When the network settings of the projector ...

Page 89: ...y the network card NIC that is connected to the projector to Valid For a network card that is not connected to the projector click the network card name under Control Panel 씮 System 씮 Device Manager 씮 Network Adapter and then click Properties R and set the device usage to Not used Problem Sometimes it takes a long time for screen transmission from the personal computer to the projector IEU 1 0 Che...

Page 90: ...es Smooth screen switching processing or animation effects cannot be followed because in Image Express Utility 1 0 the screen condition of the personal computer is sent to the projector at a fixed time interval Use the software with the PowerPoint screen switching effects animation effects and other settings set to None 16 ...

Page 91: ......

Page 92: ...tility Installation Guide 1st edition September 2002 NEC Viewtechnology Ltd NEC Viewtechnology Ltd 2002 Printed in Japan Reproduction modification and other uses are prohibited without the permission of NEC Viewtechnology Ltd 7N8P1931 ...

Page 93: ...es par défaut cliquez à gauche sur Reset à l étape 2 3D REFORM FUNCTION Die Korrektur der Trapezverzerrung kann unter Verwendung der 3D Reform Funktion durchgeführt werden Die 3D Reform Cornerstone Korrektur kann mithilfe der USB Maus der Fernbedienung oder den Gehäuse Taste durchgeführt werden Mit diesem Dokument werden Sie erfahren wie die Cornerstone Funktion mithilfe der im Lieferumfang enthal...

Page 94: ......

Reviews: