background image

English-27

English

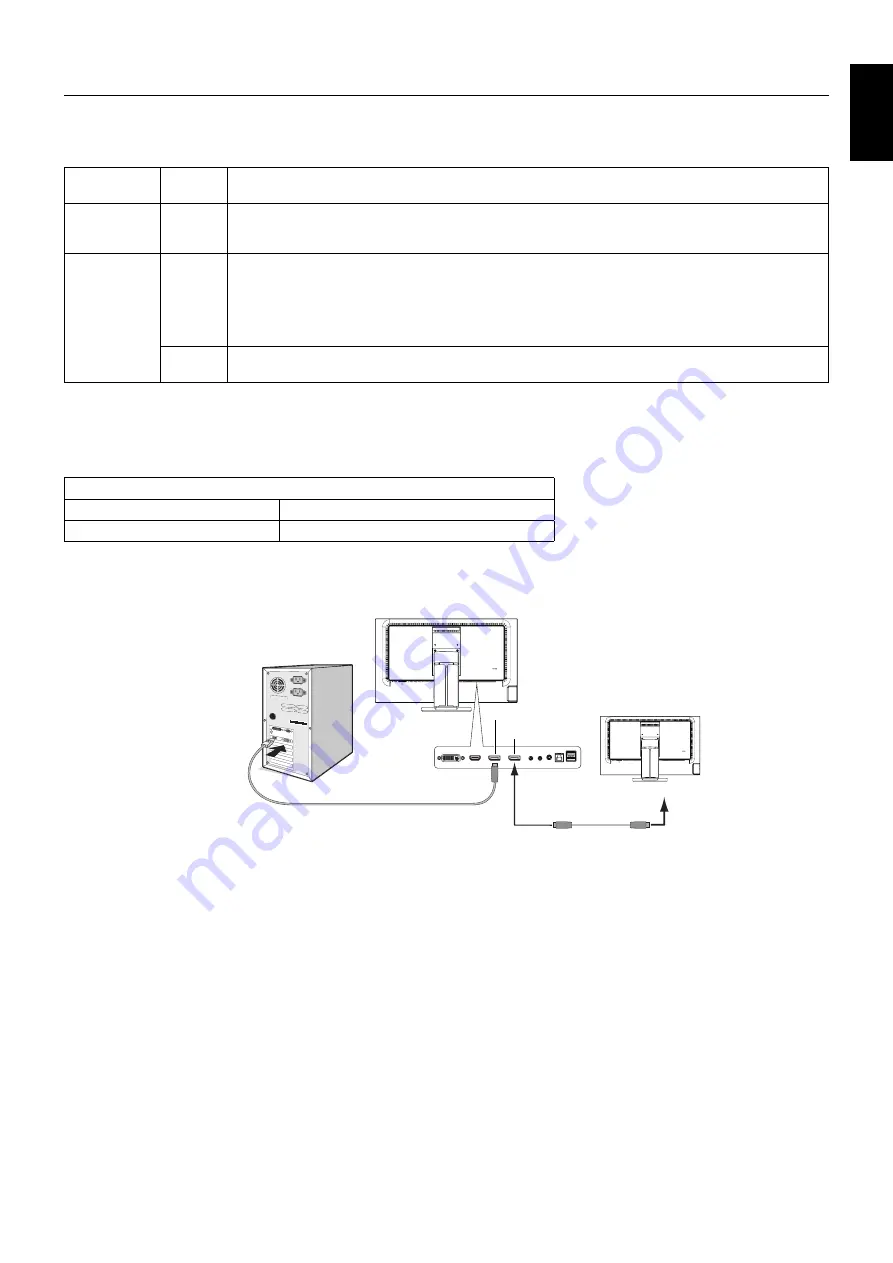
Multiple monitors connection using DisplayPort

You can connect multiple monitors by using DisplayPort daisy-chain connection.
For using as multiple monitors in MST (multi-stream transport) mode, setting should be DP OUT MULTISTREAM “AUTO”. 
Some DisplayPort confi guration may be required. Please refer below and set as required.

OSD

(See page 15)

BIT RATE 

setting

DP OUT 

MULTISTREAM 

“CLONE”

-

Factory setting.
DisplayPort 1.1a setting with:
– SST (single-stream transport).

DP OUT 

MULTISTREAM 

“AUTO”

HBR2

Default setting of DP OUT MULTISTREAM “AUTO”.
DisplayPort 1.2 setting with:
– SST (single-stream transport) and MST (multi-stream transport).
NOTE:  “AUTO” and “HBR2” should be selected when using MST (multi-stream transport).
 

When using MST (multi-stream transport), before changing the master monitor setting, “AUTO” and  


“HBR2” should be selected at the sub monitor.

HBR

DisplayPort 1.2 setting.
NOTE:  HBR setting does not support multiple monitors.

NOTE:


Monitors should be connected by the included DisplayPort cable.
Using the same display model is strongly recommended for connecting multiple monitors.
Please contact your display card supplier for detailed information.

Maximum number of connectable sub monitors for multiple monitors connection

MST (multi-stream transport)

1 unit (HDCP contents: 1 unit)

SST (single-stream transport)

19 units (HDCP contents: 3 units)

NOTE: 

The number of monitors daisy-chained depends on display card and various factors.

DisplayPort IN

DisplayPort OUT

DisplayPort IN

DisplayPort cable

Sub Monitor 1

Master Monitor

DisplayPort cable

DisplayPort

NOTE:


When the monitor has no image, follow the troubleshooting step 

Recovering from no image

 and select 

DP VER “1.1” (see page 28). Then set from the fi rst step.
When this MST (multi-stream transport) function is selected, the power management function according to the ErP 
directive doesn’t work.

Summary of Contents for MultiSync EA305WMi

Page 1: ...Desktop Monitor MultiSync EA275WMi MultiSync EA305WMi User s Manual Please find your model name in the label on the backside of monitor...

Page 2: ...ts English 5 Quick Start English 6 Controls English 11 Specifications EA275WMi English 18 Specifications EA305WMi English 19 Features English 20 Troubleshooting English 21 Using the Zoom Function Engl...

Page 3: ...nitor with its AC 125 240V power supply use a power supply cord that matches the power supply voltage of the AC power outlet being used NOTE This product can only be serviced in the country where it w...

Page 4: ...e user is encouraged to try to correct the interference by one or more of the following measures Reorient or relocate the receiving antenna Increase the separation between the equipment and receiver C...

Page 5: ...our monitor from the wall outlet and move to a safe location then refer servicing to qualified service personnel under the following conditions If the monitor is used in this condition the monitor may...

Page 6: ...s To realize the maximum ergonomics benefits we recommend the following To avoid eye fatigue adjust the brightness to a moderate setting Place a sheet of white paper next to the LCD screen for luminan...

Page 7: ...Manual USB 3 0 Cable ControlSync Cable Remember to save your original box and packing material to transport or ship the monitor 1 The type and number of power cords included will depend on the where t...

Page 8: ...display card in your system Figure A 3 For a PC with Analog output Connect a 15 pin mini D SUB to DVI A signal cable to the connector of the display card in your system Figure A 4 For a MAC with Thund...

Page 9: ...ntrolSync IN OUT ControlSync IN OUT 1 1 USB 3 0 Upstream USB 3 0 Upstream Headphone USB 2 0 Downstream NOTE Adjustment of the volume control as well as the equalizer to other settings than the center...

Page 10: ...een The monitor may be raised or lowered in either portrait or landscape mode To raise or lower screen place a hand on each side of the monitor and lift or lower to the desired height Figure RL 1 NOTE...

Page 11: ...for alternate mounting purposes 1 Disconnect all cables 2 Place a hand on each side of the monitor and lift up to the highest position 3 Place monitor face down on a non abrasive surface Figure S 1 N...

Page 12: ...r should only be used with an approved arm e g TUEV GS mark NOTE Tighten all screws recommended Fasten Force 98 137N cm Figure F 1 Weight of LCD assembly 5 8 kg EA275WMi 7 8 kg EA305WMi 100 mm 100 mm...

Page 13: ...enu Enters OSD sub menus Changes the input source when not in the OSD menu 5 MENU EXIT Accesses OSD menu Exits the OSD sub menu Exits OSD menu 6 LEFT RIGHT Navigates to the left or right through the O...

Page 14: ...e white display area The environmental brightness sensor ambient light sensor has no function 3 AMBIENT CONTENT Automatically adjusts the brightness to the optimal setting based on the white display a...

Page 15: ...rs and lines crisp best suited for basic word processing and spreadsheets MOVIE Setting that boosts dark tones best suited for movies GAMING Setting that boosts whole tones best suited for games that...

Page 16: ...on the screen NOTE When this function may not work reduce the V RESOLUTION level VIDEO LEVEL HDMI input only NORMAL For computer setting Displays all input signals of 0 255 steps EXPAND For audio visu...

Page 17: ...rrent video input signal is not present then the monitor searches for a video signal from the other video input ports If the video signal is present in another port then the monitor switches the video...

Page 18: ...e language used by the OSD OSD TURN OFF The OSD menu will stay on as long as it is in use You can select how long the monitor waits after the last touch of a key to shut off the OSD menu The preset ch...

Page 19: ...ncy Convert setting 0 11 This setting can be changed by using the ECO information menu If you want to use the French setting please refer to steps below 1 Touch the Menu key and select the ECO informa...

Page 20: ...3 2 inches 596 7 mm 23 5 inches USB Hub I F Port Load Current USB Specification Revision 2 0 Revision 3 0 USB Upstream port applicable to USB monitor control Upstream 1 USB 2 0 Downstream 1 USB 3 0 Do...

Page 21: ...z Vert Portrait Horiz Vert 641 3 mm 25 2 inches 400 8 mm 15 8 inches 400 8 mm 15 8 inches 641 3 mm 25 2 inches USB Hub I F Port Load Current USB Specification Revision 2 0 Revision 3 0 USB Upstream po...

Page 22: ...g two thirds of your monitor energy costs reducing emissions and lowering the air conditioning costs of the workplace Multiple Frequency Technology Automatically adjusts monitor to the display card s...

Page 23: ...me should be avoided To alleviate image persistence turn off the monitor for as long as the previous image was displayed For example if an image was on the monitor for one hour and a residual image re...

Page 24: ...he brightness of surrounding environment changes the monitor will also change USB Hub does not operate Check to make sure the USB cord is properly connected Refer to your USB device User s Manual Chec...

Page 25: ...resolution via H RESOLUTION or V RESOLUTION see page 14 Vertical expansion Horizontal expansion 3 The image position can be moved from the center to left or right by selecting LEFT RIGHT and upward o...

Page 26: ...split images use the following procedures to reduce the black area and enlarge the split images 1 In case A a priority image is set to be on the right side The size of the black area can be reduced b...

Page 27: ...ure 2 2 Set the DARK level This is the level of brightness that the monitor will go down to when the ambient lighting level is low Make sure the room is at its darkest when setting this level Then use...

Page 28: ...ENSING Yes HUMAN SENSOR SETTING Yes HUMAN SENSOR START TIME Yes DV MODE Yes SCREEN AUTO ADJUST No AUTO CONTRAST No LEFT RIGHT No DOWN UP No H SIZE No FINE No INPUT RESOLUTION No H RESOLUTION No V RESO...

Page 29: ...lected at the sub monitor HBR DisplayPort 1 2 setting NOTE HBR setting does not support multiple monitors NOTE Monitors should be connected by the included DisplayPort cable Using the same display mod...

Page 30: ...itch menu 5 Select DP VER 1 1 to switch the DisplayPort setting 6 Press MENU to close the OSD menu 7 Turn on the computer NOTE MST multi stream transport and SST single stream transport requires the c...

Page 31: ...s a single Energy Saving mode Mode Power consumption LED colour Maximum Operation 80 W EA275WMi 107 W EA305WMi Blue Normal Operation 47 W Default setting USB Audio sleeping EA275WMi 69 W Default setti...

Reviews: