Maintenance 7-5
Cleaning the Keyboard/Mouse
Make sure that the server and peripheral devices are all off-powered (the POWER/SLEEP lamp
goes off), and then wipe the keyboard surface with a dry cloth.
The mouse operation depends on the degree of smoothness of the internal ball rotation. To keep the
mouse ball clean, use the mouse in a place with little dust. Follow the steps below to clean the
mouse regularly:
1.
Prepare cold or lukewarm water, neutral detergent, alcohol, two dry soft clothes, and
cotton swabs.
2.
Make sure that the server is off-powered (the POWER/SLEEP lamp goes off).
3.
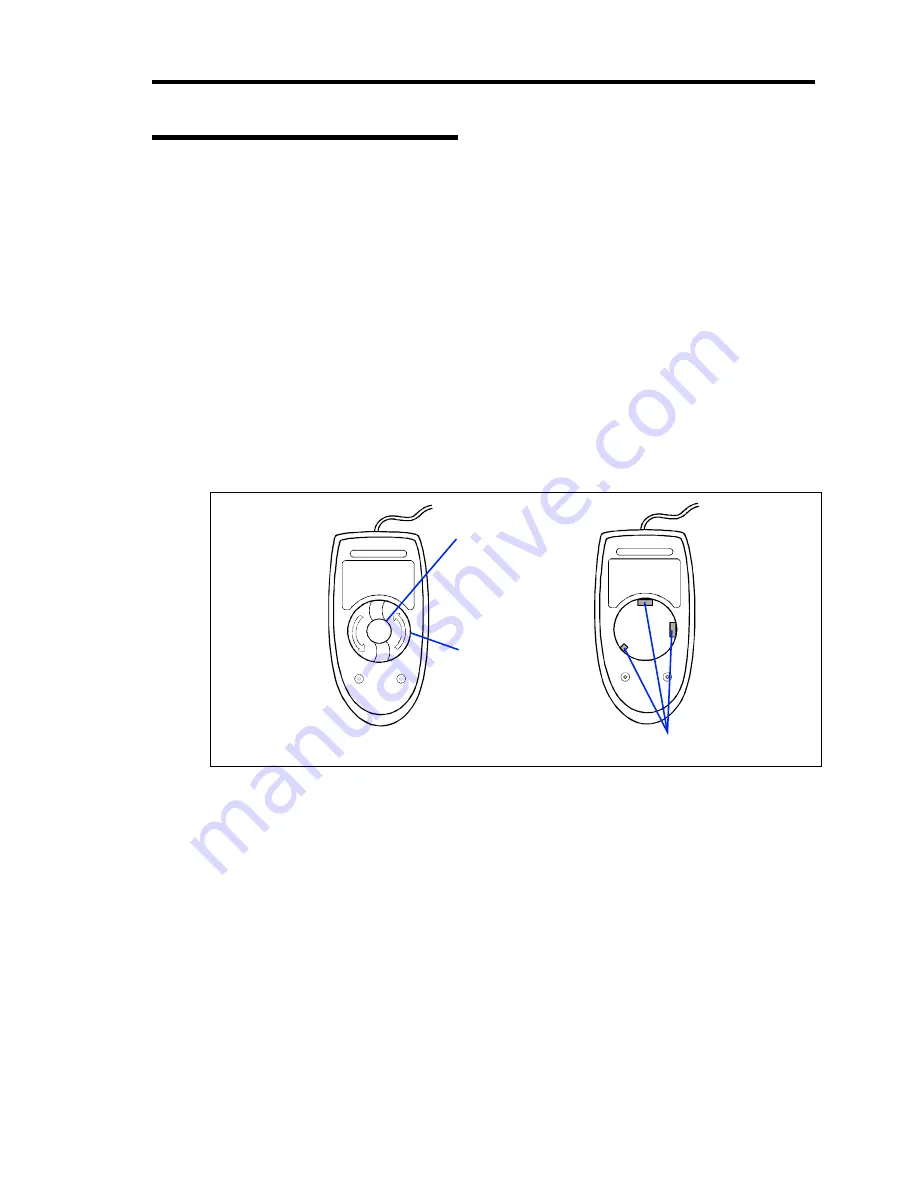
Turn the mouse upside down, and rotate the mouse ball cover counterclockwise to remove
it.
4.
Take out the ball from the mouse. Cover the bottom of the mouse with your hand, and turn
your hand holding the mouse (the mouse is on your palm with the button upward). The
mouse ball is released onto your palm.
Mouse ball cover
Mouse ball
Roller
Bottom View
5.
Soak a soft cloth in neutral detergent that is diluted with cold or lukewarm water, and
squeeze it firmly.
6.
Rub off stains on the mouse ball. Softly wipe the mouse ball with the cloth prepared in
Step 5.
7.
Wipe the mouse ball with a dry soft cloth.
8.
Wipe three small rollers inside the mouse with a cotton swab soaked with alcohol. Wipe
stains slowly and carefully by rotating rollers with the tip of the cotton swab.
9.
Blow out any dust from the mouse. Protect your eyes from the dust.
10.
Put the mouse ball back into the mouse.
11.
Place the mouse ball cover, and rotate it clockwise until it is locked.
Summary of Contents for N8100-1417F
Page 16: ...x This page is intentionally left blank...
Page 36: ...2 8 General Description Rear View 1 2 3 4 5 6 7 8 9 10 11 12 13 1 14 12 14 12 14 13 3 13 2 15...
Page 143: ...Configuring Your Server 4 75 3 Setting menu for VD 0 is displayed...
Page 220: ...7 12 Maintenance This page is intentionally left blank...
Page 352: ...9 94 Upgrading Your Server This page is intentionally left blank...
Page 353: ...Chapter 10 Internal Cabling Diagrams Internal cable connections of the server are shown below...
Page 360: ...10 8 Internal Cabling Diagrams This page is intentionally left blank...
Page 362: ...A 2 Specifications This page is intentionally left blank...
Page 370: ...C 2 IRQ This page is intentionally left blank...
Page 426: ...F 2 Using a Client Computer Which Has a CD Drive This page is intentionally left blank...
Page 430: ...G 4 Product Configuration Record Table This page is intentionally left blank...


