background image

6

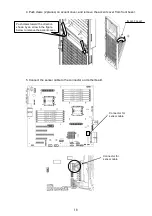
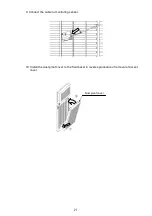
4.

アクセントカバーのツメ

2

箇所を押してフロントベゼルから外します。

5.

目詰まりセンサケーブルのコネクタをマザーボードの接続コネクタに接続します。

矢印の方向にツメを押して
アクセントカバーを外す。

アクセントカバー

目 詰 ま り セ ン サ
接続用コネクタ

目 詰 ま り セ ン サ
接続用コネクタ

Summary of Contents for N8146-28

Page 1: ...ます 内容をよく理解されてから 本文をお読みください 本書では 危険の程度を表す用語として 警告 と 注意 を使用しています それぞれの用語は次のような 意味を持つものとして定義されています 危険に対する注意 表示は次の2種類の記号を使用しています それぞれの記号は次のような意味を持つもの として定義されています 注意の喚起 行為の禁止 行為の強制 本体装置の電源プラグをコンセントから抜い てください 火災や感電のおそれがあります 特定しない一般的な禁止を示します 特定しない一般的な注意 警告を示します 発煙や発火のおそれがあることを示しま す 警告 人が死亡する または重傷を負うおそれがあることを示しています 注意 火傷や怪我または物的損害を負うおそれがあることを示しています 注意の喚起 この記号は危険が発生するおそれがあることを表しています 記号の 中の絵表示は危険の内容を図案化したも...

Page 2: ...示すような場所や本書で指定している環境条件を超える場所には設置 保管しないでくださ い 火災や故障の原因となるおそれがあります 薬品や化学物質などを扱う場所 直射日光が当たる場所 湿気の多い場所 急激な温度変化のある場所 振動や衝撃のある場所 腐食性ガス 二酸化硫黄 硫化水素 二酸化窒素 塩素 アンモニア オゾンなど の存在する環境 腐食を促進する成分 塩化ナトリウムや硫黄など や導電性の金属などが含まれている環境 本製品を正しく動作させるために次に示す注意事項をお守りください これらの注意を無視した取り扱いを すると故障の原因になります 本製品を重ね置きしないでください 保管や取り付け 取り外しの際に固いものにぶつけないでください 梱包状態でも落下させないでください 損傷するおそれがあります 本書の記号について 本書の中には次の記号を使用しています 記号は次のような意味をもつものとして定...

Page 3: ...3 本製品を第三者に譲渡 または売却 するときは 必ず本書を含め全ての添付品を一緒にお渡しください 本製品の廃棄については各自治体の廃棄ルールに従ってください 詳しくは 各自治体へお問い合わせ ください 防塵フィルタはプラスチックとして廃棄してください 廃棄について 第三者への譲渡について ...

Page 4: ...が有ります 塩害 腐食性ガスには効果が有りません 2 構成品 構成品を確認してください 項番 品名 数量 概要 1 防塵カバー 1 2 防塵ドア 1 3 防塵フィルタ 1 項番 1 に取り付け済み 4 目詰まり検出センサ 1 5 目詰まり検出センサ取り付けネジ 2 6 センサ接続用ケーブル 1 7 目詰まり検出ソフトウェア CD ROM 1 8 ユーザーズガイド 1 本書 防塵ドア 防塵カバー 防塵フィルタ ユーザーズガイド 目詰まり検出センサ 目詰まり検出センサ取り付けネジ 目詰まり検出ソフトウェア CD ROM センサ接続用ケーブル ...

Page 5: ...照し 安全上のご注意 取り扱い上のご注意 を守って 取り付け 取り外しを行ってください 本製品をT110d T120dに取り付けることにより 本体外形寸法が以下となります 200 0 mm 幅 X 613 5 mm 奥行き X 438 0 mm 高さ 突起物含まず 1 フロントベゼルを開いて 上方向にスライドさせ 取り外してください 2 デバイスドアを開いて 上方向に スライドさせ取り外してください 3 前項のデバイスドアの取り外しと 逆の手順で防塵ドアを取り付けます 防塵ドア デバイスドア フロントベゼル ...

Page 6: ...6 4 アクセントカバーのツメ2箇所を押してフロントベゼルから外します 5 目詰まりセンサケーブルのコネクタをマザーボードの接続コネクタに接続します 矢印の方向にツメを押して アクセントカバーを外す アクセントカバー 目 詰 ま り セ ン サ 接続用コネクタ 目 詰 ま り セ ン サ 接続用コネクタ ...

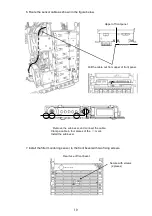
Page 7: ...7 6 下図の通り 目詰まりセンサケーブルを取り付けてください 7 フロントベゼルに目詰まりセンサを取り付けネジ 2個 で取り付けてください フロントベゼル裏面 ネジ止め 2カ所 フロントパネル上面 フロントパネルの上面を通して正面に出す サブベゼルを取り外し ケーブルを取り付ける 印の4カ所でケーブルを固定する サブベゼルを取り付ける ...

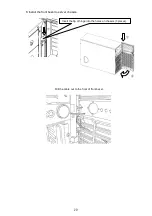
Page 8: ...8 8 フロントベゼルを筐体に取り付けてください ヒンジの先端を筺体の穴に差し込みます 3箇所 フロントベゼル正面にケーブルを出す ...

Page 9: ...9 9 目詰まりセンサにケーブルを接続してください 10 アクセントカバーの取り外しと逆の手順で防塵カバーをフロントベゼルに 取り付けてください 防塵カバー ...

Page 10: ...フィルタの交換 防塵フィルタの推奨使用期間は6か月 最大使用可能期間は1年となっております 上記期間は使用環境により前後いたします 交換用防塵フィルタはN8147 24を使用してください フィルタを交換しないまま最大使用期間を超えて装置を稼働させた場合 ほこりの目詰まり等によりデバイスの温度が上昇し装置が故障する原因となります 1 防塵カバーの PUSH 文字部分を下に押して 防塵カバーを外してください 防塵カバー ...

Page 11: ...CD ROMの FilterMonitorSoftware Windows フォルダ内の 目詰まり検出ソフトウエア Windows 操作説明書 pdf または FilterMonitorSoftware Linux フォルダ内の 目詰まり検出ソフトウエア Linux 操作説明書 pdf をご確認ください Linux OSでご使用の場合 EXPRESSBUILDER Version 6 10 022 01に入っている ESMPRO ServerAgentは 防塵センサ機能をサポートしておりませんので 弊社Webサイト から最新版をダウンロードしてご使用ください http www express nec co jp linux dload esmpro index html タブを持ってフィルタを外してください 防塵フィルタ 防塵カバー ...

Page 12: ...があります 3 弊社の許可なく複製 改変などを行うことはできません 4 本書の内容については 万全を期して作成しておりますが 万一ご不審な点や誤り 記載もれなど お気づきの点がございましたら お買い求めの販売店にご連絡ください 5 本製品を運用した結果の影響については 4 項にかかわらず いかなる責任も負いかねますので ご了承ください 本書は再生紙を使用しています タワーモデル用防塵キット センサ付 ユーザーズガイド 856 129731 404 00 第1版 856 129731 404 00T 856 129731 404 00 ...

Page 13: ...e terms are defined as follows Precautions and notices against hazards are presented with one of the following two symbols The individual symbols are defined as follows Attentions Prohibited Actions Mandatory Actions Unplug the power cord of the server Otherwise an electric shock or fire may be caused Indicates a general prohibited action that cannot be specifically identified Indicates a general ...

Page 14: ...n may cause a fire or malfunction of the server Places near chemicals or chemical substances Places exposed to direct sunlight Places where the air includes much humidity Places with drastic changes in temperature Places where vibration or impact may be generated Places with corrosive gas sulfur dioxide hydrogen sulfide nitrogen dioxide chlorine ammonia ozone etc in presence Places where the air i...

Page 15: ... all accessories including this manual along with the product to a third party Dispose of this product according to all national laws and regulations Dispose of this product as plastic garbage Disposal Transfer to Third Party ...

Page 16: ... list below Item No Name Q ty Description 1 Dust proof cover 1 2 Dust proof door 1 3 Dust proof filter 1 Installed on Item No 1 4 Filter Monitoring Sensor 1 5 Screws for fixing Filter Monitoring Sensor 2 6 Sensor Cable 1 7 Filter Monitoring Software CD ROM 1 8 User s Guide 1 This Document Dust proof cover Dust proof filter Filter Monitoring Software CD ROM Dust proof door Sensor Cable Filter Monit...

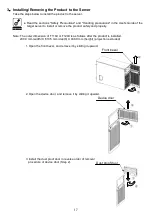
Page 17: ...the product safely and properly Note The outer dimension of T110d or T120d is as follows after the product is installed 200 0 mm width X 613 5 mm depth X 438 0 mm height projection excluded 1 Open the front bezel and remove it by sliding it upward 2 Open the device door and remove it by sliding it upward 3 Install the dust proof door in reverse order of removal procedure of device door Step 2 Devi...

Page 18: ...he accent cover from front bezel 5 Connect the sensor cable to the connector on motherboard Connector for sensor cable Push claws toward the direction shown by an arrow in the figure below to remove the accent cover Accent cover Connector for sensor cable ...

Page 19: ...nitoring sensor to the front bezel with two fixing screws Rear face of front bezel Secure with screws 2 places Upper of front panel Pull the cable out from upper of front panel Remove the sub bezel and connect the cable Clamp a cable in four places of the mark Install the sub bezel ...

Page 20: ...20 8 Install the front bezel to server chassis Pull the cable out to the front of front bezel Insert the tip of hinge into the holes on chassis 3 places ...

Page 21: ...21 9 Connect the cable to monitoring sensor 10 Install the dust proof cover to the front bezel in reverse procedure of removal of accent cover Dust proof cover ...

Page 22: ... on usage environment Use N8147 24 Dust proof filter for replacement If the server is operated for long time beyond the maximum service life the temperature inside the device raises due to clogged dust and may cause a device failure 1 Remove the dust proof cover by pushing down the portion marked with PUSH on dust proof cover Dust proof cover ...

Page 23: ...tware For the installation procedure of the Filter Monitoring Software refer to FilterMonitorSoftware for Windows Instruction Guide in the FilterMonitorSoftware Windows folder or FilterMonitorSoftware for Linux Instruction Guide in the FilterMonitorSoftware Linux folder of the attached CD ROM If you are using Linux OS and the version of your EXPRESSBUILDER is earlier than 6 10 022 02 consult with ...

Page 24: ... made to ensure the accuracy of all information in this User s Guide If you notice any part unclear incorrect or omitted in this User s Guide contact the sales agent where you purchased this product 5 NEC assumes no liability arising from the use of this product nor any liability for incidental or consequential damages arising from the use of this User s Guide regardless of Item 4 Printed on recyc...

Reviews: